|

How to make a Flower using Ulead
Needed for this tutorial: ULEAD
WEB PLUGINS (for 30 day trial version)
Open PSP, open a new file using these settings...
Width: 300
Height: 300
Transparent background
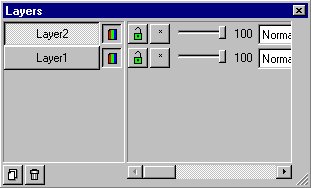
Click the Toggle Layer Palette button  ,
click the Add New Layer button ,
click the Add New Layer button  . .
Now your layer palette should read from top
to bottom Layer2, Layer1, like this...
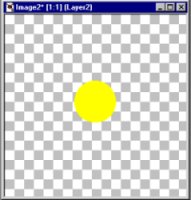
Click on Layer2. Now we need to select a color for our flower's center. I
want mine to be yellow so I'll select yellow as my foreground color (top
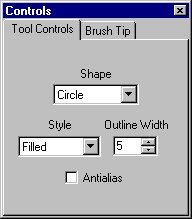
box). Click the shapes tool  ,
set your control palette like this... ,
set your control palette like this...
Shape: Circle Style: Filled like this...
Now let's draw a circle in the center of the pic. Like this...
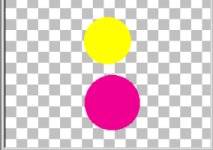
Now on your Layer Palette click on Layer1.
Pick a color for your petals. I'm using pink as my
foreground color.
Make another circle a little bigger than your yellow
one like this...
Go to IMAGE>DEFORMATIONS>HORIZONTAL PERSPECTIVE and set it to 88%.
Now our petal looks like this...

Now click the Selection tool  and draw a rectangle around the petal and single click inside the
rectangle, now move the petal to the left side of the yellow circle. Go to
EDIT>COPY, EDIT>PASTE>AS NEW SELECTION, IMAGE>MIRROR and put
this one on the right side on the yellow circle, like this...
and draw a rectangle around the petal and single click inside the
rectangle, now move the petal to the left side of the yellow circle. Go to
EDIT>COPY, EDIT>PASTE>AS NEW SELECTION, IMAGE>MIRROR and put
this one on the right side on the yellow circle, like this...

Select none by either going to SELECTIONS>SELECT NONE or holding down
the Ctrl button on your keyboard and pressing the D. Go to EDIT>COPY,
EDIT>PASTE>AS NEW SELECTION, IMAGE>ROTATE and use these
settings...
Direction: Right Degrees: 90 like this...

Place these on the top and bottom like this...

Click on the magic wand  and click on the petal on the left center. Go to EDIT>COPY,
EDIT>PASTE>AS NEW SELECTION, IMAGE>ROTATE and use these
settings...
and click on the petal on the left center. Go to EDIT>COPY,
EDIT>PASTE>AS NEW SELECTION, IMAGE>ROTATE and use these
settings...
Direction: Right
Degrees: Free: 50
Place it on the right between the middle and top petals. Go to
EDIT>PASTE>AS NEW SELECTION, IMAGE>ROTATE using the same
settings, IMAGE>MIRROR and place this one on the left between the
middle and top petals. Go to EDIT>PASTE>AS NEW SELECTION,
IMAGE>ROTATE use these settings...
Direction: Left
Degrees: Free: 40
Place this one on the left between the middle and bottom petals.
Go to EDIT>COPY, EDIT>PASTE>AS NEW SELECTION,
IMAGE>MIRROR and place this one on the right between the middle and
bottom petals.
Now our flower should look like this...

Click the magic wand again and click on each petal, then go to
IMAGE>PLUG-IN FILTERS>ULEAD WEB PLUGINS>BUTTON DESIGNER ANY SHAPE
and use these settings...
Bevel Size: 16
Bevel Smoothness: 2
Bevel Type: Select the second one from the left like this...

Select none by either going to SELECTIONS>SELECT NONE or holding down
the Ctrl button on your keyboard and pressing the D. On the Layer Palette
click on Layer2. Click the magic wand and click on the yellow circle and
IMAGE>PLUG-IN FILTERS>ULEAD WEB PLUGINS>BUTTON DESIGNER ANY SHAPE
and use the same settings.
Go to LAYERS>MERGE>MERGE VISIBLE.
Now you can add a drop shadow or you can export as a
tube.
Here's mine...

If you have any questions please just ask...

Copyright © 2000-2001 by LovlyGypsy,
all rights reserved
| I, LovlyGypsy,
Give my permission to Ldy
Archrr aka Artists for PSP to place any and all tutorials
that I have made on her site.. this 22nd day of February 2001.
These tutorials were made solely by me and permission is mine to
give. |
|

