|

How to make a nameplate that the pic
hangs off the edge
.
The DOWNLOAD file
contains the following files...
rosespeach.tub
peachbg.jpg
.
Download and unzip to any file. Open PSP, open the
rosespeach.tub, export it as a picture tube by going to
FILE>EXPORT>PICTURE TUBE when the box comes up, single click in
the box that says Tube name:, type in a name and click ok. Now go to
FILE>NEW and use these settings...
Width: 400
Height: 400
Transparent background
Click the toggle layer palette button  ,
now on the Layer Palette click the Add new layer button ,
now on the Layer Palette click the Add new layer button  ,
when the Layer Properties box comes up just click Ok. Your layer palette
should read from top to bottom Layer2, Layer1 with Layer 2 selected. Now
click the tube tool button ,
when the Layer Properties box comes up just click Ok. Your layer palette
should read from top to bottom Layer2, Layer1 with Layer 2 selected. Now
click the tube tool button  ,
if your control palette isn't up you can bring it up by clicking the
toggle control palette button ,
if your control palette isn't up you can bring it up by clicking the
toggle control palette button  ,
on the control palette select the rosespeach tube set the Scale to 65%.
Now point your mouse to the left side of the pic and single click to
place the tube. Mine looks like this... ,
on the control palette select the rosespeach tube set the Scale to 65%.
Now point your mouse to the left side of the pic and single click to
place the tube. Mine looks like this...

Now open the pic peach bg.jpg and shrink it by
clicking the minus sign on the top right hand side. Click Layer1 on the
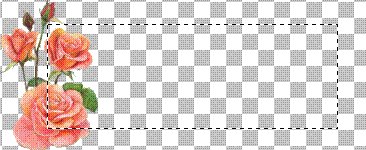
Layer Palette. Now click the selection tool  now place your mouse right below the top rose bud and single click and
hold down the button and move your mouse down the about the middle of
the big rose at the bottom then move your mouse to the right to make a
rectangle like this...
now place your mouse right below the top rose bud and single click and
hold down the button and move your mouse down the about the middle of
the big rose at the bottom then move your mouse to the right to make a
rectangle like this...
Now click the flood fill tool  .
On your control palette where it says Fill style click the little arrow
and select Pattern, then click Options. When the Flood Fill Options box
comes up where it says New pattern source click the little arrow and
select peachbg and click ok. Now move your mouse inside the rectangle
and single click to flood fill. Make sure white is your background color
(bottom box) and go to IMAGE>EFFECTS>BUTTONIZE I used these
settings... .
On your control palette where it says Fill style click the little arrow
and select Pattern, then click Options. When the Flood Fill Options box
comes up where it says New pattern source click the little arrow and
select peachbg and click ok. Now move your mouse inside the rectangle
and single click to flood fill. Make sure white is your background color
(bottom box) and go to IMAGE>EFFECTS>BUTTONIZE I used these
settings...
Height: 10
Width: 10
Opacity: 80
Transparent edge
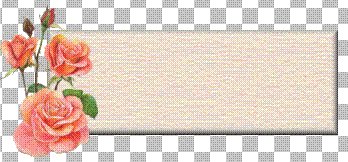
Now go to SELECTIONS>SELECT NONE. Now mine looks
like this...
Now that looks pretty good but I think I'm going to
add a drop shadow to the roses. On the Layer Palette click Layer2. Go to
IMAGE>EFFECTS>DROP SHADOW I used these settings...
Color: Black
Opacity: 100
Blur: 4.1
Vertical: 1
Horizontal: 1
Now go to LAYERS>MERGE>MERGE VISIBLE. Now I'm
going to add my name in black so I'll click the foreground color box
(top box) and select Black then I'll click the text tool  click
on the peach tag and select a font. I'm using CloisterBlack BT, Bold,
Size 36. Make sure Floating IS checked. With my name still selected I'm
going to add a drop shadow to it by going to IMAGE>EFFECTS>DROP
SHADOW and I used the same settings as before. Now go to
SELECTIONS>SELECT NONE, EDIT>CUT, EDIT>PASTE>AS NEW IMAGE
and save it as a .jpg and it looks like this... click
on the peach tag and select a font. I'm using CloisterBlack BT, Bold,
Size 36. Make sure Floating IS checked. With my name still selected I'm
going to add a drop shadow to it by going to IMAGE>EFFECTS>DROP
SHADOW and I used the same settings as before. Now go to
SELECTIONS>SELECT NONE, EDIT>CUT, EDIT>PASTE>AS NEW IMAGE
and save it as a .jpg and it looks like this...

If you have any questions please just ask...
Copyright © 2000-2001 by LovlyGypsy,
all rights reserved
| I, LovlyGypsy,
Give my permission to Ldy
Archrr aka Artists for PSP to place any and all tutorials
that I have made on her site.. this 22nd day of February 2001.
These tutorials were made solely by me and permission is mine
to give. |
|

