|
Ruthie's 3D Box
This is my rendition
of " RuthiesDrm's Tutorial"
You can find more of
her tutorials here: RuthiesDrm's
Tutorials
.
The DOWNLOAD
file contains the following file...
bg18.bmp
.
Open PSP
Go to FILE>NEW
Width: 150
Height: 150
Black background
Go to EDIT>COPY, go to
EDIT>PASTE>AS NEW IMAGE 2 times.
You should have 3 black boxes.
Set your background color
(bottom box) to White.
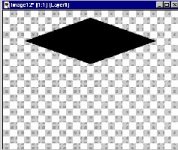
One of the boxes should already
be selected, go to IMAGE>ROTATE use these settings...
Direction: Left
Degrees: Free 45
Click ok. Go to IMAGE>RESIZE
use these settings...
make sure Maintain aspect ratio
is NOT checked
Pixel Size
Width: 300
Height: 106
Click ok. Go to EDIT>COPY
close out that box. Now go to FILE>NEW
Width: 400
Height: 317
Transparent background
Go to EDIT>PASTE>AS NEW
SELECTION and put it toward the top like this...
Now shrink that.
Now on the next black box, go to
IMAGE>ADD BORDERS use these settings...
Check Symmetric
Put 40 in the first box and PSP
should put it in all the others. Click ok.
Shrink that and add the same
border to the last black box.
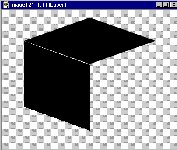
With either one of the boxes
selected go to IMAGE>DEFORMATIONS>SKEW use these settings...
Horizontal: 0
Vertical: -20
click ok. Click the magic wand  and click the black box go to EDIT>COPY close that one. Bring up the
400X400 transparent pic and go to EDIT>PASTE>AS NEW SELECTION and
place the box on the left hand side right under the top, almost touching
the top like this...
and click the black box go to EDIT>COPY close that one. Bring up the
400X400 transparent pic and go to EDIT>PASTE>AS NEW SELECTION and
place the box on the left hand side right under the top, almost touching
the top like this...
Ok shrink that and bring up the
last black box.
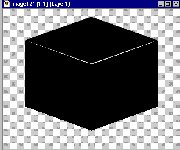
Go to
IMAGE>DEFORMATIONS>SKEW use these settings...
Horizontal: 0
Vertical: 20
click ok. Click the magic wand and
click the black box go to EDIT>COPY close that one. Bring up the
400X400 transparent pic and go to EDIT>PASTE>AS NEW SELECTION and
place the box on the right hand side right under the top, touching the
top and the side like this...
Click the arrow to switch your
foreground and background colors. So that white is your foreground (top
box) color. Click the toggle Layer Palette button  ,
click the new layer button ,
click the new layer button  ,
when the box comes up just click ok. Click the Line tool ,
when the box comes up just click ok. Click the Line tool  set
the control palette like this... set
the control palette like this...
Tool Controls...
Line Type: Normal
Width: 4
Check Antialias
Now draw lines around all the
boxes like this...

Click the magic wand and click on
the white. Now go to FILE>OPEN and open the pic bg18.bmp and shrink
it. Click the Flood Fill tool  ,
on the control palette for Fill style select Pattern then click Options,
for the New Pattern Sorce select bg18 and click ok. Now click on the
white to flood it. Now go to SELECTIONS>SELECT NONE or on your key
board hold down the Ctrl button and hit the D. Now go to
LAYERS>MERGE>MERGE VISIBLE. Wow you just made a box! To decorate
it I would suggest adding a new layer, that way you can move your stuff
around without moving your box. I used 6 new layers to make mine and
here it is.... ,
on the control palette for Fill style select Pattern then click Options,
for the New Pattern Sorce select bg18 and click ok. Now click on the
white to flood it. Now go to SELECTIONS>SELECT NONE or on your key
board hold down the Ctrl button and hit the D. Now go to
LAYERS>MERGE>MERGE VISIBLE. Wow you just made a box! To decorate
it I would suggest adding a new layer, that way you can move your stuff
around without moving your box. I used 6 new layers to make mine and
here it is....

Hmm, does it look like a fish
tank?
If you have any questions please
just ask...
Copyright © 2000-2001 by LovlyGypsy,
all rights reserved
| I, LovlyGypsy,
Give my permission to Ldy
Archrr aka Artists for PSP to place any and all tutorials
that I have made on her site.. this 22nd day of February 2001.
These tutorials were made solely by me and permission is mine
to give. |
|

