|
Text Effects Using The Ulead
Filters
Flaming Text - Icy Text - Raised
Text
ULEAD Type Filter used
in this tutorial is a part of PhotoImpact6
Free
Trial Download
If you've heard about PhotoImpact 6, no doubt you'll
know of the powerful new features and enhancements. This 30-day
trial is absolutely free, so have fun!
Open PSP
.
Flaming
Text
Open a new file
Width: 300
Height: 200
Transparent background.
.Make sure black is your
foreground color or in the top box. Click the text tool  and
select any font. I picked Arial font, Bold, Size 20, make sure to check
Floating. Leave it selected and go to IMAGE>PLUG-IN FILTERS>ULEAD
EFFECTS>TYPE when the dialog box comes up, at the bottom right click
the down arrow until you see the flaming word...Ulead and click on it.
The dialog box looks like this... and
select any font. I picked Arial font, Bold, Size 20, make sure to check
Floating. Leave it selected and go to IMAGE>PLUG-IN FILTERS>ULEAD
EFFECTS>TYPE when the dialog box comes up, at the bottom right click
the down arrow until you see the flaming word...Ulead and click on it.
The dialog box looks like this...
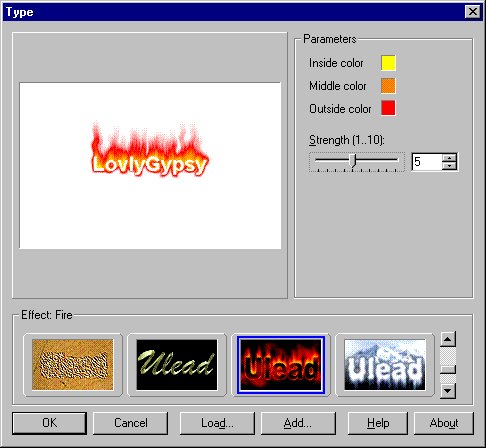
I have my inside color set to yellow, the middle
color set to orange and the outside color set to red. The slider that
says Strength (1..10) is how you set the size of your flames. 1 being
the smallest and 10 being the biggest. I have mine set to 5. Click ok.
Mine looks like this...
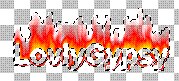
Now I could stop there and save it and it would
look like this...

Now that doesn't really look that bad but I want to
put some black in the letters. So with it still selected go to
SELECTIONS>INVERT now the inside of the letters and all around it are
selected. Click the flood fill tool  and
fill the inside of the letters with black. Now it looks like this... and
fill the inside of the letters with black. Now it looks like this...

Now I want to add a drop shadow but first I have to
deselect it by going to SELECTIONS>SELECT NONE. Now click the
selection tool  and
draw a rectangle around your words and single click inside the
rectangle. Go to IMAGE>EFFECTS>DROP SHADOW I used these
settings... and
draw a rectangle around your words and single click inside the
rectangle. Go to IMAGE>EFFECTS>DROP SHADOW I used these
settings...
Color: Black
Opacty: 100
Blur: 7.1
Vertical: 1
Horizontal: 1
Now I am going to go to EDIT>CUT,
EDIT>PASTE>AS NEW IMAGE
and save it as .jpg and this is what it looks
like...

.
.
Icy Text
I am going to use the file already open that we cut
the flaming text from.
If you don't have that use these settings...
Open a new file
Width: 300
Height: 200
Transparent background.
Ok, using black as your foreground color, click the
text tool and pick any font. I picked Arial Black, Bold, Size 20 again
make sure Floating is checked and click ok. With it still selected go to
IMAGE>PLUG-IN FILTERS>ULEAD EFFECTS>TYPE when the dialog box
comes up, at the bottom right click the down arrow until you see the icy
word...Ulead and click on it. My inside color is white, my middle color
is light gray, my outside color is dark gray and my strength is 3. Click
ok. Now go to IMAGE>EFFECTS>DROP SHADOW and use the same settings
you used on the flaming text. I went to EDIT>CUT, EDIT>PASTE>AS
NEW IMAGE and saved it as a .jpg and it looks like this...

.
.
Raised Text
Again I am going to use the file already open that
we cut the icy text from.
If you don't have that use these settings...
Open a new file
Width: 300
Height: 200
Transparent background.
Pick any color for your foreground color. I picked
red. Click the text tool and select any font. I picked Balloon XBd BT,
Bold, Size 28 again make sure Floating is checked and click ok. With it
still selected go to IMAGE>PLUG-IN FILTERS>ULEAD WEB.
PLUGINS>BUTTON DESIGNER-ANY SHAPE when the dialog box comes up, where
it says Bevel Type I click the bottom arrow one time and picked the
second one from the left. The dialog box looks like this...
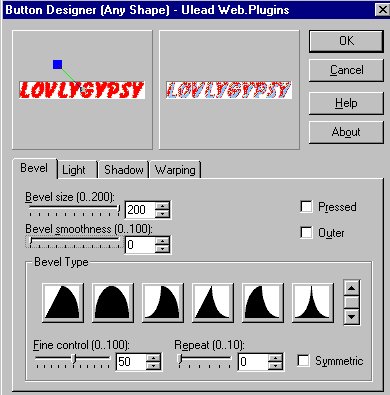
Where it says Bevel size (0..200) I slide it all the
way to 200 and where it says Bevel smoothness (0..100) I slide it to 0
and clicked ok. now I'm going to add a drop shadow and I'm going to use
the same settings as before. I went to EDIT>CUT, EDIT>PASTE>AS
NEW IMAGE and saved it as a .jpg and it looks like this...

That's it. If you have any questions please just
ask...
Copyright © 2000-2001 by LovlyGypsy,
all rights reserved
| I, LovlyGypsy,
Give my permission to Ldy
Archrr aka Artists for PSP to place any and all tutorials
that I have made on her site.. this 22nd day of February 2001.
These tutorials were made solely by me and permission is mine
to give. |
|

