|
Text effects - Sparkling
Text
The DOWNLOAD file is the
following file...
tt1040m_.ttf
.
Download, unzip to your Windows fonts folder
Open a new file
Width: 400
Height: 200
Background Color: White
Pick Black for your foreground color. Click the text
tool, this works better with a smaller font. I picked Amazon BT, Bold
Italic, size 36. Make sure your text is in the middle. Click the layer
palette button to bring up the Layer Palette. It will look like this...
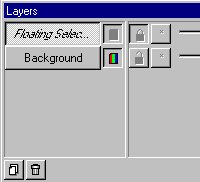
Where it says Floating Selec...right click on that
and click Promote To Layer. Go to EDIT>COPY. Go to
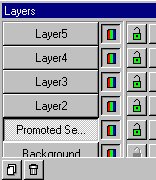
EDIT>PASTE>AS NEW LAYER, 4 times. On the Layer Palette click on
the layer that says Promoted Se...Like this...
Click the selection tool  and
draw a rectangle around the text and move the text until it lines up
with the rest. It will look like this... and
draw a rectangle around the text and move the text until it lines up
with the rest. It will look like this...

See you can't tell there's a bunch of them there it
just looks like one. Now click the Replace Color button  .
Pick a color for your foreground color I picked a light purple. Now
click the flood fill tool .
Pick a color for your foreground color I picked a light purple. Now
click the flood fill tool  and
flood fill each letter. You won't be able to see the change but it did I
promise. On the Layer Palette click Layer2. Pick another color, I picked
a light green. Click the Replace Color tool and flood fill this one. On
the Layer Palette click Layer3. Pick another color I picked a light
blue. Click the Replace Color tool and flood fill this one. On the Layer
Palette click Layer4. Pick another color I picked a hot pink. Click the
Replace Color tool and flood fill this one. Ok, select none. On the
Layer Palette click the layer called Promoted Se. Go to
IMAGE>BLUR>MOTION BLUR use these settings... and
flood fill each letter. You won't be able to see the change but it did I
promise. On the Layer Palette click Layer2. Pick another color, I picked
a light green. Click the Replace Color tool and flood fill this one. On
the Layer Palette click Layer3. Pick another color I picked a light
blue. Click the Replace Color tool and flood fill this one. On the Layer
Palette click Layer4. Pick another color I picked a hot pink. Click the
Replace Color tool and flood fill this one. Ok, select none. On the
Layer Palette click the layer called Promoted Se. Go to
IMAGE>BLUR>MOTION BLUR use these settings...
Deg. 0 Intensity: 30 Do that 2 times.
On the Layer Palette click the Layer2.
Go to IMAGE>BLUR>MOTION BLUR use these
settings...
Deg. 90 Intensity: 30 Do that 2 times.
On the Layer Palette click the Layer3.
Go to IMAGE>BLUR>MOTION BLUR use these
settings...
Deg. 45 Intensity: 30 Do that 2 times.
On the Layer Palette click the Layer4.
Go to IMAGE>BLUR>MOTION BLUR use these
settings...
Deg. 315 Intensity: 30 Do that 2 times.
Click on Layer5. Pick white as your foreground color.
Click the text tool and place the same text slightly offset. On the
Layer Palette where it says Floating Selection like this...
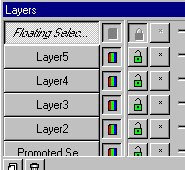
Right click on that and click Promote To Layer.
Go to LAYERS>MERGE>MERGE ALL (FLATTEN).
Now crop and buttonize and it looks like this...

Here's one I did with a Black background and I used
white on all the layers and black on the last text...

You just have to play around with the colors.
If you have any questions please just ask..
Copyright © 2000-2001 by LovlyGypsy,
all rights reserved
| I, LovlyGypsy,
Give my permission to Ldy
Archrr aka Artists for PSP to place any and all tutorials
that I have made on her site.. this 22nd day of February 2001.
These tutorials were made solely by me and permission is mine
to give. |
|

