|
How to make a Glass Dome Nameplate
.
The DOWNLOAD file contains
the following files...
roses3.tub
frame4.tub
bubble4.tub
.
Download, unzip.
Open PSP, open the tubes and export them.
Open a new file, 300 x 300, transparent background.
This will give us plenty of room to work.
Ok, click on the tube tool  and on the control palette
select: roses3, Scale: 49%. Which looks like
this...

Place the roses in the center. Now you can pick a
color for you background and flood fill, you can even flood fill it with
a pattern if you want. But I want my background to be white so I'll
leave it the way it is. Now click the Toggle Layer Palette button  when
the dialog box comes up click the new layer button when
the dialog box comes up click the new layer button  ,
you don't have to give it a name unless you want to. I just clicked ok.
Now click the new layer button again. Now you should have 3 layers, like
this... ,
you don't have to give it a name unless you want to. I just clicked ok.
Now click the new layer button again. Now you should have 3 layers, like
this...

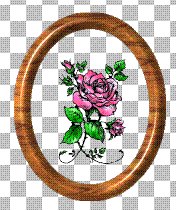
Ok, click on the Layer3, if it's not already
selected. Click on the tube tool again and on the control palette
select: frame4, Scale: 67% and place it around the roses. If it didn't
go where you want it to just click the selection tool  and
draw a rectangle around it then drag and drop it to where you want it.
Here's what mine looks like... and
draw a rectangle around it then drag and drop it to where you want it.
Here's what mine looks like...
Now click on Layer2.
Click on the tube tool again and select: bubble4,
Scale: 147.
Now place a bubble inside the frame.
You want the bubble to touch the sides of the frame
like this...

You can click the selection tool and move it around
if you need to.
Now make sure it's not selected and go to
IMAGE>DEFORMATIONS>CYLINDER-HORIZONTAL like
this...

When the dialog box comes up, where it says... %
Effect select 40 like this...

Click ok. Now if you were making one on your own
and
didn't know what size to use just play with it.
If you don't like it just go to EDIT>UNDO.
Now let's go to LAYERS>MERGE>MERGE VISIBLE.
Now it looks like this...

Now if you wanted to you could put things around the
frame. But I'm just going to click the text tool  and
put my name at a slant on the bottom right side. I used Amazone BT font,
Bold, Size: 22, I checked: Floating. I want gold text so I have to do
the wax coating four times then colorize at Hue: 35, Saturation: 155.
Then I'll rotate by going to IMAGE>ROTATE and rotate to the Left,
free: 20. Now I want to give it a drop shadow, Color: Black, Opacity:
100, Blur: 0, Vertical: 1, Horizontal: 1. Now mine looks like this... and
put my name at a slant on the bottom right side. I used Amazone BT font,
Bold, Size: 22, I checked: Floating. I want gold text so I have to do
the wax coating four times then colorize at Hue: 35, Saturation: 155.
Then I'll rotate by going to IMAGE>ROTATE and rotate to the Left,
free: 20. Now I want to give it a drop shadow, Color: Black, Opacity:
100, Blur: 0, Vertical: 1, Horizontal: 1. Now mine looks like this...

Now I'll click the selection tool and draw a
rectangle around the whole thing and single click on it to select it.
Then I want to give it all a drop shadow, Color: Black, Opacity: 100,
Blur: 16.3, Vertical: 1, Horizontal: 1. Then I'll copy and paste as a
new image save and here's what mine looks like...

Not too bad. lol
If you have any questions please just ask...
Copyright © 2000-2001 by LovlyGypsy,
all rights reserved
| I, LovlyGypsy,
Give my permission to Ldy
Archrr aka Artists for PSP to place any and all tutorials
that I have made on her site.. this 22nd day of February 2001.
These tutorials were made solely by me and permission is mine
to give. |
|

