|

How to use Masks
.
The DOWNLOAD file contains
the following files...
frame4.jpg
prose.tub
sparkle.tub
wineglass.msk
.
Download the file. Unzip it. Go to
EXPLORER>PROGRAM FILES>PAINT SHOP PRO make sure you have a file
there named Masks. If you don't with PSP still highlighted go to
FILE>NEW>FOLDER and name it masks. Now go to where ever you
unzipped the files to and cut the file called wineglass.msk and paste it
in the masks file.
.
Open PSP.
Go to FILE>NEW with the following settings...
Width: 175
Height: 175
Background Color: Black
Click ok
Here's the tube we will be using...

Click the Picture tube tool  Select
the purple rose, size 39. Select
the purple rose, size 39.
Place the rose like this...

Now click Toggle New Layer Palette  . .
When you do that this box will come up..

Click the add new layer button... that will bring up
another box. At the bottom of the new box click ok. Pick pale yellow as
your foreground in it. Click the flood fill tool and flood fill the pic.
Go to MASKS>LOAD FROM DISK pick the wineglass.msk click ok. Now it
looks like this...

Now I want to color the roses. Click on the
foreground color box on the right and pick a color and click ok. I
picked a light red. Now on the layers box...
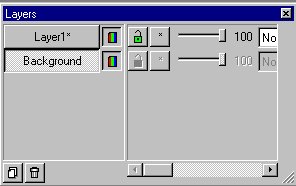
If you move your mouse over the words Layer1 &
Background it will tell you which layer has the purple rose on it. Which
should be the background layer. Click it. Now click the airbrush  .
Use the following settings on your control palette... .
Use the following settings on your control palette...
Shape: Round
Size: 7
Opacity: 100
Hardness: 90
Density: 33
Step: 25
Now color in the 2 black & white roses.
If you mess up, go to EDIT>UNDO AIR BRUSH.
Now it looks like this...

Go to LAYERS>MERGE>MERGE ALL.
Click the bottom box on the right and select Black.
Go to IMAGE>ADD BORDERS with the following
settings...
Check Symmetric and set the all to 24. Click ok.
Now it looks like this...

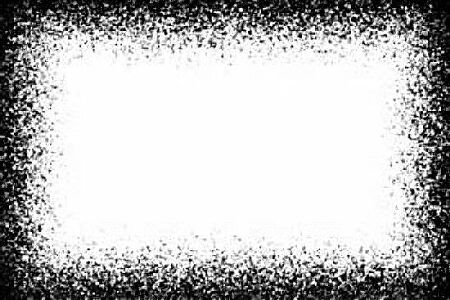
Now open the frame. It looks like this...
Now make sure your tag is selected. You can select
it by clicking on it's toolbar.
Now go to MASKS>NEW>FROM IMAGE use the
following settings...
Source window: frame4
Create mask from
Do not check Invert mask data
Click ok. Now you can close out the frame4 pic.
Go to FILE>SAVE AS give it a name and click ok.
Close it out, then open it again. Now it looks like
this...

Go to IMAGE>EFFECTS>BUTTONIZE with the
following settings...
Height: 11
Width: 12
Opacity: 63
Transparent edge
Click ok. Now it looks like this...

Now we want to add a sparkle on the right hand side
of the glass where the yellow goes in alittle. Click the tube tool.
Select the sparkle. (attached) Place it where you want it. Here's what
it looks like now...

Now I want to add text to the bottom of the frame.
Pick pale yellow as your foreground color. (The same yellow you flood
filled the pic with earlier). Click the text tool. Click on the bottom
of the border. Select your font. I picked Arial font, Bold, Size 18.
Click ok. Go to IMAGE>EFFECTS>DROP SHADOW with the following
settings...
Color: Black
Opacity: 100
Blur: 2.4
Vertical: 1
Horizontal: 1
Click ok. You can move the text around by dragging
and dropping it where you want it. Go to SAVE>SAVE AS give it a name
and click ok.
Now it looks like this...

If you have any questions, please just ask...
Copyright © 2000-2001 by LovlyGypsy,
all rights reserved
| I, LovlyGypsy,
Give my permission to Ldy
Archrr aka Artists for PSP to place any and all tutorials
that I have made on her site.. this 22nd day of February 2001.
These tutorials were made solely by me and permission is mine
to give. |
|

