|

How To Make A Tear Drop Nameplate
A friend told me how to do this and now I'm
gonna tell you. It's easy and fun.
.
The Download file contains
the following file...
house.jpg
Burton's Nightmare Font
.
Download and unzip to any file.
Open PSP
Go to FILE>NEW use these settings...
Width: 353
Height: 289
Transparent background.
.
Select white as your foreground color (top box).
Select black as your background color (bottom box).
Click on the shapes tool  set your control palette like this...
Tool Controls:
Shape: Circle
Style: Filled
Outline Width: 2
Now click in the center of your pic and holding
down the mouse button draw
a circle. You want the circle to almost fill the
pic like this...

Now on your keyboard, hold down the Ctrl button and
hit the A button (Ctrl +A)
this select all. Now single click on the circle
this will select only the circle.
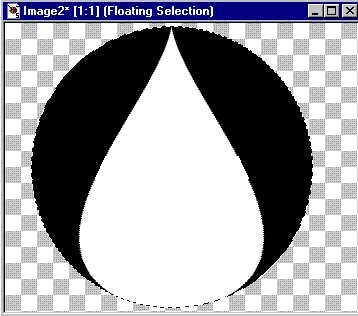
Go to IMAGE>DEFORMATIONS>PERSPECTIVE VERTICAL
when the dialog box comes up set it like this...
%Difference: -100
click ok. Now it looks like this...
On your keyboard hold down the Ctrl button and hit the D (Ctrl +
D). This will deselect. Ok we want to get rid of the black so click the
magic wand  and click on the white, go to SELECTION>INVERT now hit the delete key
on your keyboard. Go to SELECTION>INVERT again. Now let's open the
house.jpg and shrink it by clicking the minus sign. Click the flood fill
tool
and click on the white, go to SELECTION>INVERT now hit the delete key
on your keyboard. Go to SELECTION>INVERT again. Now let's open the
house.jpg and shrink it by clicking the minus sign. Click the flood fill
tool  .
On your control palette under Tool Controls set the Fill Style to
Pattern and click Options. When the dialog box comes up set The New
Pattern Source to the house. Now flood fill the tear. Select none Ctrl +
D. Select a color for your text in the foreground color box. I picked a
dark red. Now click the text tool .
On your control palette under Tool Controls set the Fill Style to
Pattern and click Options. When the dialog box comes up set The New
Pattern Source to the house. Now flood fill the tear. Select none Ctrl +
D. Select a color for your text in the foreground color box. I picked a
dark red. Now click the text tool  ,
click on the pic where you want you text and select a font. I picked
Burton's Nightmare, Bold, Size 22. You can stop here and just add a drop
shadow and save it I'm going to do a little more. I'm going to go to
IMAGE>PLUG-IN FILTERS>ULEAD WEB. PLUGINS>BUTTON DESIGNER-ANY
SHAPE I'm going to use... ,
click on the pic where you want you text and select a font. I picked
Burton's Nightmare, Bold, Size 22. You can stop here and just add a drop
shadow and save it I'm going to do a little more. I'm going to go to
IMAGE>PLUG-IN FILTERS>ULEAD WEB. PLUGINS>BUTTON DESIGNER-ANY
SHAPE I'm going to use...
Bevel
Bevel Size: 6
Bevel Smoothness: 2
Bevel Type: The second on from the left in the top
row
now I'm going to add my drop shadow by going to
IMAGE>EFFECTS>DROP SHADOW and I used these
settings...
Color: Black
Opacity: 100
Blur: 7.4
Vertical: 1
Horizontal: 1
Now I'll go to EDIT>CUT, EDIT>PASTE>AS NEW
IMAGE
and here's what mine looks like...

If you have any questions please just ask...
Copyright © 2000-2001 by LovlyGypsy,
all rights reserved
| I, LovlyGypsy,
Give my permission to Ldy
Archrr aka Artists for PSP to place any and all tutorials
that I have made on her site.. this 22nd day of February 2001.
These tutorials were made solely by me and permission is mine
to give. |
|

