How to use the Ellipse Filter
.
The DOWNLOAD file has the
following files...
flbkgr53.jpg
bg11.bmp
sparkle0.tub
** You can get the free filter needed for this
tutorial from NVR
BORDERMANIA
.
Download the file. Unzip to any folder. Go to EXPLORER and find
the files you just unzipped. Cut the file nvrbm13.8bf, go to PROGRAM
FILES>PAINT SHOP PRO>PLUGINS and paste the file there.
Open PSP
Open the file sparkle0.tub and export as a picture tube.
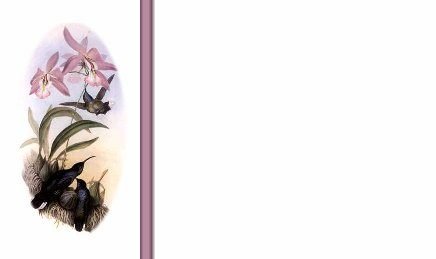
Open the file flbkgr53.jpg. It looks like this...
Click on the selection tool  .
If your control palette isn't up bring it up now by clicking the control
palette button
.
If your control palette isn't up bring it up now by clicking the control
palette button  . Set the control
palette like this...
. Set the control
palette like this...
Selection type: Ellipse
Feather: 0
Do not check Antialias
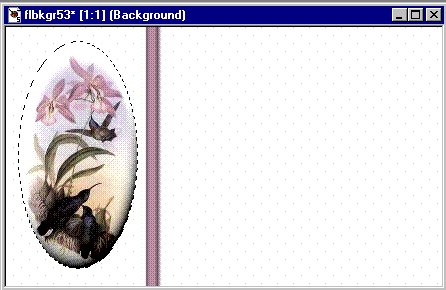
Now move your mouse to the center of the humming birds, click and
drag your mouse to the outside of the humming birds. Like this...

Now go to IMAGE>PLUG-IN FILTERS>NVR
BORDERMANIA>ELLIPSE
On the Ellipse Filter Options box use the following
settings...
Border Width: 176
Light Angle: 0
Light Intensity: 117
Outside Mask: 0
Outline Width: 0
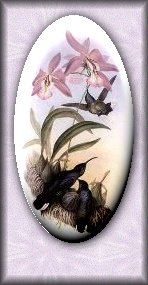
Click ok. Now it looks like this...
Now go to EDIT>CUT. Close that out. You don't
have to save any changes.
Go to FILE>NEW with the following settings...
Width: 148
Height: 285
Background Color: White
Click ok. Open the pic bg11.bmp. It looks like
this...

Select the tag by clicking it's toolbar. Click the
Flood Fill tool  .
.
Set the control palette like this...
Fill Style: Pattern
Match mode: RGB Value
Tolerance: 200
Opacity: 100
Click Options. Use the following settings...
Fill Style: Pattern
Blend Mode: Normal
New Pattern Sorce: bg11
Click ok. Now flood fill the tag. Close out bg11.
Go to EDIT>PASTE>AS NEW SELECTION. Place it
like this...

Go to IMAGE>EFFECTS>DROP SHADOW use the
following settings..
Color: Black
Opacity: 100
Blur: 15.4
Vertical: 1
Horizontal: 1
Click ok. Now it looks like this...

Go to SELECTIONS>INVERT.
Go to IMAGE>EFFECTS>BUTTONIZE
Use the following settings...
Height: 10
Width: 8
Opacity: 69
Transparent edge
Click ok. Go to SELECTIONS>SELECT NONE.
Now it looks like this...
Now click the selections tool .
Set the control palette like this...
Selection type: Rectangle
Feather: 0
Do not check Antialias
Now put a rectangle below the hummingbirds like
this...

Go to IMAGE>EFFECTS>BUTTONIZE use the
following settings...
Height: 7
Width: 5
Opacity: 69
Transparent edge
Click ok. Now it looks like this...
Now go to IMAGE>EFFECTS>DROP SHADOW use the
following settings...
Color: Black
Opacity: 100
Blur: 12.2
Vertical: 1
Horizontal: 1
Click ok. Go to SELECTIONS>SELECT NONE.
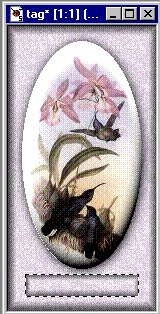
Now it looks like this...

Now click on the tube tool  .
.
On the control palette pick the orange sparkle you
exported earlier
and use the following settings...
Tube: sparkleO
Scale: 28%
Place the sparkles where ever you want them.
Mine looks like this...

Click the foreground color box and pick a color for your text. I
picked dark purple. Click the text tool  and
pick a font. I picked Arial font, Bold, Size 11. Click ok. Now go to
IMAGE>EFFECTS>DROP SHADOW and use the following settings...
and
pick a font. I picked Arial font, Bold, Size 11. Click ok. Now go to
IMAGE>EFFECTS>DROP SHADOW and use the following settings...
Color: Black
Opacity: 100
Blur: 1.6
Vertical: 1
Horizontal: 1
Click ok. Go to SELECTIONS>SELECT NONE and go to
FILE>SAVE>SAVE AS give it a name and save it as a JPEG file. Now
it looks like this...

If you have any questions, just ask...
Copyright © 2000-2001 by LovlyGypsy,
all rights reserved
| I, LovlyGypsy,
Give my permission to Ldy
Archrr aka Artists for PSP to place any and all tutorials
that I have made on her site.. this 22nd day of February 2001.
These tutorials were made solely by me and permission is mine
to give. |


