
[Pretty Fluid Chaos] Tayste's movement bible, second edition!
"What are you doing the most in DMC? More than anything else?.. Moving, and that’s what this guide is all about" =P
September/October 2004.
All demos throughout PFC were recorded on a private DMC server without pro code physics. Here are all of the demos in PFC and are examples to go with the guide, they also appear in the relevant places throughout the document
Example to show the multi-dimentional possibility of aircontrol in DMC. This shows sideways movement. -DOWNLOAD
Example to show the multi-dimentional possibility of aircontrol in DMC. This shows a simple bunnyhop sequence taking advantage of moving while facing different directions. -DOWNLOAD
Accel, spin and rocket jump demos -DOWNLOAD
'Pure' Bunnyhopping -DOWNLOAD
Bunnyhop Patterns -DOWNLOAD
Example of bunnyhopping, this is also an example of the sticky bug in vanilla DMC. This was corrected with pro code physics but as you can see in this demo, bunnyhop sequences are 'cut' in places, and shows how speed must be regained again. -DOWNLOAD
Introduction:
Pretty Fluid Chaos Tayste's movement bible is to provide a good read for players wanting to know about whats involved
with acquiring decent movement skills and what good movement involves. It is useful for players without experience and knowledge or those who simply
never acquired the co-ordination skills and didn't manage to get the gist of the movement physics engine in DMC.
[pfc](this document) includes
everything I know about movement put to writing in an easy to understand way.
The main
factor to becoming good is practice. The more you practice, the more you start to understand the physics engine until everything comes second nature and you simply know the feel of the game to an absolute level. I won't talk about simple strafe jumps or any techniques that I don't use. There are techniques with the physics that I understand and can use, but simply don't use because I find them ineffective. I will talk about some of these towards the end. I’ll be explaining what I think is useful and whats involved with aiming to have the best movement possible, and simple strafe jumps are never used by me in game (wherever a strafe jump is effective, an accel jump is always highly more effective, whatever the circumstance).
However by simply knowing how to pull off a move doesn’t mean
that particular move can be done with 100% consistency. Consistency comes with practice. The same goes for reading this movement guide, you still need
the experience which comes through practice to really know the physics and knowledge from reading just isn't enough. And remember experience is permanent, practice enough and your experience will always remain. You could leave DMC for a year, come back, and still be able to accel jump perfectly because you know it and it’s natural.
If you want to have good movement you've come to the right place, but it won't happen like magic. Follow this guide and put in the practice and your way on your way for great improvements, and you will be surprised at how fast your experience will grow, especially if you’re relatively inexperienced or doubt your own ability. Practice improves consistency, co-ordination and control. For example, movement doesn't just mean bunnyhopping and accel jumping, there is much more to having good movement than trick style moves and speed. Practice improves many areas and co-ordination and positioning skills are always features displayed in players with good movement control
- a small example would be on DMZ1.
A player with good movement control will use the RA boxes to their advantage by jumping back and forth between them constantly, barely looking where they are going, whilst attacking their opponent on the ground. Another example is in the RA room on dm3, I love jumping back and forth the bars up at the RA and at the middle level whist in battle. Impressive gap? no, cool combo? no, impressive bunny speed? no!.. simply control, positioning skills, knowledge and experience put to use. It may not be an insane trick or a fast bunny combo, but its still movement skill, just one aspect of what it is to have good movement. And this all comes through practicing these main key areas - Air control, accel jumping, spin jumping, bunnyhopping and rocket jumping. Have all these mastered and not only will you be bunnyhopping at speed and making huge gaps and combos, but your control, co-ordination and positioning control will be highly improved.
-Tayste
[For convenience I have put important parts of some paragraphs into a separate box.]
Heres the contents of what will be covering in [pfc].
1. Air control
- Technical explaination along with easy to understand explaination
2. Accel jumping
- Reverse accel jumping
3. Spin jumping
- Spin jump or accel jump?
- Spin rocket jumping
- Reverse spin jumping
4. Bunnyhopping
- The Art of Bunnyhopping
- Learn to bunnyhop
- Ground Height
- Bunnyhop Patterns
5. Rocket jumping
- Scripts
- Varying timing
- Horizontal rocket jumping
- Double rocket jumping
- Lava rocket jump
- Grenades
6. Extras - walls, floors, tips and tricks.
- Wall slide
- Low ceilings
- Snake dashing
8. Finally
1. Air control
Air control (turning as if on land but in the air) is the most important technique to get right. You need to know it well to bunnyhop properly but also aircontrol is a technique you should constantly use to not only position yourself well, but to make sure you have complete control of yourself even in battle. As I mentioned in the introduction, positional control is extremely important.
At first it requires a lot of concentration and co-ordination, but this will become a natural instinct over time. To make curves while travelling forwards, release the forward key, hold down the strafe direction button in which you want to turn into and simply steer with the mouse, obviously steering the direction you want to turn! Steering the mouse the opposite direction would turn you backwards.
In order to switch direction you must switch strafe buttons to the direction you want to turn into before beginning to steer the mouse.
Using aircontrol while travelling forwards is great while on the run, especially bunnyhopping and for getting into good positions, but there are also other uses for aircontrol which are very important; sideways aircontrol and diagonal aircontrol. Diagonal aircontrol has limited use, it is achieved the same way as forwards aircontrol only the forward key is held down ASWELL as the directional strafe key. This will result in the same aircontrol except slightly diagonal (you will look into the curve somewhat). The only real use i have found for this is to give more vision when going around a corner, for example - down the stairs to enter the RL/YA room on ztndm3, this will give you more vision of the room as you bunnyhop in, and also from the health pack to the RA on dm6, this method gives some more vision down the corridor as you approach the RA.
Sideways aircontrol is great for battles. The art of circling an opponent while bunnyhopping or moving midair is underrated. Do it by facing the opponent and while airbourne circle them by holding the forward key and turning the mouse to keep the xhair on the opponent. The faster you turn the mouse the tighter the circle, all the while facing the center of this circle you are creating. A technique like this over time becomes second nature and you will be doing it and similar forms of it in places without realizing it. No strafe buttons will be needed for this particular move, but random movement is key in battle, so suddenly switching to a forward aircontrol to hopefully come around back at them can be useful. This is a technique which can be exploited and has very few down sides, random is the best in battles but this sideways control is great for spinning around your opponent while blasting them. A technique which is excellent not only in Rocket Arena, but while duelling and battles in FFA too.
Although it has limited use, you can also make a reverse curve, by using the backwards key. E.g. - Run along using the right strafe key, jump, now while your in the air, both hold the backwards key and also turn your mouse to the right. You will make a curve while facing away from the curve. The best use i have found for this technique is while standing on the GA/LG on DM4. Look towards the upper teleport (the one that leads to the GA), now strafe right (off the edge towards the quad/SNG) and hold backwards while turning the mouse slightly to the right.. hopefully you will land on the SNG (while all the time looking away from the back wall!)
[The most effective and useful way of controlling movement mid air while moving forward is to release forward, hold down the strafe direction button in which you want to turn into and simply steer in the same direction with the mouse]
[Diagonal aircontrol can be achieved my combining the forward key with this method, and looking more in the direction you want to travel in]
[Sideways aircontrol is achieved by using the forwards/backwards keys combined with mouse movement]
-Technical Explaination along with easy to understand explaination
Technical explaination -
Advanced Aircontrol 1 - Sideways movement - DOWNLOAD
Advanced Aircontrol 2 - Full surround movement - DOWNLOAD
These demo's show the full aircontrol physics engine. The walk forward, strafe left and right and walk back movement controls are all identical as far as the aircontrol physics are concerned, the control you get depends on which direction your POV is looking! This of course means than an accel jump can be taken forward or backwards as has already been explored by players. The player acts like a car with the mouse being the front lights and the strafe keys being the steering wheel. Hold the left strafe key and turn the mouse to the left in mid air while moving forward will turn you left in the same way that turning the steering wheel to the left and the car turns left, as does the front of the car(the mouse in DMC). To control movement while traveling backwards through the air you (to turn left) must hold the left strafe key (turn left with the steering wheel) and turn the mouse to the right (the front of the car turns to the right as you reverse!).
The accel jump in the first example is a true sideways accel jump/combo. The second example shows the potential that a player can in fact always face where he needs to be while bunnyhopping through a map. As a good movement player, using this advantage helps a huge amount, however of course during games, combos are not used since you need to adapt to what goes on. Ultimately you want to be looking at the threat while doing whatever it is you have to do.
Here is a paragraph which is easier to understand and will enlighten new players to the physics of aircontrol with simple explainations and a diagram.
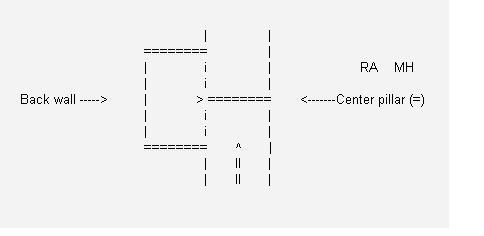
This diagram shows the dm2 lava U-bend curve. The > indicates the direction (either forward, strafe left, right or move backwards key) which must be held in correspondance to the direction the player is facing to gain air control, it must always be the key that would normally move the player toward that center pillar. If > is the forward key, the player must face the center pillar. If the 'strafe right' key is held (when coming from the direction indicated) then the same aircontrol is gained by facing forward, if the strafe right key is used obviously the player must be facing backwards, and if the walk back key is used the player will face the back wall as they curve around. Each combination gives exactly the same effect its all down the which direction the player is facing.
2. Accel Jumping
Accel jump is another move I use in excessive amounts. It is always effective but unfortunately very difficult to explain. So for this technique I will be explaining alongside demos.
First I’ll give a quick introduction to accel jumping. It is a jump facing forward giving massive distance boost, the mouse is very important and is used as a kind of swing, you’re literally using the mouse to throw yourself forward. The move is done using a combination of both strafe buttons and forward, but these can be varied.. for example you can do a half accel jump using only one strafe button. However I will first explain the raw accel jump in its most effective form.
Accel jumping is actually a sideways jump, in other words, you have to be facing sideways to the direction you want to jump to. But to counter this, we look to one side before taking the jump. The reason we look to one side before jumping is because accel jumping requires a swinging mouse movement, so without looking to one side you would swing and end up going in another direction to which you wanted to go. (so if you were side on to a jump you could get away with doing half of a forward accel jump, by starting at the point after you have looked to one side).
For this explanation we will be looking to the left before jumping. Whilst steering with the mouse to the left you hold the forward and left strafe buttons down. These two buttons are held down for the whole duration until you are fully looking to the left, at this point you switch to the right strafe button and begin looking to the right. This should be done in a swinging way, like throwing yourself. Don’t jump until you’re at the peak of the swing, so, when the swing would launch you in the correct direction. As soon as you jump, that’s when the forward key is released.
At this point in mid air you can swing the mouse left and right, using the left and right strafe buttons to go with the mouse movements, or adjust yourself so that your gonna land where you want to land. Doing the left right thing will give a wiggle effect in the air. This wiggle stage isn't necessary and good accel jumps can be done without any air movement, however, practicing for style has its benefits, through the repetition of doing this stylistic wiggle technique will make your bunnyhops better and whilst doing them in an accel jump won't make much of a difference, making it a habit is good in the long term for speed with bunnyhopping over time. Check the demo zip for some accel jump examples
You might notice in my demos I do a bit of winding like a snake before jumping, this is just my style and I got it through habits, this isn’t necessary, but what is necessary is the final parts of the snake wind, looking left or right, then swinging into the jump. The demos of accel switches are just a bit of fun, they show example of being able to turn 180 degrees whilst in an accel jump, in order to attack an enemy behind. Of course reverse air movement then applies. It’s very similar to reversing in a car.
[look left or right with the mouse and combine this with the same strafe key while walking forward, then swing when you are looking fully to the left of right swing back forward with the mouse and switch strafe so that its the same direction as the mouse swing. jump at the peak of the swing (point at which jumping would launch you in the correct direction), and instantly release the forward key and adjust your strafe and mouse movements whilst mid air]
[Mid air wiggling isn't necessary for a good accel jump, but doing it is a very good habit to get into]
- Reverse Accel jumping
Reverse accel jumping is simply an accel jump done backwards, providing the same distance as a regular accel jump. To do one simply use the reverse air control when doing the accel jump, so opposite mouse movement to strafe button. These are highly ineffective though because you simply cannot see your take off position making them a very inconsistent jump (unless you practice a particular jump a lot).
For a more effective backward jump worth learning see section - Reverse spin jumping. I only included this section because they are possible and thought it would fit in the accel jumping section. Check the zip for a demo on dmz1
[Reverse accel jumps aren't effective - you cannot see your take off position]
[To do one simply do an accel jump facing backwards using the reverse air control technique (opposite strafe to mouse swing) to pull off the accel jump]
3. Spin jumping
- Spin jump or accel jump?
Spin jumping was discovered by an unknown aspiring DMC noob called Tayste nearly 3 years ago. At the time he didn't know how to accel jump, but was interested in the movement side of playing DMC. It was discovered through perhaps a misunderstanding of strafe jumping, or recognition of this little techniques effectiveness and ease of use. At the time he didn't quite know HOW effective they were, but it turns out they give an equally good distance as accel jumps when pulled off correctly, so therefore they are very useful =].
The difference between the two is they are effective in different situations. Where a spin jump is effective, an accel jump is less effective, and same applies to the other way around. Where accel jumps are effective, spin jumps are less effective and it’s all down to positioning. The reason I put spin jumping after accel jumping is because spin jumps are more effective than accel jumping only around 10% or less of situations you can be in.. accel jumps are therefore a highly more useful technique.
However it can be argued that spin jumps are easier to do than accel jumps, especially for inexperienced players. But it depends on what you start doing first, the positioning for spin jumps is more difficult to get right than accel jumps because towards the beginning of the jump you cannot see your take off position.. in many cases.
To do a spin jump you must be at a strange angle.. anywhere more than 90 degrees, anywhere just under 180 degrees is best, and it’s sometimes worth positioning yourself nearer this angle before doing a spin jump. if you give yourself only a small spin with the mouse, so a small angle, the jump is less effective, more like a strafe jump. So therefore they are very effective coming down the teleport stairs to the RL area in Dm3. You go down the stairs and do a spin jump to the left to land at the RL.. which is almost 180 degrees.
Another example is at the RL quad area on dm2. At the rocket launcher, opposite the rockets in the corner. Spin jumps are more effective to make it to the quad at this angle. This angle thing can be difficult to get the hang of it, but practice greatly improves your awareness of where you are when not facing fully forward.
Once you have the angle, all you do is hold the direction of strafe you want to jump to, and spin around with the mouse, giving you a lot of swing, at the peak of the swing is when you jump (very much like an accel jump) which gives a spin effect. The difference (technically speaking) between spin and accel jumps is that the forward key is used when doing an accel jump. With spin jumps only one strafe direction is needed and the mouse only needs to be turned in one direction. If you still don't understand check out the spin jump examples in the zip.
[all you do is hold the direction of strafe you want to jump to, and spin around with the mouse, jump at the peak (to throw u in the right direction) of the swing]
[The longer you spin the better the jump, up until 180 degrees or so, only spinning a small amount gives same distance as a strafe jump or something, so a deep angle is needed for a good spin jump]
- Spin rocket jumping
Spin rocket jumping is where you pull off a rocket jump at the peak of your spin jump. When I wrote my older movement guide, I was wrong. Spin rocket jumps DO NOT give you more height, however distance is arguable (because your spin jumping, you have more jump thrust so when the rocket explodes your sent by the thrust of both rocket and spin jump, compared to just rocket and forward jump with a normal RJ), but in some situations they are easier to use than regular rocket jump or any other kind of rocket jump.
For example they already set you up for air movement, and in some situations any other way of rocket jumping would require more effort, such as lift to window on dm3. They can be done from the stairs on dm2 to the upper areas too.
Here are the examples - Note that the first RJ on rsj3.dem isn't a spin rocket jump, it is just a regular rocket jump while running backwards. It is there to show how much easier a spin RJ can be. Other ways of taking that RJ would be to do it forwards, but that way you sometimes get too much height and you also have to position yourself first. Spin RJs in this situation are incredibly effective. The zip pack as a few examples of spin RJing.
[rocket jump while doing a spin jump, useful in some situations, you don’t get any extra height but it may give you extra distance]
- Reverse spin jumping
Reverse spin jumping is a full on backwards jump with the speed of a forward accel or spin jump. I have found them beneficial when fighting enemies behind you, specifically on dmz1 and dm2. There aren’t very many uses for this but it works well. Doing it is the same as a regular spin jump, just done backwards.
So you spin using the mouse but you hold the opposite strafe button, because it is reversed. However, this is one of the hardest techniques of all the useful movement techniques in DMC.. however they are good to learn and much better than reverse accel jumps. Check out the examples in the zip.
[Reverse spin jumps are done the same as a regular spin jump but backwards, use reverse air control technique - opposite strafe to mouse swing)
4. Bunnyhopping
Accel and spin jumping allows the player to jump far distances through an increased speed of movement, bunnyhopping is a technique that allows a player to use speed already gained either from one of these jumps or an explosion, and then keep the speed and even increase this speed over a continuous distance, for as long as the player wants. A good bunnyhopper therefore will at all times move at the speed of at least an accel jump! So how is this possible? Read on.
- The art of bunnyhopping
It was discovered if a player jumps instantly as they land, that they will receive no friction at all, so can therefore
keep hopping at a high speed and at its most simple form, bunnyhopping is simply timing these jumps to receive no friction (just in a straight line). However when combined with the aircontrol techniques already explained, the player can also turn, while all the time increasing their speed, enabling the navigation of whole maps at high speed.
A player who can bunnyhop effectively will start by jumping with an accel, spin or rocket jump and then continue to use aircontrol patterns to increase speed over
time, this player will forget he is even jumping as he lands, and will simply always feel he is 'flying' through the air, always using aircontrol to move around the maps. To
get to this stage requires the player has practiced the timing so much that they never miss time it and aren't even thinking about the jumping aspect, and also that they are using effective aircontrol patterns to increase their speed.
- Learn to bunnyhop
The only way to really learn how to bunnyhop is to first learn a technique of gaining speed, this doesn't always have to be a jump technique or an explosion, the player can also bunnyhop ‘purely’ by hopping on the spot, using air control techniques to gradually gain speed but of course this is not an effective method! However I have included this demo to show how aircontrol increases speed gradually, this is what could be called a ‘Pure Bunnyhop’ sequence, there was at no point a time where I used any of the move forward or strafe keys on land, and throughout the whole sequence the forward and backward keys weren’t used at all
Bunnyhopping without any aid - DOWNLOAD
Once the player can accel jump or gain speed in some way it is time to learn how to bunnyhop. The first thing to learn is the jump timing as essentially this is all that bunnyhopping is, and this is purely down to practice, however i checked my config (i haven't looked at it for over 2 years!) and this is my jump key
bind "your jump kep" "-jump;wait;+jump;wait;-jump;wait;+jump;wait;-jump"
This was the bind i used 2 years ago for use with standard DMC which i originally got from WangMauler, and i haven't looked at it since, so i don't know if this is actually necessary if the main game you play uses the pro code physics, but i thought i should include this anyway, for the main reason i used this bind was to decrease the amount of 'stick' (a bug in standard dmc that made you lose speed for no apparent reason). Here is an example of a fairly long bunnyhop sequence showing the sticky bug original DMC suffered from.
I also want to say at this point that it doesn't matter what you use for your jump key. Use whatever you want to jump just make sure it doesn't distract or hold you back from doing anything else, the reason i say this is that some players seem to think the only way to bunnyhop is to use mouse2 as the jump key, well take it from me that it really doesn't make a difference what you use because i use, and have always used, the space bar to jump and have never felt the need to change to mouse2 or any other key.
Anyway, like i was saying the timing is down to practice, just remember there are no 'stop off' points, bunnyhopping is continuous and you have to literally jump the instant you land.
- Ground height
When bunnyhopping the height of the ground you are landing on should be taken into account when timing your jumps. If the ground is sloping up (For example bunnyhopping towards the grenade launcher on dm6) then when you bunnyhop onto the ramp you should time your jump off the ramp significantly earlier than usual. Forgetting about this will mean your bunnyhop will slow down a LOT, in fact it will mess it up completely.
Getting it right will give you an even bigger speed boost than normal as inclines do this. Imagine moving at speed towards a ramp going up, as you hit the ramp and time that jump perfect you are flung forwards with enough speed to clear the center gap off the following jump. In fact don't imagine, practice!
I often I hit the ramp and fall down the center gap (when aiming to clear it by landing at the edge). Another example is bunnyhopping up the dm6 stairs. Each step is higher than the previous so to bunnyhop up the stairs you have to jump at closer intervals than bunnyhopping on equal ground.
- Bunny Patterns
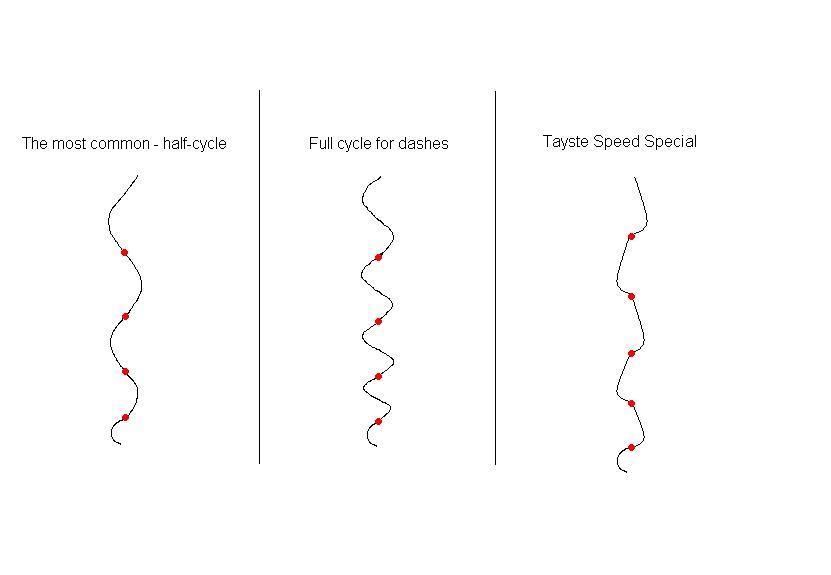
Once you have learned the timing you can now bunnyhop! You can start with an accel jump or whatever you like and then continue to hop along, using aircontrol techniques to turn corners. However if you still want to learn more and move faster still, you should use effective bunnyhop patterns with your aircontrol skills to speed yourself up along the way, you can develop your own patterns and create a distinctive style for yourself, or just use a traditional half cycle pattern which is very common. Anyway here are 3 examples of the main patterns i personally use and usually mix up a bit on the go. To go with these patterns i have done a demo with all 3 variations. The red dots in the patterns indicate when the player hops (although this is very rough and jumping can occur at different times, usually immediately after a change in direction). I know the patterns aren't very well drawn but this was the best i could come up with in paint! In the demo, after showing the 3 patterns i do a quick move using the pattern i often use.. the Tayste special (lol), which features short consistent erratic mouse movements.
Bunnyhop pattern demos - DOWNLOAD
5. Rocket jumping
Rocket jumping is an essential skill and easy to learn. Simply shoot a rocket and jump at the same time while looking down to do a vertical rocket jump.
- Scripts
Forward rocket jump scripts and heavily modified rocket jump scripts I do not recommend at all, not only are they a bad habit to get into and look fake and not fluid (We want Pretty Fluid Chaos not Pretty Fake Chaos!!!), but they pose you with many disadvantages, for example the scripts that do everything for you are repeating the same thing every time you use them so therefore you have no scope at all. You can't decide how high you want to rocket jump (if you don’t need to jump high there’s no point wasting health on a high rocket jump) and you can’t be versatile (rocket jump off walls etc) Stay clear, learn to manually rocket jump to any situation, it’s worth it.
- Varying timing
Knowing the timing and learning the timing for certain jumps is very important. You should know exactly how long to wait before shooting after jumping to get only the minimal height you need. This not only gets you to your destination faster but saves you health the lower the jump.
For example an important one to learn is dmz1. When rocket jumping for the RA you want to skim over the box so at the very worst you just about grab the RA while traveling over the box. To do this you must jump first and then fire afterwards, the longer you wait the lower the jump, the latest you ever want to leave firing is at the peak of your jump (I would do this for example to get onto the boxes near the secret MH in the SNG room to save health on a high RJ from the ground underneath the MH)
It sounds complex but before long you know the timing for landing at the MH on dcdm5, to the quad on dm2, to the GA on dm4, RA on dm6 or MH from stairs on dm2 (full power or near full power) etc etc.
- Horizontal rocket jumping
Much more advanced techniques require a horizontal rocket jump although this isn't needed as often as a vertical rocket jump. It’s not very hard to learn though and its main uses include power for bunnyhop speed and escaping situations. Simply angle your rocket jump more horizontally. Walls can be used too and with a bit of practice you'll find yourself flicking 180 degrees to rocket jump and then flicking back to bunnyhop.
-Double rocket jumping
Double rocket jumps give you a bit more height than a rocket jump and practicing them enough will make them instinctive.. for example if you can see your not going to make a ledge you can double rocket jump to make it. To do this first you must do a full power vertical rocket jump in attempt at reaching a high destination.
For example the grenade launcher from the arena below on dm2. For jumps that require a double rocket jump you will almost be high enough with a single rocket jump, but must shoot the ledge of the destination with another rocket before you start to fall down, shoot the wall slightly down and a whole manner of maneuvers are possible to get to your destination.
At the most simple level you can simply hold the forward key, if the wall you shoot off is from another direction (see demos of double rocket jumps in my trick1.bsp pack for an example of this) then you can shoot backwards away from the wall, and either spin forward or use backwards air control to get to your destination (the latter is done in one of the demos).
Using this technique it is possible to reach the grenade launcher on dm2 from the ground level, to the pent window from the outdoors – either from the ground by the pent or the MH on dm3, or to the top YA corridor on dm4 from the lava paths etc.
[To do a double rocket jump, rocket jump normally and use a wall to fire another one on your way up for extra height]
- Lava rocket jump
This is absolutely essential and will save you a suicide every time you fall in the lava with more than 100 health (its possible to save yourself using a lava rocket jump with only 100 health but this is rare and lucky).
It’s simple to do too, all you have to learn is the timing of the rocket. In the lava, look at the ground and use your walk backwards key. You will start to surface while looking down. Just before getting to the surface of the lava shoot the rocket and you will be propelled into the air allowing you to land on ground again. This can be done in any liquid not only lava.
If the liquid is deep then the wall must be used. For this do the same but look forward a bit facing the wall a split second before shooting and you will be propelled out. There is an example of the wall variation in the trick1.bsp pack. Considerable height can be achieved with a lava rocket jump, for example you can jump out of the lava at the highest point near the YA on dm2.
[Instead of using jump like with normal RJ's, look down and use your walk backwards key, firing the rocket as you approach the surface]
- Grenades
Rockets and grenades can be combined to produce interesting effects. It’s simply a matter of learning the grenade timings. Alternatively shooting a grenade directly up and letting it bounce once before rocket jumping as the grenade lands a second time is effective. This will give you an ultra high or long rocket jump, and combined with double rocket jumps a massive distance can be gained. See my trick1.bsp trick zip pack for a grenade/ quadruple rocket jump across a massive distance.
6. Extras - walls, floors, tips and tricks.
- Wall slide
Wall sliding is easy and common skill known by experienced players. When walking alongside a wall press the strafe direction to hit the wall, combined with forward, to get a significant speed boost.
- Low ceilings
Low ceilings at a jump are annoying to say the least. Just means you have to jump at your most effective (as close to the edge as possible). You get a low ceiling out of the secret RA on dm2, the RL window on dm3 and the outside pent window too. Bunnyhopping into the jump makes it easier (for example bunnyhopping off the ledge)
- Snake dashing
Snake dashing (as I call it for convenience) gives the same effect as wall sliding only without needing a wall. It is useful when playing careful or sneaky because bunnyhops reveal your location. To do this technique just walk forward while strafing left and right alternately, the faster you alternate the strafe keys the faster you move (to a degree, at best you get the same effect as wall sliding).
7. Finally
Finally I would like to say that learning these techniques is down to practice and experience. Give it enough and it will come. Set goals and meet them. If you can do all of these techniques consistently and implement them into the online competition game environment then you will find it a great help if nothing else, in getting around the maps! But its not just about that, its about having fun and learning all these techniques will gain you experience to become a better player overall.
- [pFc]Tayste
