Photos to accompany a series of articles about Pattie's grooming tips. The articles went by the name "Pattie Boyd's Beauty Box" and ran for three months beginning in the September 1965 issue.
--- --- --- --- --- --- --- ---
|
1. Blush-on rouge.
2. Foundation cream for lips before lip gloss. 3. Pale pink lipstick 4. Brown eyeshadow 5. Blue-gray eyeshadow |

|
6. Brownish-black eye-liner
7. Lip gloss 8. Black mascara 9. Long comb with coarse and fine teeth 10. Gold bristle brush |


Your eyes are the most important feature of your face.
Here's how to make them strikingly attractive - in three steps!
SINCE so many of you have asked over and over for details on how I make-up (especially my eyes) and how I do my hair, I have decided to devote a couple of issues of 16 to teaching you the details of my "beauty" secrets. This month, I will just tell you how I do my eyes - and how you may do yours, if you wish to. Next month, I'll go into make-up and hair.
So let's get started - and I suggest that you hold onto the Beauty Box "key" photo on these pages, as all the otems you see there will be discussed in 16.
As far as I am concerned, eyes are the most important feature of the face, and they require the most work. That's why I spend a lot of time on mine, and I hope you don't mind doing the same, and will be patient about learning how to make-up your eyes. Remember - to get light on eye make-up, but to use great skill (acquired by practice only) and never try to do a good eye make-up job when you are in a hurry. It just won't work.
After you have cleaned, washed and dried your face, sit down before a well-lit mirror (and brush back your bangs if you have them, like I do!) and take a good look at your eyes. Look at the lids (upper and lower) and examine where the lashes grow in on the top lid. For today's lesson you'll need eye-liner, an eye-liner brush, brown and blue-gray eye-shadow, mascara brush and mascara.
The first thing you do is to moisten your eye-liner brush (it should be a good sable one with a fine point) and cover it with eye-liner (either liquid or paste - I use paste). Only experience will help you decide whether black or dark brown eye-liner is best for you. Black is usually best on everyone, but there are exceptions. Now gently, but firmly, make an even black line from your indside top lid going outward. Be sure to keep your lids lowered and concentrate upon looking at what you're doing with the other eye. You may need to use your other hand to pull lid taught to make a straight line. If you have a great deal of difficulty make a base line with a medium soft (razor sharpened) black eyebrow pencil, then follow that line with the brush. Practice making the end of your eye-line curve up or run out straight and downish. Choose whichever looks best on you.
The next thing you do is apply your eyeshadow. Keep a couple of basic colors on hand to blend with your clothes and coloring. I keep brown and blue-gray Use creamy cake eye-shadow and a firm, medium-blunt brush. Imagine a line straight from where the inside of your eyebrow starts to just above the inside corner of your eye. Start to gently brush on eyeshadow from that point, arching the line slightly upwards and keeping it just above the first crease in your eyelid. When you reach the peak spot in the middle, start sloping downwards, stopping the eye-shadow just above the end of your eyeline. This makes your eyes look very exciting!
Last of all, apply your mascara. Use black or brown, tube or cake. Lift eyebrows and put your head at an angle that feels right for you. Brush mascara on with upward and outward strokes. When it has almost dried, apply another coat, but don't allow lashes to "cake" together. I also put mascara on my lower lashes. be sure to try this out at home first, for it looks good only on very few girls. If it suits you, do it. If not, skip it.
Well, thanks for listening in - and do meet me here again next month (the October issue of 16 goes on sale August 19th), and we'll see if we can do something about that hair!
--- --- --- --- --- --- --- ---
 |
 |
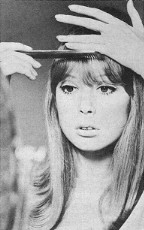 |
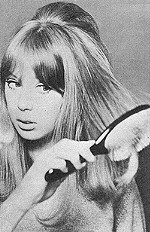
SINCE A GIRL's "shining glory" truly is her hair, I think it is very important to pay extra special attention to your "Barnet" - that's London slang for hair-do.
My hair is long, so I am writing this only for girls with long hair (or girls who plan to grow long hair). First off, cleanliness is the number one beauty secret when it comes to long hair - or any hair I s'pose. I usually wash my hair once a day. I dry it in a clean linen towel, then carefully and gently comb all the tangles out.
You will have to experiment with various shampoos to find one that is right for you. You don't have to use expensive shampoos. There are very good ones in your five and dime stores. I think a shampoo with olive oil added is good for most normal hair.
Just before my hair is completely dry, I give it a good brushing with a natural bristle brush. Be sure your hair is not still wet, or you will "stretch" it and break off the ends. When my hair is gleaming (still dampish), I take about eight big round rollers and carefully roll up the ends. I curl them over about three times. You have to use more or less turns, depending on how much natural curl there is in your hair.
When my hair is dry, I remove the rollers. Then I lift the hair at the top of my head and back-comb or brush it until there is enough teased up to give me a little "crown". next, I comb over the teasing gently until the crown looks smooth and neat. Now I comb my bangs down over my eyebrows and, holding them lightly, flicks the ends up so that I get a curved line (which is very flattering to the eyes).
Finally, I carefully comb the sides and ends, also flicking the bottoms up all the way around. The final move is to spray my hair thoroughly with a good, light hair spray. This holds it in place without getting it all gooey.
If you have trouble with this hair style, don't despair. Please keep trying and soon you will learn how to do what is exactly right for you and your hair type. Good luck!
Next month in the November issue of 16 Magazine, I am going to tell you my basic "face make-up" secrets. How to get that "pale look" and how to do your lips so that they look natural, but have a pretty sheen. Be sure to get the November issue of !^. It will be on sale September 21st.
--- --- --- --- --- --- --- ---
 |
 |
IN THE PAST two issues of 16, I have tipped you dollies on how to apply eye make-up and how to do your hair - if it is long. If you missed either of those two issues (September and October), turn to Page 65 and you will find out how you can order them through 16 Magazine.
Now it's time to talk about your face - it's care and beauty treatment. First off, you all know that cleanliness if a prime requisite when it comes to having a pretty face. Many of us have skin problems from time to time, and may require special creams or medicates manke-up to keep those pimples from "bubbling" up. Serious skin problems, such as acne, should be treated by a doctor. Oily skin and blackheads can be combatted on a personal level by washing your face at least twice a day with a mild soap (rinse thoroughly), and by watching your diet. Foods that invite pimples and oily skin are soda pop, fried things, chocolate and coconut. Just about all the things we really love, eh? Well, if you want to have pretty skin, you just may have to make a few sacrifices.
A girl with normal skin should not wear make-up. It looks silly on a young teener, and the biys can't stand it. here is what I do:
My skin is too fair for a foundation cream so I use only a little on my lips. I sort of make them the color of my face - and I'll tell you why later. if your skin isn't even colored and fair, you may use a light foundation. You can buy good ones in the dime store. Drop a drop or two on the inside of your wrist right there in the store and see how well it blends with your skin tone. After a bit of testing, you will surely find one that seems right for you.
Apply very little foundation to each cheek (with clean hands) and blend into your skin with gentle upward motions of your fingertips. It will take a little practice, but if you try you will soon have it down pat. If your skin is too oily for a foundation, I suggest a light powder or a fine coat of pancake make-up. This is put on with a damp sponge and should be exactly the color of your skin, so that it won't look like "make-up".
I have a roundish face, so the next thing I do is try to elongate my cheek lines. I have a large rouge brush which I lightly twirl in blush rouge and then gently dust some along each cheek just above the jaw bone. This gives the illusion of having a thinner, better-shaped face.
Now let's get back to the lips. After eyes, this is the first thing a boy notices about a girl. As I told you before, I put natural foundation on my lips. Then I take a moist natural pomade (you can buy it in tubes or in the jar) and lightly tap it on my lips. This makes them look completely natural, yet shiny. If I know I am going to be in a place where the lights are dim, I may use a little of the lightest pink lipstick I can find. Anything else looks ghastly on me.
As I said before, each of you will have to experiment a bit as you wrk out your own make-up problems. It's well worth the go, you know - and I wish you the best of look and lots of beauty!