
The Oberheim MS-1A Mini-Sequencer is a simple 8 step sequencer, which is a an integral part of the Oberheim 2 Voice system.
Unfortunately, a lot of internal functions are not connected to the outside world. :-(
Here is a suggestion for an external patchboard to complement the Mini-sequencers functions left out.( the dimensions are the same as the Mini-Sequencer)
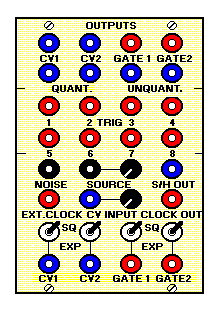
Mini-Sequencer MS-1A Patchboard Lay-Out
Hereabove is a suggestion of a patchboard lay-out using Banana jacks .Iin order to differentiate between AC and DC signals, all Banana jacks use the standard color code used in Serge and Buchla equipment.
Black Banana Jacks = AC Audio signals
Blue Banana jacks = Control Voltages DC signals
Red Banana Jacks = Gates / Triggers
This is a list of the I/O Pin Assignments on the PCB itself : In most cases, you 'll have to solder a wire to a given point on the PCB or solder/connect a Molex male connector to its equivalent female connector
.(Note: Pin 1 is always at the beveled edge of the Molex connector!).
From the Top of the Patchboard :
Function Mini-Sequencer Molex Pin Number (Color) / PCB patch points.
CV1 output C1 (Orange) (*)
CV2 output B1 (Red) (*)
GATE 1 output C3 (Orange) (*)
GATE 2 output B3 (Red) (*)
SEQUENCE 1 OUTPUT (Quantized) A1 (Brown)
SEQUENCE 2 OUTPUT (Quantized) A3 (Brown)
SEQUENCE 1 OUTPUT (Unquantized) I1 (Brown)
SEQUENCE 2 OUTPUT (Unquantized) I3 (Brown)
TRIGGER OUTPUT STEP 1 N5 (output LED 1 on PCB)
TRIGGER OUTPUT STEP 2 N1 (output LED 2 on PCB)
TRIGGER OUTPUT STEP 3 O5 (output LED 3 on PCB)
TRIGGER OUTPUT STEP 4 O1 (output LED 4 on PCB)
TRIGGER OUTPUT STEP 5 N7 (output LED 5 on PCB)
TRIGGER OUTPUT STEP 6 N3 ? (output LED 6 on PCB)
TRIGGER OUTPUT STEP 7 O7 (output LED 7 on PCB)
TRIGGER OUTPUT STEP 8 O9 ? (output LED 8 on PCB)
NOISE OUTPUT G1 (Grey)
SAMPLE & HOLD SOURCE INPUT (connect to 50Klin Pot input, then wiper output to Molex G3). Don't forget Grounding!
SAMPLE & HOLD OUTPUT F3 (Blue)
EXTERNAL CLOCK INPUT H1 (White)
EXTERNAL CLOCK CV INPUT (connect to a 50Klin Pot input, then wiper output to Molex H3). Don't forget Grounding!
CLOCK OUTPUT F1 (Blue)
EXT.CV1 INPUT (Keyboard CV 1) : solder the Banana jack input to the middle lug of an ON/OFF/ON DPST toggle switch , then solder the lower lug to Mini-Sequencer Molex E1 (Green) on the PCB. (**)
EXT.CV2 INPUT ( Keyboard CV 2) : solder the Banana jack input to the middle lug of an ON/OFF/ON DPST toggle switch , then solder the lower lug to Mini-Sequencer Molex D1 (Yellow) on the PCB. (**)
EXT. GATE 2 INPUT (Keyboard Trigger 2) : solder the Banana jack input to the middle lug of an ON/OFF/ON DPST toggle switch , then solder the lower lug to Mini-sequencer Molex D3 (Yellow) on the PCB. (**)
Note:
(*)
1) connect also CV1 output internally to Molex connector B1 and B3 (Red) on the first SEM PCB ( these are VCO1 and VCO2 CV inputs on the Expander module itself).
2) connect also CV2 output internally to Molex connector B1 and B3 (Red) on the second SEM PCB.
3) connect also Gate 1 output internally to Molex connectors X2 and X3 (Green) as well as Y2 and Y3 (Green) on the first SEM PCB: (these are the Gate/trigger inputs of ENV 1 and ENV 2 on the Expander module itself) .
4) connect also Gate 2 output internally to Molex connectors X2 and X3 (Green) as well as Y2 and Y3 (Green) on the second SEM PCB.
5) Finally ,connect Molex connectors B2, C2, F2, G2 (and the GND terminals of the two Pots) to Ground!)
(**)
If you wish, , you can use the upper lugs of the four ON/OFF/ON DPST toggle-switches on the Patchboard to connect - in parallel - the two External CV/Gates directly to the Expander modules themselves. In this case, you will have the choice to bypass the Mini-sequencer internal ON/ON/ON routing switches (the DPST switch on the patchboard should be set to the lower position).
![]()
