A BIT OF HISTORY :
In the mid 60's, Robert A. Moog discovered that the gain of an amplifier could be controlled by a DC voltage: the VCA was born. Taking into account the design similarities between an Amplifier, Oscillator and Filter , there was no reason to believe that a VCO and a VCF couldn' be constructed as well. This major discovery was going to revolutionize electronic music production for the years to come, for it was now possible to construct a musical synthesizer entirely Voltage Controlled by DC voltages.
Around the same time, American composer and pianist Walter ("Wendy ") Carlos , was looking for a new technology to enhance his musical performances. Eventually, W. Carlos met Bob Moog, and asked him to develop an electronic instrument, using standard keyboard keys, which could synthesize new sounds: The MOOG Music System 55 was born.
About the same period, Berkeley' legendary 'electronic wizard' Don Buchla, while experimenting with electronic circuitry, discovered that a clock used in conjunction with an Up Counter could drive a step voltage generator to produce a series of independently adjustable control voltage steps, one after another, sequentially : The Sequencer was born.. Morton Subotnick, who at the time was first clarinettist to the 'San Francisco Symphony Orchestra', was also looking for ways to exploit electronic sounds in his compositions. Eventually, the two met and Morton Subotnick asked Don Buchla to build him a VC synthesizer,without a keyboard ,but with a Sequencer-Touchboard : The Buchla 100 was born..
The rest, as we know, is History...
VOLTAGE CONTROLLED AMPLIFIERS (VCA):
In Electronic Music Studios, the VCA is a very common device.. Many VCA's have two audio inputs : the "inverting input " (which causes the signal to be multiplied by -1 times the gain of the amplifier), and the + Audio input, called "non-inverting input "(which causes no inversion : the signal is multiplied by +1 times the gain of the amplifier). Some VCA's even provide two outputs : a signal appearing at one output equals the signal appearing at the other output by -1 (such a VCA is said to have differential inputs and outputs. (see figure 9 ). It should be noted that with this VCA, summing the positive and negative outputs together would make the signal disappear altogether... Indeed ,according to the theory : two signal appearing exactly at 180° out of phase cancel each other respectively.

The most commonly used VCA's are capable of linear and exponential CV input versus amplifier gain characteristics (the gain of a VCA is proportional to a voltage applied to its control input). In the linear mode, the CV versus gain is A = k . v c , where A is the voltage gain ; k is a constant and vc is the control voltage. In the exponential mode, the CV versus gain characteristic is A = k v c (see figure 10).

VOLTAGE CONTROLLED OSCILLATORS (VCO):
The heart of an analog synthesizer is the Voltage Controlled Oscillator (VCO) : it is the most common source of audio signal used in emusic. In general, analog synthesizers have at least two Audio VCO modules and one Low Frequency Oscillator (LFO), most have three VCO modules all operate in the Audio and sub-Audio frequency range.
A typical VCO module provides simultaneous types of waveforms at its outputs : the most common waveforms are Sine, Square, Triangle and Sawtooth (some synth even provide inverted /non-inverted sawtooths) .Most of the time, a VCO is also equipped with a Synchronization (Sync) output. Likewise, a typical VCO also provides simultaneous CV inputs : a 1Volt/octave input used in conjunction with a Keyboard or Sequencer CV output, a Frequency Modulated (FM) linear input (with attenuation potemtiometer), an Exponential input (with attenuation potemtiometer), a Pulse Width Modulation(PWM) input and a Synchronization input. (It should be noted that the 1Volt/oct and Sync inputs do NOT have an attenuation potemtiometer at their respective inputs).There is also a Master potemtiometer (or graded Vernier) which controls the oscillator Master Frequency. On some systems there is an additional 'Fine Tuning' potemtiometer for discrete adjustments of the Fundamental frequency .In most cases, a High /Low mini toggle-switch is used to select the frequency range : the Audio range, from 20 Hz to 10.000 Hz or 10 KHz and the sub-Audio range , from 0.01 Hz to 20Hz.(LFO) (see Figure 11).
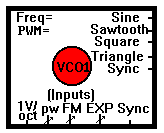
(Figure 11
Experiment 1:
But, before we can have fun, we need to find a simple controller to send a DC voltage to the VCO and VCA. We don't have any? Let's build a simple DC foot pedal...(see figure 12).

(Figure 12)
Go to the attic and find an old inoperative "wawa pedal " : strip the pedal off of any old printed circuit board ,but leave the potemtiometer intact as well as the 1/4" output jack. Clean the potemtiometer of any dust and carbon particles and look at the three contacts facing down: the Left contact is the Input, the Middle contact (wiper) is the output and the Right contact is Ground. Take a +9V battery and solder the Red wire(+) to the Left contact of the potemtiometer and the Black wire(-) to the Right contact of the potemtiometer (Ground). After that, solder a wire from the Middle contact (Output) of the potemtiometer to the 'hot point' contact of the 1/4" jack and another wire from the Right contact of the potemtiometer to the "Ground "contact of the Jack.
Voila! We have made a DC foot pedal that we can use for Voltage Control...
Patching:
1. Take a patchcord and patch the Sine output of a VCO into the (+) audio input of a VCA. Turn the gain potemtiometer of the VCA fully clockwise ( full gain) and listen to the sound while you move the VCO frequency potemtiometer up and down. (see Figure 13). Do the same with the other waveforms and write down your first impressions of the sound characteristics of each waveform.

Now use the DC pedal you just constructed and patch the 1/4" jack output of the pedal to the 1V/oct input of the VCO (see Figure 14). Each time the Pedal is pressed, a discrete DC voltage will control the frequency of the VCO. Learn how to play a melody with your foot : "Frère Jacques" will do ... In no time,You will have the 'feel' of the pedal's sensitivity...

Now reduce the gain of the VCA to mid-point (12 o'clock position) and patch the 1/4" jack output of the pedal to the VCA Linear input. Connect the VCO sawtooth output to the VCA (+) Audio input . Each time the DC pedal is pressed down , a discrete DC voltage will open the VCA :you can now control the Gain i.e "Loudness" of the VCA with your foot...(see figure 15)
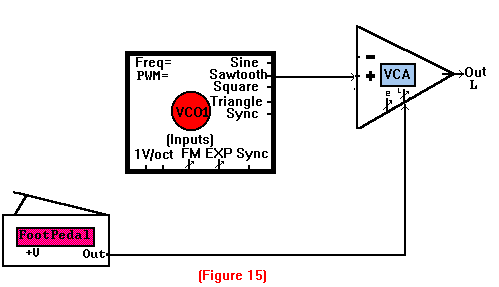
ANALOG DC JOYSTICK
A X-Y analog Joystick is a combination of two 100K linear potemtiometer controlled by only one shaft: the joystick moves horizontally along a X axis and vertically along a Y axis: the amount of DC voltages sent to the input of the X-Y potemtiometers are controlled by two external potemtiometers; and the polarity of the input DC voltages (+/-) for X-Y can be toggled by two external mini switches.

Patching :
Use a X-Y analog Joystick (or any other device delivering two +5V DC voltages): adjust the X-Y polarity to + and the range to 5V (5 octaves). Now patch the Joystick X output to the 1Volt/octave input of a VCO and the Joystick Y output to the linear input of the VCA.. Each movement from Left to Right along the horizontal axis (X) will increase the frequency of the VCO; each movement from Down to Up (Y) will increase the gain of the VCA. You can now control two parameters in real time : Frequency and Gain...(see Figure 16)
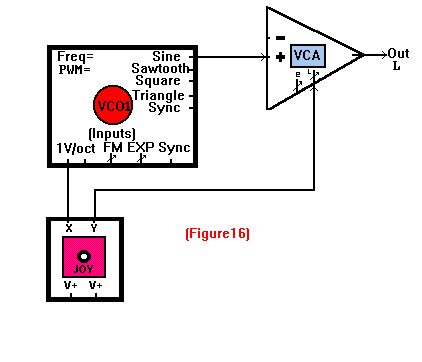
Using a an external mini-switch ,toggle the polarity of the (Y) axis to -5Volt and set the range of the X axis to +1 Volt (use the external attenuation potemtiometer): each movement of the joystick from Down to Up along the Y axis will decrease the gain of the VCA ; each movement of the joystick from Left to Right along the X axis will increase the frequency of the VCO but limit its range to one octave only.Explain Why?
Continue to experiment for a while, with different setup of polarities and ranges...
FREQUENCY MODULATION
Frequency Modulation (FM) is the process by which the frequency of a signal called "carrier" is varied in accordance with changes in the frequency of another signal , called "modulating signal". With FM the amount of change of frequency of the carrier signal is also dependent on the amplitude of the modulating signal. The modulation index ,also known as deviation ratio, is the peak difference between the instantaneous frequency of the modulated wave and its unmodulated frequency (carrier frequency). For example, if a 2000Hz sinuzoidal carrier is frequency modulated by a 100Hz sine wave, the carrier will swing from 2000 Hz to 2200 Hz*, back to 2000Hz, down to 1800Hz *and back to 2000Hz during one cycle of the modulating signal. In this case, the modulation index is 2.
Note, that this swinging back and forth of the carrier by 200Hz * is due to the frequency of the modulating signal (100Hz) multiplied by the modulation index "strenght" or deviation ratio(2)= 200Hz variation.
As with any modulation, FM produces sideband pairs spaced , more or less, symmetrically on both sides of the carrier at integral multiples of the modulating frequency.(see Figure 17).
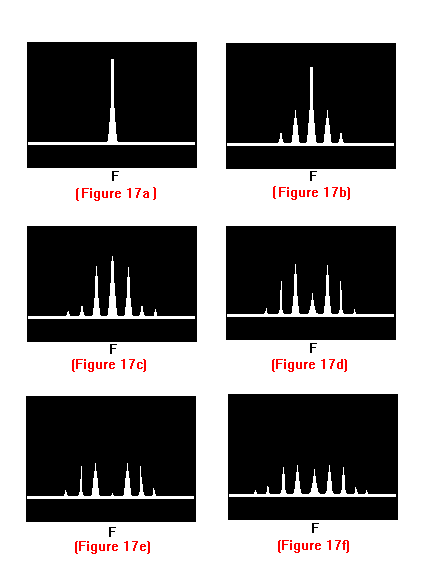
Now look at Figure 17a : there is only one Carrier Fundamental frequency (F) and no sidebands , because there is no modulating signal. As you increase the modulation index, by turning the FM input attenuation potemtiometer clockwise, the modulating signal gathers strength and lower and upper sidebands are appearing symmetrically on both sides of the carrier fundamental frequency.(see Figure 17b). As the index of modulation rises, the fundamental frequency sinks in and the upper and lower sidebands rise up (see Figure 17c and Figure 17d). When the index of modulation reaches a certain point (about 75% of the potemtiometer's range), the fundamental nearly disappears and the sidebands are prominent(see Figure 17e). Finally, when the index of modulation is at the maximum, the fundamental reappears : notice, that the fundamental and the upper and lower sidebands have now, more or less, the same amplitude level (see Figure 17f).
Patching
Set the frequency of VC01 sine waveform to 880 Hz (A5) and patch the output to the (+)audio input of a VCA (full gain).Then, patch VCO2 sine waveform output to the attenuated FM input of VCO1: set the (LFO) frequency for a perfect vibrato i.e 7Hz or 7 beats per seconds. (see Figure 18). Now open VCO1 FM input potemtiometer fully clockwise (high modulation index) and listen to the sound . If the settings are correct,you should hear the shrill sound of an Ambulance passing by.(Notice the strength of modulation of the modulating signal)
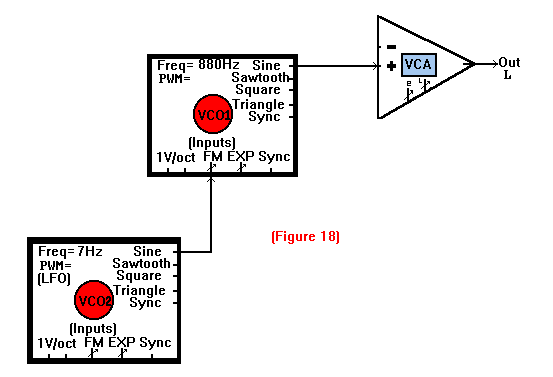
Now, reduce the setting of the FM input potemtiometer to +/- 20% of its range (low modulation index : the carrier signal should now be modulated by a very pleasing vibrato. Why? Because the "strength" of modulation of the modulating signal has been radically reduced and influences the carrier 's frequency only slightly,...
Now set the frequency of VCO2 sine waveform to the audio range (toggle switch in the High position) and set it to the same frequency as the carrier i.e 880 Hz . The Fundamental frequency (F) will now become 1760 HZ( 880Hz+880Hz) and the spectrum created will contain Upper sidebands (2640Hz =the sum of 1760Hz+880Hz, 3520Hz =the sum of 2640Hz+880Hz and so on...Last but not least, the spectrum will also contain a Lower sideband of 880Hz (the original carrier 's Fundamental frequency is now a Lower sideband). By using simple FM , we have generated a range of sidebands (harmonics) which are all integral multiples of the fundamental frequency.
In general, if you need to generate very complex spectrums of sidebands in FM , the carrier's frequency and the modulating frequency should NOT be and integral multiple of each other.
Continue patching for a while, by using different waveforms , frequencies and modulation indexes.
Remember: In the case of FM modulation of an audio carrier by a LFO modulating signal, the carrier's frequency is the 'slave' of the fundamental frequency ,as well as of all the other characteristics, of the modulating signal .
To understand the FM process better, imagine that you are stretching and releasing a rubber band ,back and forth, along its X axis ...(see Figure 18a)

RANDOM NOISE GENERATORS:
The most common type of noise source used in emusic is the White Noise generator: a device which produces a signal of both random frequency and amplitude which displays equal power per unit bandwidth. The energy distribution of white noise is such that the same energy is present in the whole spectrum. (see Figure 19a)
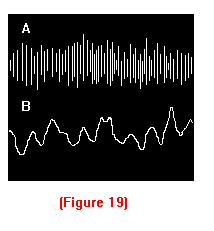
Pink Noise may be produced by passing white noise through a Low Pass Filter with a slope of -3dB/octave. Pink noise displays equal power for equal percentage of bandwidth within the spectrum. Indeed, pink noise exhibits a 1/ f noise spectrum: e.g noise power varies inversely with frequency, such that the noise voltage increases as the square root of the decreasing frequency. For example, pink noise contains equal power for any given octave. Pink noise with frequencies below 20 Hz provides the composer with a control signal having random qualities: this signal may be further processed and used to produce random rhythmic sequences or continuous random pitch changes.(see Figure 19b)
Red Noise, also known as 1/f 2 noise, is generated by passing white noise through a highly selective BP filter which produces a signal of determinate frequency but random amplitude (narrow band noise). This narrow band noise is useful both as an audio or control signal.
Patching:
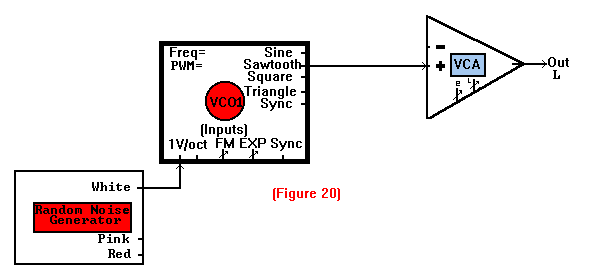
Patch the output of a White Noise generator into the 1V/octave input of a VC0. Now connect the sawtooth waveform output of the VCO into the (+) audio input of a VCA with full gain (see Figure 20): listen to the richness of the sound ,while you turn the Master Frequency pot of the VCO up and down. Repeat the procedure with other VCO waveforms (sine, square, triangle) and listen to the differences in noise Timbre (colours).
Now patch the output of a Pink Noise generator into the 1 Volt/octave input of a VCO. Connect the sine wave output of the VCO into the (+) audio input of a VCA with full gain.(see Figure 21).

Turn the VCO Master Frequency potemtiometer fully clockwise (+/-10Khz): you should now hear a sound similar to water coming out of a leaking Pipe... :)
Now, turn the VCO Master frequency potemtiometer to its mid-position : you should hear a sound similar to the sound made by an egg fried in Butter... :)
Finally, turn the VCO Master frequency potemtiometer to about 25 Hz : you should hear the sound of molted lava coming out of a Volcano.. :)
Questions :
1. Explain why there are two Schools of thoughts in analog synthesis: which one did influence synthesizers design predominently? Explain why some composers find it regretful?.
2. How many axis does an analog DC joystick have? What is the usual range of a DC joystick used in emusic? Explain why the selection of the polarities of each axis is important.
3. What effect does altering the frequency deviation index have on the spectrum of a FM carrier wave?
4.. How many sidebands are present in a FM process? Where are they placed on the spectrum?
5. How many kinds of Noises are useful for emusic synthesis?: describe each one in detail.
END OF CHAPTER 2
To order the complete 10 Chapters of this tutorial, send an email to:
Back to Chapter 1