
What is an overlay? It's easier to show than explain. Remember the example on the first page? If we were to use that image to create a one image lake applet, we would most likely crop the top half of the image and scrap the bottom half with the "still" water. Click HERE to see what that lake applet would look like. Hey, not bad, right? But we want to use the entire image to show the stream flowing. Sooo, we keep the top portion handy but fetch up the bottom part that we scrapped. We bring that image into our graphics program and "cut out" the still water. Click HERE to see what that would look like. Now, all we do is take that image and "overlay" it on top of the lake applet we just looked at. The gray you see on the overlay image is made transparent so that the "lake" will show through.
Got the basic idea? This tutorial will show you exactly how to do all this. Let's start by picking our transparent color and cropping off the top. Look at the screenshot below....
|
|
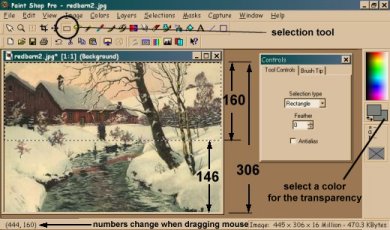
Before we do any cropping, we must choose a color that we want to be transparent when the overlay is complete. The color must be different from any portion of the remaining overlay image after completion. Going back to the overlay image we just looked at, you'll see we chose gray. White would have been a lousy choice because of all the white in the image. Click HERE to see an example of what happens when you choose a color close to what is on the image. Notice the blotches and some areas where the applet is showing through.
To choose your color, look at the screenshot above. See the 2 boxes that I am pointing to with the note "select a color.."? The box in front would be the foreground color and one behind the background. More on those later but for now, left click on one to bring up the color palette and click on the color that you decided on. Do the same with the other box. NOTE: If you are using a gif image, you'll have to increase the colors from 256 to 16 million. You'll know right away that you aren't using 16 million because your palette will show a limited amount of colors. Go to the menu bar, click on "colors," then "increase color depth" by "16 million colors." No image should be edited in PSP unless the color depth is 16 million.
Ok, let's crop off the "top" for our applet. Use the screen shot as a reference. From the tool bar in PSP, click on the "selection box." I have it circled. You should also see the "control palette." If you don't you'll need to "toggle" it on. The "toggle control palette" is the 5th icon on the right from the lower level of tools. Also, using the TAB key toggles the palette off and on. From the control palette, choose "rectangle" under selection type and "0" under feather. Leave the antialias box unchecked. Now, slide your mouse cursor across the image without clicking. Look at the bottom left of your screen and you'll see 2 numbers changing as you slide the mouse. The number on the left is width and the right is height. Slide your mouse to the top left of your image until you see a 0,0 starting point. Click and hold your left mouse button from that point and start moving the cursor down and to the right. You'll want to cover the entire width of the image, but stop lowering when you get just above the point where the "still" water starts. Release the mouse button. Notice the dimensions I placed on the "screenshot." The portion that I am cropping is 160 pixels in height which is larger than the bottom portion I am leaving behind which is 146. ALL my overlays are done this way and I have lots of trouble if the lower portion has a larger height than the upper. Keep that in mind when choosing your images. To "crop" our selection, either hold down the "control" key on your keyboard and click on "X" or go to "Edit" on the menu bar and choose "Cut." See the "gray" you left behind in the original image? That is dictated by the "background" color we chose earlier from the color palette. Now, to paste in our new "top" image, either use "Control" + "V" from the keyboard, or "Edit" and "Paste as new image" from the menu bar. You should see something like the screenshot below. Save your cropped "top" image as a jpg. I saved the example as "sample_top.jpg." Minimize it because we are done with it for now.
|
|
Ok... that's step 1. Let's move on to STEP 2.
|
|

