
Chains?? Probably the most neglected part of your bike is the chain. They need adjustment, cleaning and lubrication to function correctly. I prefer chains over a belt, because I can play with the final gearing for performance, by changing either the front or rear sprocket or both resulting in a perfect final gear ratio. Also, if I have a problem with a chain on the road, a chain can be changed quicker and easier than a belt!
Most chain companies recommend chain replacement when chains become stretched 1-1/2 inch for non o-ring and 1 inch for o-ring chains. Twenty links of 530 chain measures 12-1/2 inches. If it measures more than 12-11/16ths it needs to be replaced. When chains wear out and need replacing, do you have any idea what size, quality and how many links? How many links is easy, count the rollers or pins to get your number. An easy way is to start at the connecting link or get some white liquid paper and mark a link, then start counting.
Different motorcycles use different size chains based on their engine horsepower and torque. You’ll find 420, 428, 520, 525, 530 and 630 sizes in most catalogs. What do these numbers mean? The first number is the distance between links (or pin to pin from the outside) measured in 1/8-inch increments. A 4 means 4/8s, which is ½- inch, 5 is 5/8 and a 6 is 6/8 or ¾-inch. Now you know what the first numbers, 4, 5 or 6, indicate.
The next two numbers denote the width of the chain at the roller, or the roller width inside the chain plates. This measurement again is measured in 1/8-inch (.125) increments. So a 20 is 2 x .125=.250 (1/4-inch). A 25 as the last 2 is 2.5 x .125 =.3125 (5/16-inch) and a 30 is 3.0 x .125=.375 (3/8-inch). So now you should know the size denoted through the model number and how many links you need.
Now comes the quality part of this article: This is the hardest part because chains will have different thicknesses of side plates, different diameter of link pins and also different types of heat treating and steel alloys. Chain companies will have tensile strengths and some also have a life table listed in their catalog or on their Web site. Chain companies also publish recommendations regarding engine size or horsepower. Because of the different thickness of side plates and o-ring chains, the overall widths of chains differ greatly. The greater width can cause several clearance problems with primarys, transmission cases and chain guards.
These clearance problems can cause engine case destruction, paint worn off the fender or frame, rubbing the side of the tire and frames with gouged tubes. Check your clearances before there is a problem.
I could go on about sizes, but this information is available on Web sites, or has been covered in books and magazines. BUT, there's one very important fact about chains to learn. It revolves around the connecting link also referred to by some companies as the master link. Some chains use links that need to be pressed on. This type requires a special tool. Don’t try to do this yourself unless you purchase a quality tool and press the chain on correctly. Look at the picture to see the correct way to press on the chain.
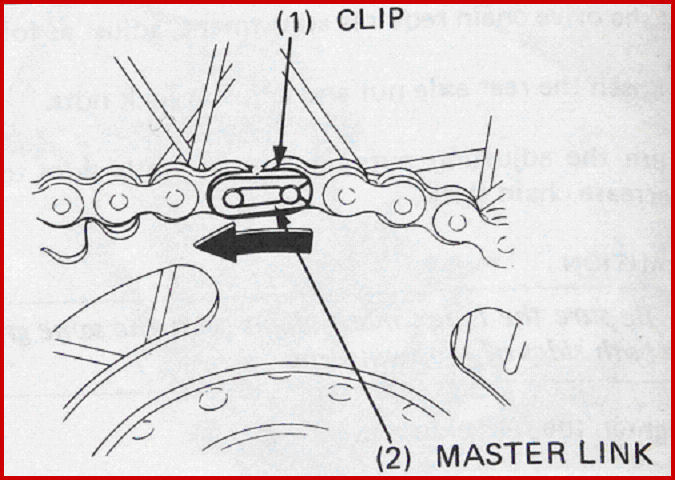
If the chain has a master link with a spring link clip, make sure you install it so the closed end of the sprung steel link clip faces the direction of the chain travel.
It amazes me how many clips are installed the wrong way. If it's snapped on wrong and comes in contact with anything, it could become dislodged, fall off and the chain could unravel and leave the rider stranded along side a deserted road to nowhere. The rider could sniffed up and down the highway for master-link components until an 18-wheeler makes road kill out of his sorry ass, or he rolls the dice with a family of rattlers and ends up with snake eyes. On the other hand, he could stand alongside the blistering road and a knockout redhead could pull up to rescue him or her. He could fall in love, destroy his marriage and his kids will hate him forever. That might not be all bad…
Make sure you master-link has the same plate size as the rest of the plates on the chain, or the shafts won't be long enough.
Because of the different sizes of chains, different overall width of links, pin sizes of different diameters, different manufacturers and different types of installation there are many master link styles available. If you have trouble on the road and need a master link, a shop may not stock the correct master- link. Don’t try to install one that has a different pin diameter or width, or the chain may come apart causing damage to the bike or even cause personal injury. So, buy an extra master link and put it in your tool bag or fasten it somewhere on the bike or key chain. Very cheap insurance if you happen to have a chain problem. This way you can fix your chain and enjoy your ride. Here's a couple of other tips regarding chains:
A chain guard is a must on any custom bike. A loose chain can cut your leg off or worse. Don't fuck around.
Master-links are delicate operations. Make sure the clip is secure in the axle slots. It's a good notion to check your chain during break-in to make sure the locking clip is still properly in place after 100 miles.
Make sure your chain is properly lubed, aligned and adjusted for the road. It's a good notion to check the adjustment periodically during your break-in period. With the advent of multiple chain sizes, sprockets must match the chains. Watch out. That cheap swapmeet chain might not fit your sprockets.
It is really too bad you don't have a skateboard. The night is approaching! Would you know what to do in this situation? What do you do? Tomorrow your goal is to locate a dealer to replace your damaged tire, but what happens in the meantime? Should you perform an "Emergency Temporary Repair?"
I personally do not believe in repairing a tire. My well-being is much more important than the price of a tow truck and a new tire. Yet I realize and have been faced with the dilemma above and will offer a few suggestions. Again, this is only a temporary repair until you can reach a reputable dealer.
This is what would be termed an "Emergency Situation." First things first. You will need to evaluate the tire. Is the damage/hole less than ¼-inch in diameter and in the center portion of the tread, not the sidewall? Is there more than 1/32- inch of tread remaining on the tire? The main problem with a damaged tire, that is still mounted on the rim, is the fact that you cannot see the entire damaged portion. There is always a possibility more damage occurred than what simply appears on the outside of the tire.
If the damage appears to be more extensive, please call a tow truck immediately. There are several types of repairs available for tubeless tires, external and internal types. This message will stick to External repairs which match best with our scenario outlined above. The middle of nowheresville trip.
Most motorcycle accessory dealers carry Tubeless Tire Repair Kits. They are offered through most all major motorcycle accessory distributors, thus a motorcycle dealer can easily obtain one if they do not stock them. Stop & Go International calls one product "Tire Plugger". This kit consists of a spring gun, probe tool, nozzle, 25 plugs, lubricant, tools, and instructions for use. The only tools, besides the ones provided, you will need are a razor blade, pliers, and some CO 2 cartridges or a small travel size (read micro bicycle pump).
Essentially this kit uses a "mushroom" plug, instead of straight plug. Make sure you follow the instructions of use included with the tire repair kit. Take it easy on your temporary repaired tire. Get to a dealer as soon as possible to replace this temporary repaired tire.
Balancing tires Balancing is always a consideration after repair or replacing a tire. Talk about a balancing act. A few ounces can really affect the handling of your bike so mounting and balancing a tire correctly is important.
When mounting a new tire begin by making certain the rim has been thoroughly cleaned. It may require a wire brush. If you leave the speck of old rubber, rust or dirt (even as little as .04 of an inch) the result may be a variation force of 11 lbs. And this may cause motorcycle tires to wobble. Next, lubricate the tire and rim to allow the new tire to seat itself. Lubricating the tire is not done just to help you get the tire on the rim. Lubrication allows the tire to seat itself.
Trying to mount a tire without cleaning the rim and lubricating the beads is like trying to put on a dry sock over a wet leg; you can't get the darn thing straight; it doesn't line up; all the ribs are crooked. Now some people don't care if the ribs on their socks are crooked but at Avon we happen to like ours straight.
If you try to mount a motorcycle tire without thoroughly lubricating both beads you stand a good chance of mounting it "tweaked". This is because when the beads first come in contact with the rim, there's tension. If the beads don't slide back and become comfortably seated they will be straining to get straight for the rest of the tire's life. This may cause wobbling and lower mileage so make sure that both beads are thoroughly lubricated with a good commercial lubricant. Soap and water may also be used but be careful in applying so you avoid getting soapy water inside the tire. This may cause the tire to become imbalanced and may also promote the rusting of steel rims.
Also water trapped inside the tire will turn to steam when riding, affecting tire pressure and performance. I strongly recommend against putting sealant and/or balancing fluids in a tubeless motorcycle tire. They tend to mask damage done to a tire by a penetrating object. These fluids continue to fill puncture holes until the object may suddenly be thrown out which may lead to a dangerous blow out. And with the kinds of heavy loading we're getting these days on motorcycles the risk is of concern.
Balancing new tires is also very important. 1.8 ounces of imbalance will result in 110 lbs. of variation force at 80 mph. That may cause a lot of wobble and 1.8 ounces of imbalance is not so uncommon with some manufacturers' tires. Always have tires balanced at a dealership. Computer balancers are state of the art and you should take tires to places that have them. All tire manufacturers mold a thin line around the sides of each tire close to where the tire meets the rim. This rim line is to help the mechanic determine if the tire is properly seated. Be sure this line is parallel to the rim all the way around on both sides of the tire. If it is not, you must relubricate the beads and try again. After mounting any new tire, remember that new tires need to seat themselves properly and get scrubbed in so take time to break your tires in just like you would with a new pair of shoes.
Also bear in mind that often a wheel by itself can be out of balance. It's a good exercise to balance the wheel first so that an out of balance problem is not incorrectly blamed on the tire.
Follow these tips and achieve the right balance in your life
