
The Caboose gets its wheels.Now was the time to give the Caboose the wheels that I had envisioned. The aluminum wheels on the Doghouse were cool, but the ultimate would be the same wheels as on the 6000 tow car. By the way, youre probably wondering why I didnt match the trailer to the color of the car. Well the white trailers just looked kinda cheap. I liked the rich color of dark blue much better, and the aluminum trim and wheels look better against the dark blue. At least they do to me.Well after some searching, I found the wheels I wanted a good price. $25 a piece (too bad they only had two or I would have gotten a third for a spare) at a local junkyard. The clearcoat was peeling pretty bad, so I looked up a web page on how a guy refinished his Fiero wheels for almost nothing. I printed it and followed it, and my wheels turned out very nice. A winter's worth of road salt later, they are still just as nice. Now it was time to figure out the wheel mounting. I took several measurements, and concluded that I would need 1" thick wheel adapters to compensate for the difference in both wheel offset and keeping the wheel inside the fender but away from the suspension arm. I priced adapters at $100 a piece. I also found non-hubcentric adapters at $50 a piece. I wouldnt go with anything less than hubcentric adapters. The hub needs to carry the load. Using the studs to carry the load is poor practice in my book, and is just asking for problems. $100 each was a bit steep for me, so I decided to make my own adapters at work. After asking nicely and putting my plan and machine knowhow upfront, they didnt have a problem. Thats one thing I like about working there, theyre usually really cool about stuff like that. It took me a week's worth of late nights to get the adapters done, but I think it was well worth it. When I was done with the adapters, I had the tires changed over and I mounted the new wheels on the trailer. What a difference. They even rolled smoother since they were hubcentrically mounted now. One thing I had to take into consideration now was possible weight limitations. I could not find a weight limit on these wheels, so I took the GAWR from a coworkers Trans Sport with the same wheels. Turned out to be 2600#. The trailer's GVWR was 2980#. Properly loaded with proper tongue weight, the axle load would be about 2600# max anyway. Not like Ill ever pull that much with my car anyway, but good to know if anyone ever borrows it. Beelman Trucking Company, please stay clear of this trailer!! :-)
|
 Wheels as from the junkyard.
Here are wheels in similar condition as those that I picked them up from the junkyard. Pretty corroded and the clearcoat is peeling off. So I followed the webpage advice and bought a large plastic bin from Walmart, fine-grit sandpaper, and a sanding block. I wetsanded the wheels in my living room in the bin to remove all the clearcoat and all the factory machining marks. I made sure to keep the motion concentric with the wheel. I decided to not go with the polishing step, so I stopped after using 600 grit sandpaper. I wanted the wheels to have a brushed aluminum finish, not a chrome-like finish. I didnt re-clearcoat them either, but I applied several layers of wax. Theyre on their second road-salt winter and still looking like the day I put them on!
|
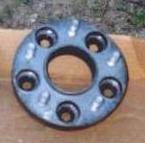 Wheel adapters
Here is a picture of one of the wheel adapters that I made. Looks just like one of the adapters you can buy, but mine are better. Mine are made of steel instead of aluminum. Reducing unsprung weight to boost performance is not really a concern of a trailer. Notice that mine are also hubcentric. I machined them to within +/- .002", so with the wheels balanced, the trailer rides smooth as silk.
|
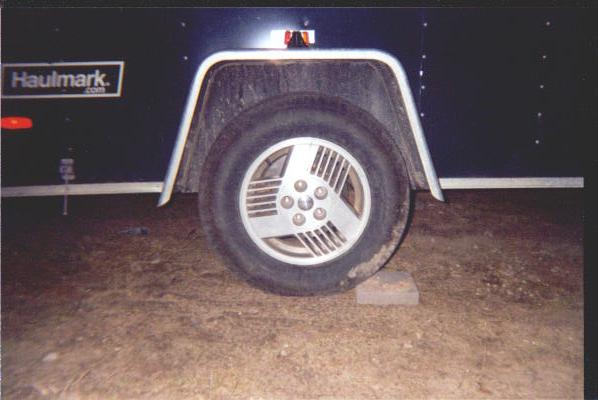 Wheels installed
Here is a view of one of the wheels installed. The center caps are sink sprayer hole covers from a hardware store. I also added chrome lugnuts to complete the package.
|
