PHOTO IMPACT 7/TUTORIAL 2
By: Spicey


You will need the filter Graphics Plus and the fonts Batman Forever and LainieDaySH
Increase the AV and BG images to RGB True Color by clicking on Format in the top task bar, scroll down and click on Data Type, then click on RGB True Color.
To colorize your av, click on Format on the top task bar, then go to Color Balance, when that box opens, click on the bottom right square once, top right square once and then the middle right square once, click OK to apply. Your av should look like the av below.

Copy the bg and paste onto the av as an object, right click on the bg, click on Properties and increase the transparency to 35, click ok. Erase the bg so that the girl shows. Right click again on the background, go to Properties again and decrease the transparency to 0, click ok then merge all.
Next click on your Selection tool and choose the Lasso tool as shown below.

Completely enclose the girl on the av.

Now go to Effects, scroll down and click on Magic, next click on Light and click on Options and use the settings below, click on the light color box to change the light color to R 253, G 238, B 253, then click OK.

While the image is still floating, go to your Easy Pallet, click on Style, then click on Light, then click on Shadow and merge all.

Now go to your Retouch tool, select Blur and soften the girl in the av. Your av should look similar to the one below.

Now we’ll add lines to the av. Click on your Line Arrow tool and select Line Arrow Tool.

Change the color to R 89, G 70, B 60, mode is 3D Round.

Draw a dotted line as shown in the av.

Now go to your Easy Pallet, click on Material Attribute Gallery, click on Metallic, then double click on Steel 2 to apply the effect.

Next go to Bevel and right click on B 4, click on Modify Properties and Apply.

Click on the Border/Depth tab and change the setting for the Border to 1 and click OK.

Now right click on the line while it’s still floating, go to shadow and use the settings below, click ok.

Copy the line and paste next to the other line as shown in the av.

While the copied line is still floating, copy and paste as object and place as shown on the av. Next copy and paste the line one more time, go to Edit on your task bar, scroll down to Rotate and Flip and click on Rotate Right 90 degrees.

Copy the line that has been rotated two more times and place on the av as shown.

To erase any of the lines, you must first go to Object on your task bar, click on Convert Object Type, then click on from Text/Path to Image while the line is floating.
To select a line after already placing them on the av before merging, go to the Pick Tool on your tool bar, hold over the line until the crosshair shows and click to make it antialias.

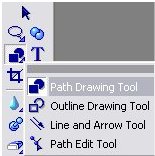
Next we will place the gears on the av. Click on your Path Drawing Tool, color is white, mode is 3D Round.


Next click on Path Drawing Tool again. Choose Custom Shape on your Task bar. In the Custom Shape Box, click on Gear Part then click ok.

Click on your av and drag until the last set of numbers in the bottom corner of your screen is W 51, H 46. While the gear is still floating go to the Easy Pallet, Material Attributes, scroll down and click on Steel 2, next go to Bevel and click on B 05. Next I applied Graphics Plus Cross Shadow, change the Intensity to 110 and the Brightness to 127, click ok. Right click on the gear, Modify Properties and Apply and change the settings to X offset 1, Y offset 7, softedge 3, click ok. Right click again on the gear, go to Properties and increase the transparency to 21, click ok. Place the gear so it looks like it is wrapped around the girl’s arm. Copy and paste the gear as an object on the av as shown. Go to Object on your task bar, click on Convert Object Type, then click on from Text/Path to Image while the line is floating and erase the gear so the arm shows. Merge all.

Now we’ll put the name on the av. I used Batman Forever, size 21, color white, 3D custom, Bold checked in the Text Box.


Next go to your Easy Pallet, click Material Attribute, Metallic, Steel 2, then I used Graphics Plus Cross Shadow, change the Intensity to 107, Brightness to 202.

Merge all.
Now change your font to Lainie Day, size 21, color white, 2D Object.

Go to Material Attributes in your Easy Pallet and click on Realistic, then click on Wood 2. Right click on the text while it is floating, scroll down and click on shadow, change the settings in the Shadow box to: X offset 2, Y offset 4, soft edge 3, click ok, and merge all.
Next go to Format, Color Balance, then click on the top middle square once, bottom left square once, then the middle right square once, click ok. Add your own magic and you’re done.

TUTORIALS/PREPAINTS


