
 |
Kynnabaria |
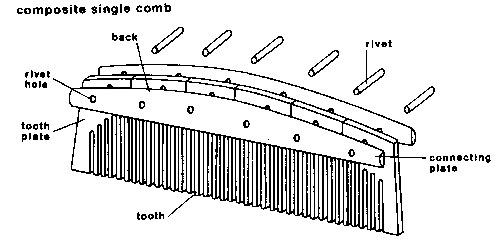
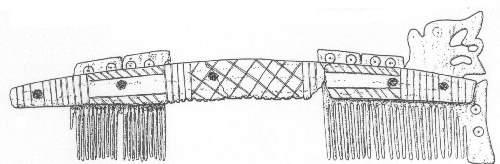
The comb is a composite single comb, meaning it is made of more than one piece and has teeth only along one edge. While double sided combs and simple combs have been found in Viking Age graves, this construction is most commonly associated with Norse culture. The drawing below should save several thousand words relative to the comb construction:
I chose elk (the American version) as my best approximation of European red deer. The most common material for combs at Birka was moose, although a substantial number were of red deer and one even had bronze connecting plates. Other materials are represented in different places and times: a comb from Stöng, Iceland was made of walrus ivory, a double comb from Greenland was of caribou antler, and there is some indication that later combs used bone. Note Birka was abandoned in the mid-tenth century, so any later inventions would not be represented.
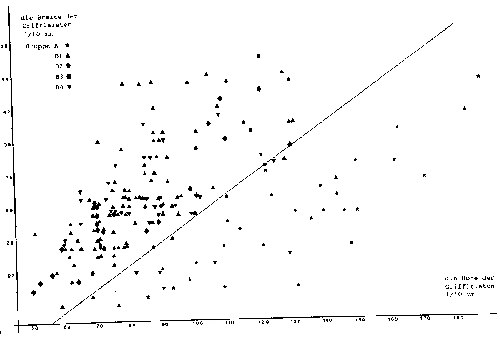
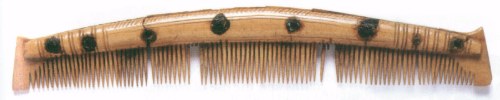
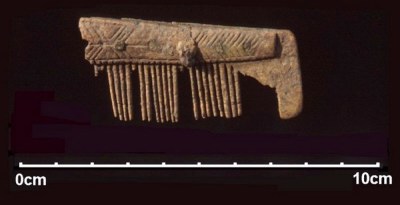
I targeted 13cm long connecting plates; documented comb lengths range from 10cm to 22cm (see the Icelandic comb below). At Birka, connecting plate height varied between 5 and 19 mm; thickness varied between 1.8 and 5mm. I targeted 5mm thick connecting plates. A distinguishing feature resulting from Ambrosiani's work is that type B combs' connecting plates are significantly more "circular" in cross-section than type A. Specifically, for a B-type comb the ratio of connecting plate thickness to height should be more than 3.5. Ambrosiani's graph below compared connecting plate thickness to height by decoration type; the dividing line is a slope of 3.5 and splits the A type combs from the B type combs.
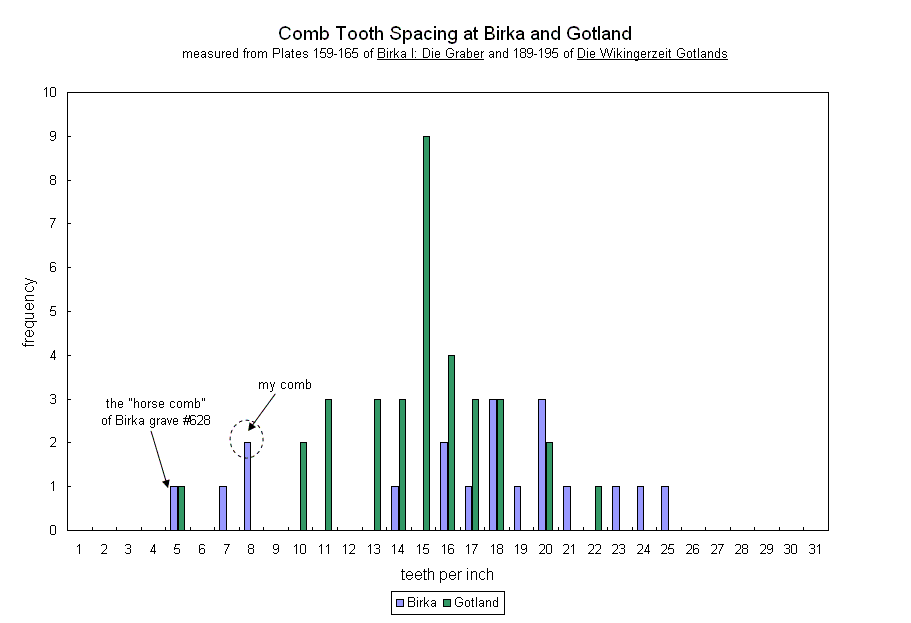
Tooth count varies wildly from comb to comb, and to a lesser degree even along a given comb (see 'extra thick tooth' below). A histogram of measurements of material from Birka suggests bimodal tooth spacing distribution. If this difference was driven by functional needs, then one possible explanation is that the fine-toothed combs are lice combs and the coarser combs are "styling" combs, or combs for untangling hair. A common suggestion in the literature is that the coarse toothed combs were intended for animals, hence the "Horse Comb" from Birka.
My measurements on combs from Gotland distributed more normally and somewhat "filled in the gap" of the Birka results. If coarse toothed combs were for animals and fine toothed combs for humans, the overlay of Birka and Gotland measurements makes it difficult to draw a line between the two. Very few of the discovered combs were represented in Birka I and there is probably more material than shown in Die Wikingerzeit; a study of all the available material might show clearer trends.
I chose 8/inch tooth spacing for reasons of durability. My wife did not need or want a lice comb, and I was not convinced that coarse toothed combs were not meant for humans- note that coarse toothed combs meant for human use are easy to find in modern stores.
I made a simple nail heading tool to form rivet heads. It worked, but I think I could have done a better job freehand.
In the Birka material bronze rivets were more popular over iron by 2 to 1; furthermore, type B3 combs were only found with bronze rivets. Rivet placement on Viking Age combs is often independent of connecting plate decoration, and placement is not necessarily symmetric or even. There are combs which appear to have been built with rivets as the primary decoration, however: on the Frojel Gotlandica CD examples include C.12661-1 and C.8055-9. I would present pictures of these combs, but then the reader might be less inclined to purchase their CD, which is well worth the very reasonable price and helps fund a fantastic project.
Rivets were not uniquely centered either on or between tooth plates, although the tooth plates at either end obviously needed a rivet hole drilled through them. The combs below demonstrate rivet placement options.
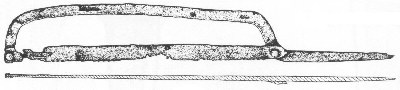
A comb from London showing a rivet through a tooth plate joint (second rivet from left) as well as one through a tooth plate (fourth from left): Note also the tooth spacing variation from left to right.
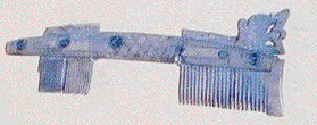
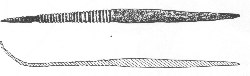
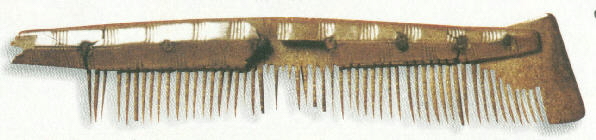
A 22cm long comb from Iceland showing a rivet through a tooth plate joint (third from left) as well as one through a tooth plate (fifth from left):
Ambrosiani defines the B3 type comb as having connecting plates decorated with ring-dot designs, in addition to any other combination of straight lines. In Ambrosiani's study curved decorative lines appear to be rare or nonexistent in comb decoration. Even on combs with knotwork motifs, the lines are straight. I chose a combination of angled and parallel lines along with the ring-dots.
There may be exceptions to Ambrosiani's classification, since graves 112 and 1015 contained a possible comb fragments decorated with a simple curvilinear patterns.
Raw elk antler (the American version, not the European animal that Americans would call a moose) was sawn into plates and roughed to size and shape with a hammer and chisel, a rasp and a sharp knife. Note that tooth plates were cut so that the teeth would fall along the long axis of the antler. Tooth plates were sized for the intended tooth spacing, and the assembly was riveted together. A combination of sawing and filing produced pointed teeth.
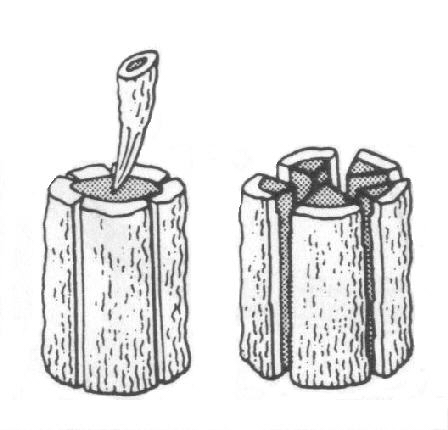
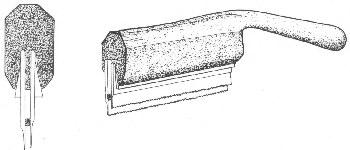
Both Ambrosiani and MacGregor have suggested that the tine of an antler was used as a wedge to split antler. The common interpretation is that the antler will be split four ways:
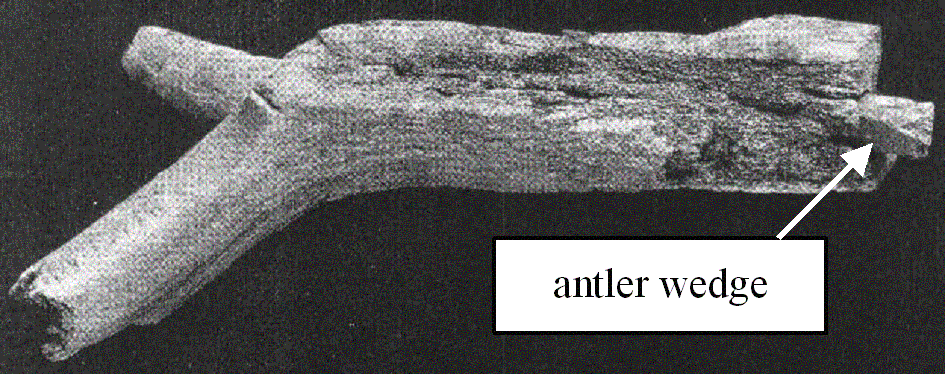
Here's a find from Hedeby that one might use to support this hypothesis:
There are several problems this this theory. First and foremost, the artisan should hope for at best two lengths of antler by this method as it is so unlikely as to be practically impossible that the antler would fall into four parts simultaneously. Ambrosiani documents Lars Lindberg's comb-making experiment, which included splitting a beam using an antler tine; Lindberg clearly expects only 2 piece and has sawn the beam accordingly. Even with four cuts as shown above the two parts with the weakest seams will break out first, and after that the wedge will then be useless.
Furthermore, this method offers very little control. The craftsperson is likely to break chips off the wedged end rather than cause the antler to fall into long, even sections.
Both Ambrosiani and MacGregor agree that the antler must be scored, with a saw for example, before this this method will work. It makes little sense that a fine craftsman would begin a cut with a saw, use it to cut through the hardest, most dense part of the antler, and then, just short of completing the cut, discard the saw in favor of a relatively uncontrollable tool like a wedge. Usually fine work progresses towards finer tools rather than away from them. In any case wedges are not very effective in soft, spongey material like the cancellous material inside an antler.
The sources agree that a saw is required to score lines to direct how the antler breaks, and clearly these have to be radial in order to be effective (ie from the outside towards the center). Note however in the photo above the cuts shave off the surface rather than cutting towards the inside of the antler. Once the antler is split, the wedge would be removed- but this piece has been worked quite a bit and the wedge is still in place.
One alternative suggestion as to the purpose of the antler tine would be that it is a fixturing point, or a hold-down spot. It gives the artisan something to strap/nail/hold onto while he's working on the antler. Like Lars Lindberg, I used a bench vise to hold parts in place. The antler tine might have provided a way for the comb maker could hold the material as it was being worked.
The tools used to create this comb: hammer, chisel, hacksaw, coping saw, rasp, file, nail heading tool, ring-dot drill, power drill (for rivit holes) and a bench vise (for hold parts).
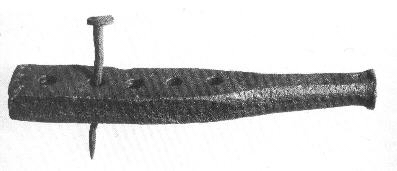
The Mastermyr find contained hammers, a hacksaw, and a nail heading tool:
hacksaw:
rasp:
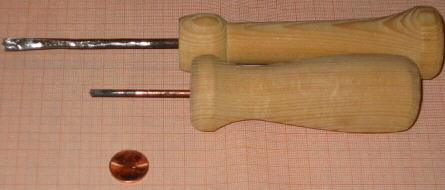
nail heading tool:
My nail heading tool was a piece of 1/8" flat iron with a hole drilled in it. When the hole enlarged during use, I hammered it smaller.
MacGregor references both a back saw and a double-edged saw in Anglo-Saxon England, gives tooth counts of 9 to 15 teeth per inch, and cut widths of 0.1mm to 2.6mm. Note the comb tooth spacing data suggests saw blades as thin as 0.5mm were in use at Birka. MacGregor also extrapolates the offset "comb tooth saw," which would maintain a relatively constant spacing and size of tooth. This was not a universally used tool for comb-making.
Nonparallel teeth and variable tooth sizes on several extant combs indicate the teeth were sawn freehand, so not every combmaker used a double-bladed saw to cut teeth. Observe the extra thick tooth, third from right below:
Although the "comb tooth saw" was not universal, there is evidence at least of single bladed saws used for cutting teeth. The teeth of the comb below were sawn freehand as shown by the squared root at the base of each tooth as well as the nonparallel & varied thickness of the teeth:
Except on combs believed to be unfinished, teeth were sharpened to some degree. Tooth plates were sized such that gaps fell at their edges- ie no "half teeth."
Ring-dot drills were believed to the be the method of producing ring-dot decoration in antler. MacGregor suggested the drill forms below:

This prompted me to make a couple of simple drills, one 1/8" and one 1/4":
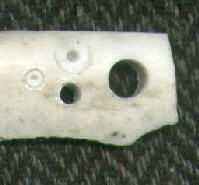
In terms of the functional tip, these drills are basically the same as spade bits available at the hardware store; furthermore, after simple tempering, the drills made amazingly clean holes. Here's a scrap of antler with ring dots and drilled holes from the same tool.
Certainly looks like spade bits were used in the Viking Age; Ambrosiani agrees.
Nonperiod tools included a bench vise to hold material during shaping (I would not attempt to make an antler comb without a bench vise), and a power drill for rivit holes (I was not willing to risk the antler parts by using my handmade drills).
