|
Welcome to another one of my custom action figure tutorials! This one is how to paint your basic set of eyes and skin tone. We’re making a Hitman action figure from the video game and using a DC Superheroes Lex Luthor head. I kinda went out of order doing this head because I didn't want too many photos of the steps. Usually you'll paint the skin tone first and then detail the eyes. Here I mixed both steps in to keep the guide shorter. Keep in mind this is only a guide and just outlines the steps and techniques I use. Your results may be different depending on the paints/tools you use and your level of skill. Remember tho, practice is the key! Study these steps and practice over and over until you achieve the result you’re looking for. Here’s a quick rundown of the paints/brushes used:
Brushes
Paints
Buy Testors Model Master acrylic paints Other paints you can use are Citadel/Games Workshop, Vallejo Model Color, and War Games paints. These need a primer coat or basecoat of Testors/P3 for them to stick properly to bare plastic however. You will also need to topcoat Games Workshop to keep it from wearing off. The Vallejo Acrylic Varnishes are excellent brush-on, clear topcoat sealers and come in gloss, semigloss, and matte. Thin these down with just a little bit of water and they can topcoat seal any acrylic paints/ Ok, we ready to start? First basecoat the head in Light flesh. We’ll be using multiple thin coats so make sure your paint is properly diluted with water, no thick paint here. After about three coats you’re ready to lay down the white of the eye and the thin black strip above it that serves as the eyelash. 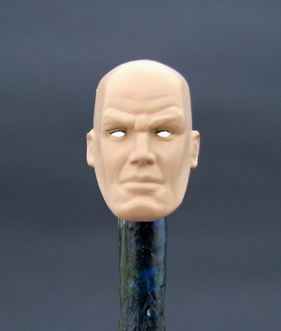 Now it’s time to paint the first step of the Iris. The common iris has a darker outer ring of the same color, or black if you prefer. Instead of trying to paint a tiny ring, paint a large iris with the top partially hidden to replicate the eyelid covering it. Since Agent 47’s eye color is blue (or at least from what I can tell of the movie poster) we’re using a base of Magical Blue for this. 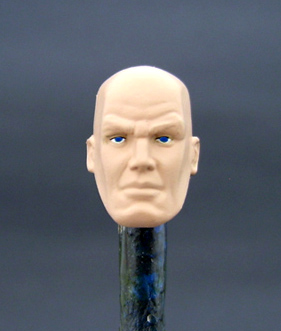 Now paint a smaller iris of the lighter Morning Blue inside the dark section leaving a little ring of the darker color showing. This step takes practice and it can be very difficult to get one iris the same size as the other. Some people use the end of a toothpick but really nothing beats a good detail brush. I’m using the Dynasty Eye of the Tiger 0/5 Round for this. But for real tiny detail like on GI Joes, snag a Reaper 30-0 or even 20-0 detail brush. 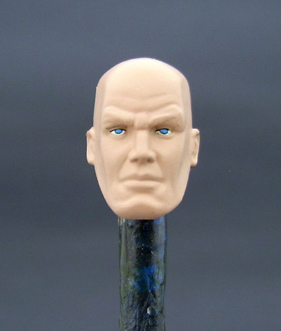 Next we’ll paint in the detail such as the pupil and the reflective dots. A small dot of flat black is added to the very center and a small white dot is placed half on the pupil and half on the iris. Keep in mind that every figure face is different and you’ll have to adjust these methods for characters with wide open eyes or other differences. Also you can make a character look in different directions with iris placement. 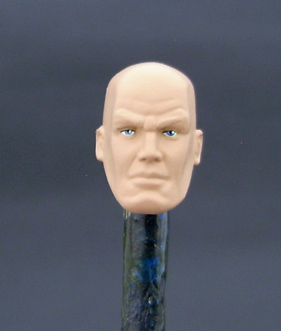 Here we’ll start the skin tone. You’ve already basecoated it in Light Flesh, now mix up a wash of Warm Flesh by diluting some with water. (refer to my previous Marvel legends painting guide for the wash technique) You’re aiming for the consistency of milk, not too thick and not too thin. Cover the entire skin surface with the wash and then DON’T TOUCH IT. Let the wash dry naturally, don’t use a hairdryer to speed it up or try to ‘touch up’ areas that look odd. The wash will look totally different when it dries and you’ll just have to wait to see how it settles in. 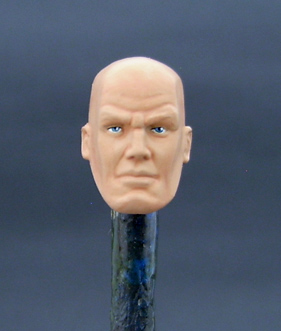 Ah, the skin has darkened and the wash has properly settles in the crevices of the face, giving Hitman a more realistic tone. If the wash isn’t dark enough in some areas feel free to use your detail brush and line-in brow wrinkles, nostrils, etc. Sometimes you’ll have blotches of wash where it was too much or didn’t settle right on a flat surface. That’s ok, take a larger brush and drybrush the surface using your original base color, light flesh. This will highlight the right areas and blend the wash in where it was too noticeable. 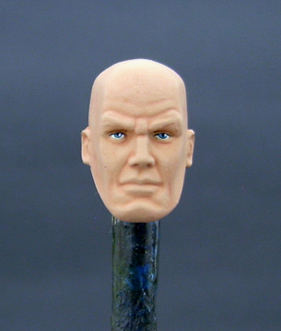 Now we’re ready for the final detail step, doing the eyebrows, hair, and lips. For lip color mix some Warm Flesh with a little leather or brown, just enough to tint it. You can also use red or burnt sienna for a pinker lip color. Paint the full bottom lip and just a little on the top lip. Paint the mouth line leather. You can use black for this but I find that’s just a bit too strong for light flesh colors. Since Hitman is bald we don’t have to paint hair, just the eyebrows, so a bit of Leather works there. You’re done! You can also use clear gloss over the eyes and lips to accent too if you choose. 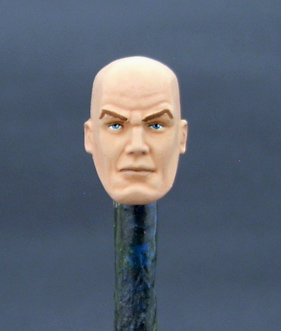 Tah-dah, he's done!
Advanced Techniques/Tips A lot of people ask me how to mix skin tones and there’s various ways of doing this. My trick so you don’t have to mix them every time is to buy 2 jars of Light Flesh and 2 empy paint jars from somewhere. Empty half of the paint into the spare jars so you now have 4 jars to mix your flesh tones. Also Testors and Games Workshop have a lot of different skin tone colors premixed. Snag some different ones from their lines and experiment with those too. For a darker flesh tone like the SOTA Ryu Street-fighter figure, mix some olive green in with some light flesh and a drop or two of brown. For a tanned look pick up some Games Workshop Bronzed Flesh and mix some of that in. You can also add a bit of orange and brown to get this. Remember you’ll need to do a wash of darker skin tone at some point so you may want to buy two jars of Warm Flesh and make the darker variations of these shades. All this skin tone mixing takes practice and I still haven’t mastered it. Just experiment often and you’ll find out what works best for you. Always let skin tones dry completely on a figure before judging them. Often what’s in the jar isn’t the same shade that ends up on the figure once dried. That’s especially true with washes, so practice. When detailing female faces there’s a few extra steps that you need to do. Remember the first step where we painted a black line above the white of the eye? For a female you’ll need one on the bottom too and usually you want a bit of extra length coming off from the corners of the eyes for the long eyelash effect. You’ll need to shade above the eye as well, usually mixing your warm skin color with some purple, blue, or whatever eye shadow color the character wears. Lips are also fuller and usually mixed with just red and not brown. Lipstick is just whatever color you choose over the plain lips. I often paint a female’s eye larger than a males and put the iris right in the center instead of covering part of it up with the eyelid. As always, choose what’s right for you! Painting the inner eye detail can be as simple or complex as you want. (or have the brush size for!) You can add a half-circle of white at the bottom of the iris and a dot of white mixed with the iris color against the black pupil for a more complex look. Google some characters and you’ll see tons of different ways to paint eyes. You can make a more sinister look by picking up some testors Skin Tone Shadow and mixing that with your warm skin tone, then painting that around the eye itself. Then use some diluted red to line in underneath the eye for the ‘late night mischief’ look. Sigma 6 Strike Duke has a good example of that look. Beard stubble can be done a few different ways. One way is to mix Skin Tone Shadow with your warm tint the same way as described above and paint that on solid for the beard. Another is to do a wash(s) of light gray over the facial area until it looks dark enough. Another is to mix your hair color with some gray and do lots of vertcle, individual line with your brush. Well, that's the end of the guide. Hope you enjoyed reading! Looking for other custom action figures made by awesome customizers around the world? Click your favorite series below to be taken to this week's offerings!
|

