Maps of the battle of Hastings
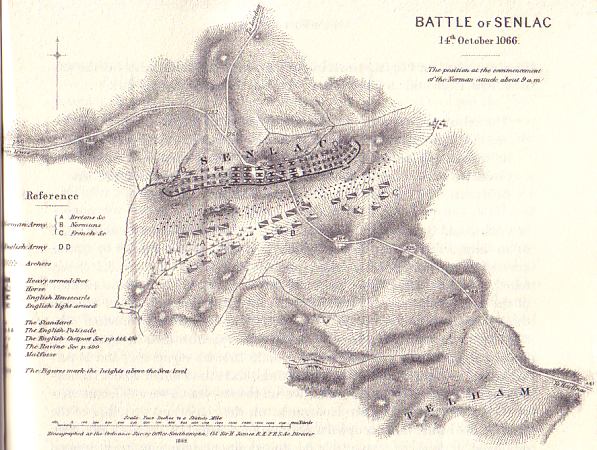
Edward Augustus Freeman's map (The History of the Norman Conquest of England, Oxford 1870-9) shows a large area occupied by the English army, with the left flank extended along the entire ridge, and the right flank down to the low marshy ground. Freeman did not estimate the numbers involved. However, his map of "neat little units" is inconsistent in a couple of ways: the extent of the English line infers a very large army indeed, while the evident spacing of the discrete units does not fit with the sources (and Freeman's own prosaic description), which state how densely packed the English shieldwall was: so that the wounded could not extricate themselves, and the dead could scarsely slide to the ground. Freeman's map and his descriptions made a case for a huge English army. But the German scholar Hans Delbrück, who claimed that medieval armies must be small unless overwhelming evidence is found to the contrary, had gained consensus among scholars (which since the turn of the 20th century has been followed almost "slavishly").
Note the "palisade" (the solid black line) arranged in front of the English position: this is according to Wace, who Freeman depended on heavily as a reliable source for graphic and dramatic details. Freeman also places Harold's light infantry on the flanks, and admits that the right was his weakest point. These elements in Freeman's account - implied huge armies, reliance upon Wace for a palisade, claiming that the light infantry were on the flanks - all came under a stiff attack, mostly after his death. And his map also has not been taken seriously since the beginning of the 20th century. But recently, M. K. Lawson (The Battle of Hastings 1066, Tempus 2002) has made a very good case for large armies at Hastings. He also does not discount the palisade, nor the light infantry on the right flank in particular: his proposal, if the armies were in fact numbered in tens of thousands, is that the English right flank rested down in the low marshy ground to the west of the hill. The palisade, "like other aspects of Freeman's treatment,...may one day have to be reinstated".
Sir James H. Ramsay (The Foundations of England, Oxford 1898) also believed in much smaller armies than Freeman's map proposed. (And verily, since that day, the consensus of Hastings historians has accepted smaller armies.) Ramsay's map shows an occupied area of small extent, where "...5,000 Frenchmen 'would satisfy our ideas of what was at all likely: 10,000 men we should consider beyond credibility'". (Lawson p. 131) Ramsay's need for an equally small English army has made him pull in the left flank considerably. He posited a "ravine" to cover the English right flank. But this is inaccurate, as the "ravine" is not there. So his bending back of the right would accomplish nothing, as the Norman left could have turned it easily enough.
(click on map for a view of the whole thing)
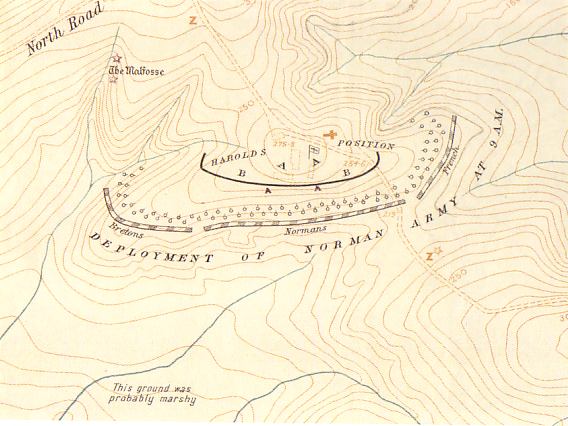
R. H. Baring conducted a survey of the area and mapped it for Major-General Edward R. James (used in his article The Battle of Hastings, 14th October 1066, The Royal Engineers Journal, v 1907). James "had walked the entire battlefield with Freeman forty years earlier" (Lawson, p. 132) but disagreed with Freeman's placing of the English left wing along the ridge to the east: rather, like Ramsay, he pulled in the English left considerably, no doubt to help facilitate the appearance of a smaller army. By so doing, this map - which was used as the best authority as late as R. Allen Brown's talk in 1980 (The Battle of Hastings, ANS III reprinted in SM page196-218) - ignores the Carmen requirements entirely, of a "valley" included in the English defensive position.
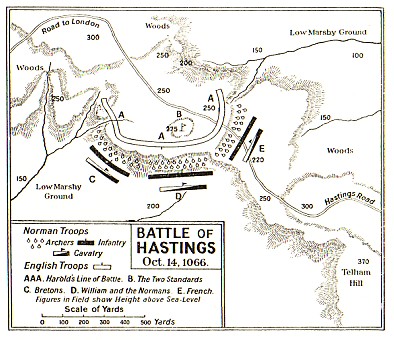
Sir Charles Oman's map (A History of the Art of War in the Middle Ages Volume 1: 378 - 1278, first published 1898, 2nd edition 1924) is perhaps the only other (than Freeman's) to fulfil the requirements from all the sources: The Carmen says that Harold's army was formed up on a hill, rough ground and a valley. Oman shows the English right wing drawn back over the low ground of the head-waters of the Bulverhythe, and anchoring it on the steep ground behind. His estimate of the English strength is c. 25,000 men. Note that Oman has pulled in the English left considerably and merely anchored it upon the steep north-facing slope behind; but he has done his best to place the steep ground in front of the left, thus further inhibiting the French right wing's approach.

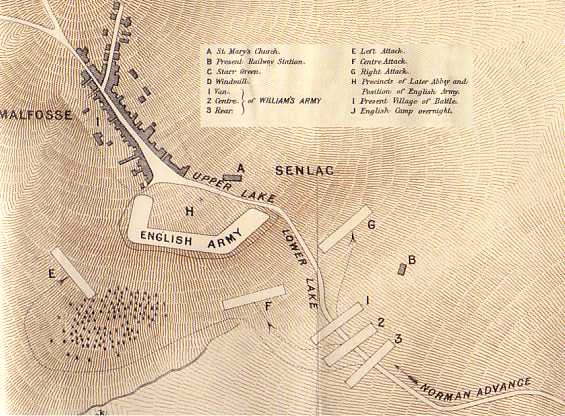
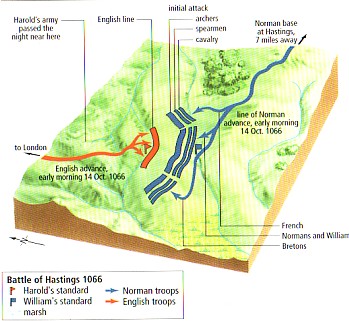
In the 900 year anniversary issue (August 1966), National Geographic published this three-stage battle map. It doesn't reveal anything unique, but is useful for seeing how the modern town is situated upon the battlefield. The English line seems rather too short to take advantage of the steep ground to the rear on the left. The Norman army approaches at an awkward angle. William's command post being upon the spot occupied by a modern "garage" is completely conjectural.

David Howarth's highly detailed map. (1066 The Year of the Conquest, 1977, page 168) As drawn, his map supports Jim Bradbury's hypothesis, that Calbec hill is actually the best place for a defensive position: note how covered the flanks are by the marshy low ground, much better protection than "battle hill" provides.
The latest detailed map that I have seen. (Cambridge Illustrated Atlas Warfare The Middle Ages 768 - 1487, 1996, page 44.) It must be inaccurate as to the relative sizes of the two armies. (Again, buying into the - Delbrückian - consensus that the English army was small indeed; this is hardly large enough for even 5,000 men.) But even if the English army was that badly outclassed, there is still NO ravine behind the right flank to anchor to. Computer enhancement of the contours hasn't helped us see things any more clearly by depicting one. The "ravine" over on the English left is no different than that shown in the best maps and descriptions.
Of interest here is the (misleading) way the Franco-Norman army seems to have half of its strength in marksmen. The double-thick line is meant (I assume) to represent an open order spacing to the rear, so the actual proportion of marksmen must be closer to 38% - quite likely still too high. (This is based on the fact that the line of spearmen would be almost one-and-a-half times more numerous, occupying the same amount of ground, as the cavalry behind: e.g. 1,024 close order infantry takes up as much space as 640 close order cavalry.) But if the open order spacing is also to the side, then the marksmen units would be half the strength of the spearmen behind; or c. 23% of the total army strength, which seems more likely.
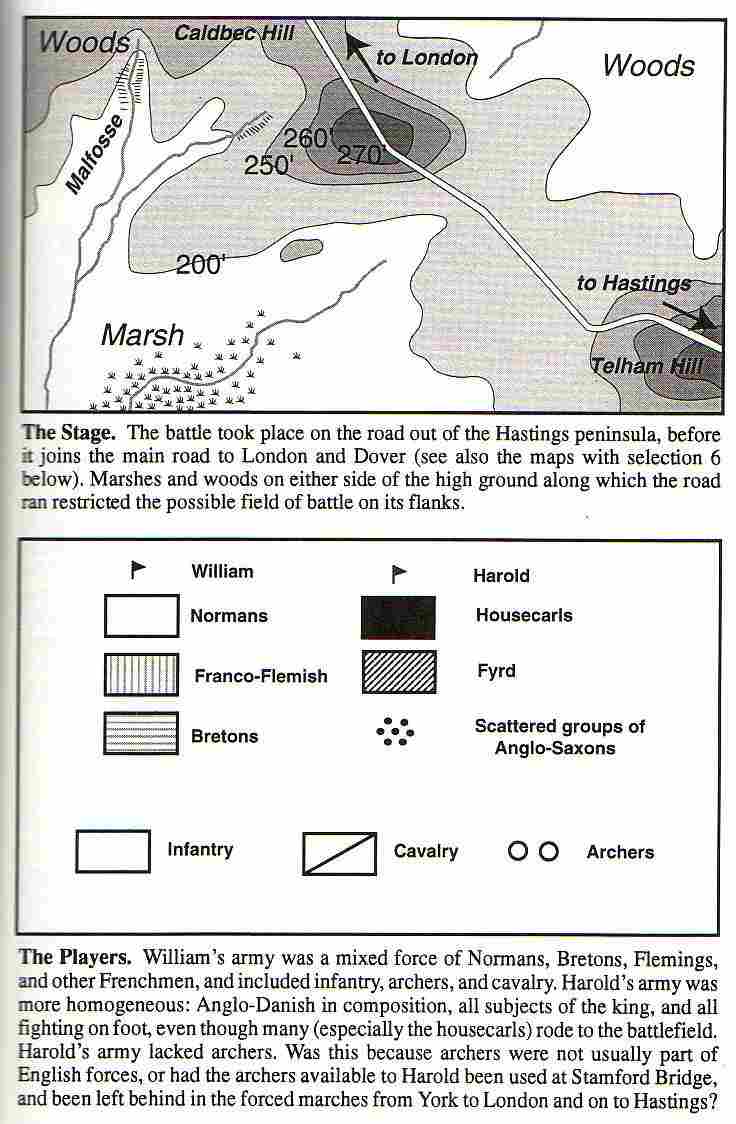


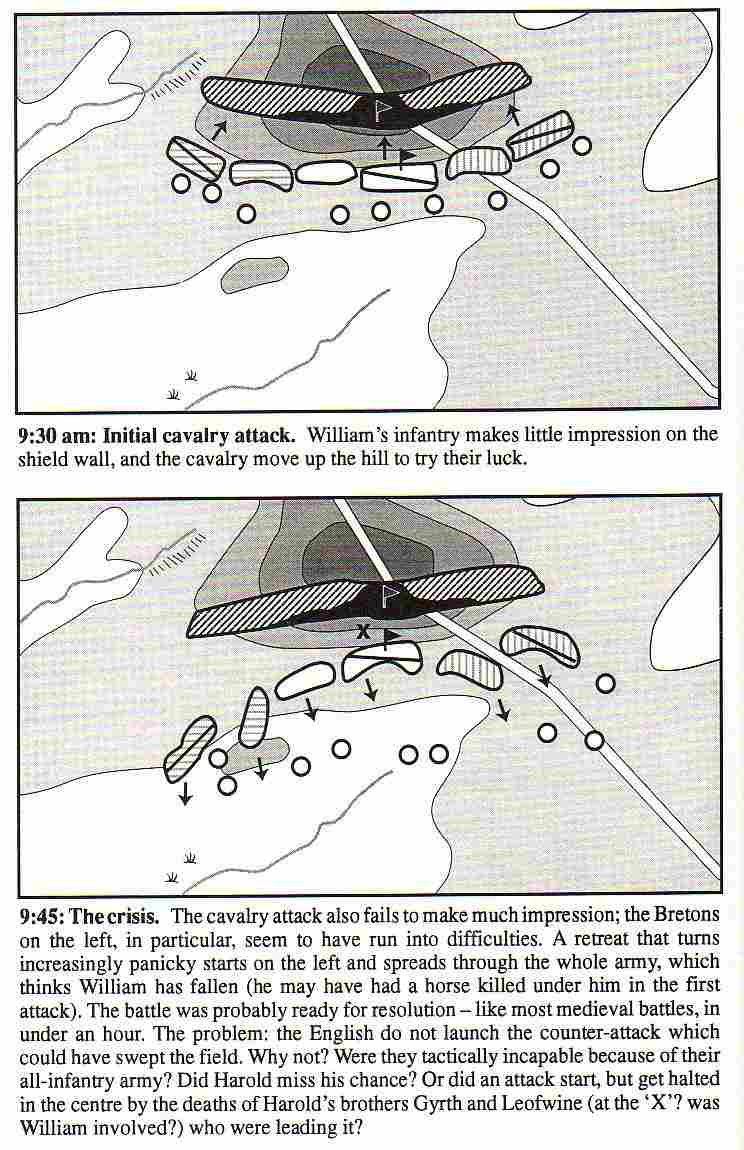
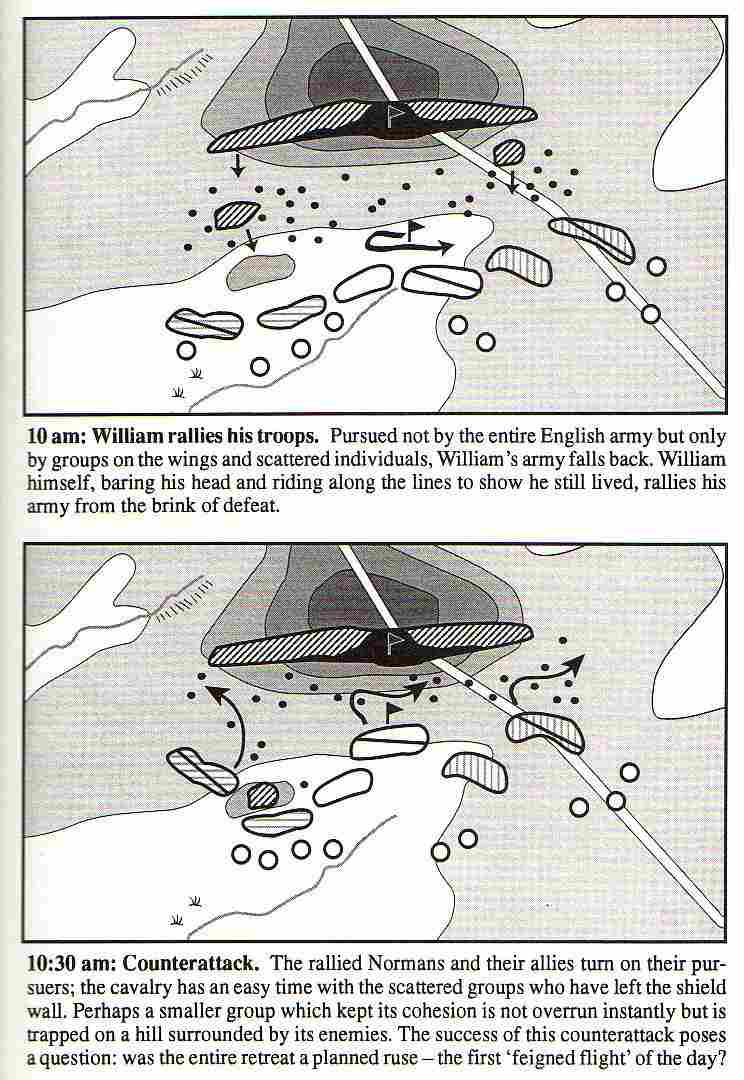
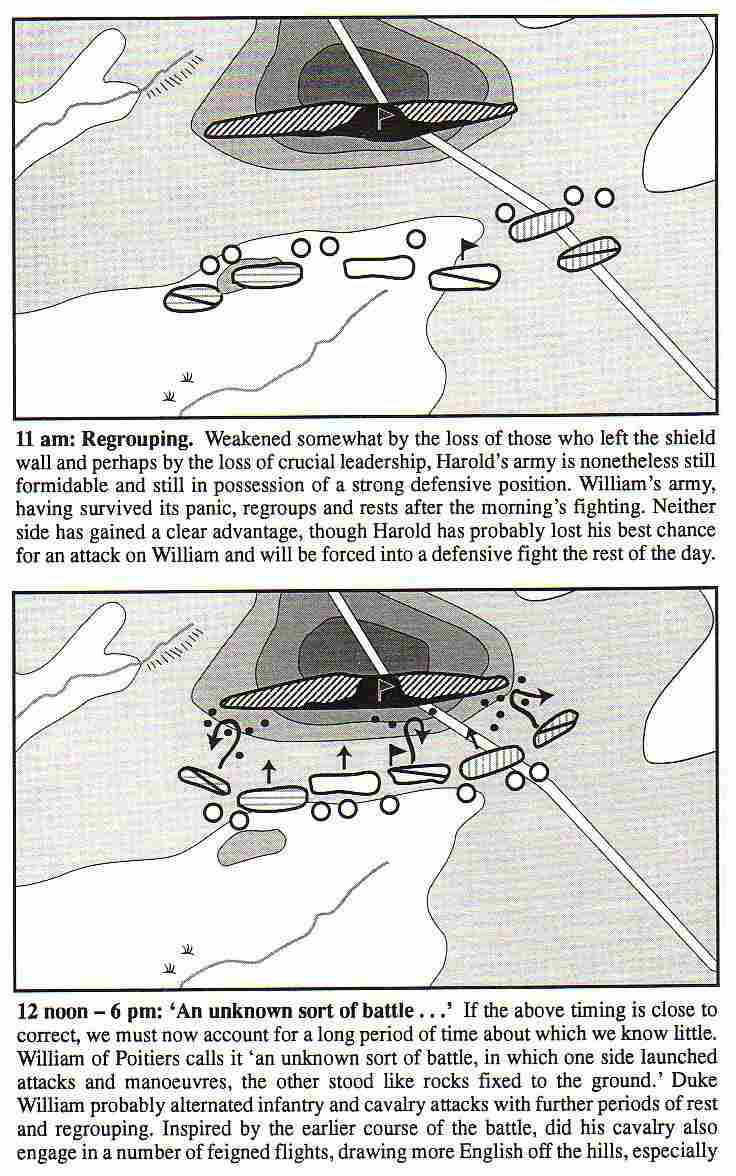
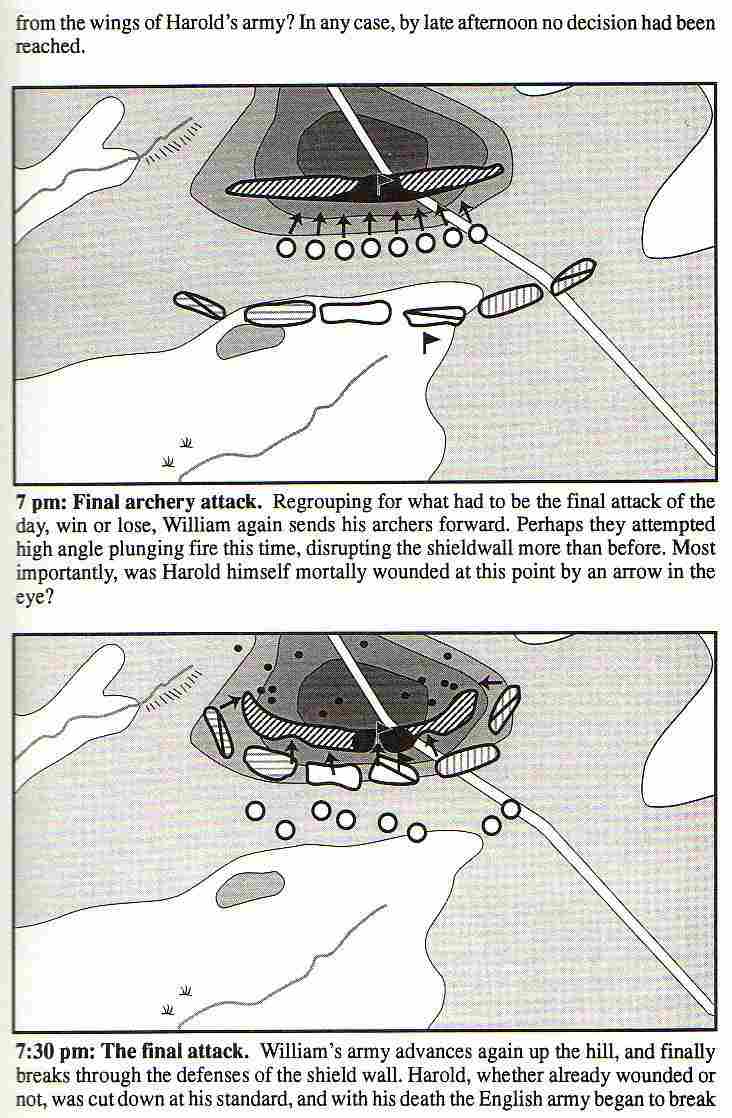
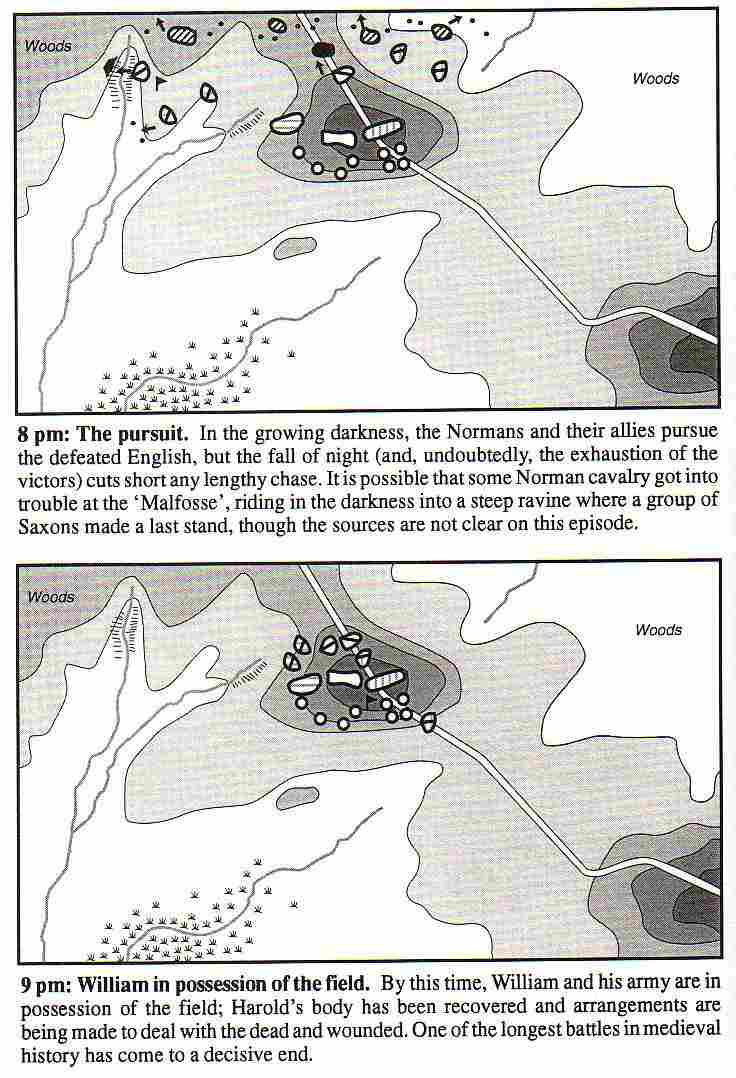
Dr Stephen Morillo's series of descriptive maps, from his book The Battle of Hastings, Sources and Interpretations (The Boydell Press 1996).
Mostly I agree with the way he portrays the battle. But I do not accept the traditional "three-stage" attack, vis a vis, archery first, followed by infantry, and finally a cavalry attack. (It never worked for me in wargaming the battle: the Normans usually get trounced when they attack piecemeal like that.) As my monograph discusses, the depth of the English line was more than likely deeper than 12 ranks. Also, I think the actual timing of the first main attack was closer to noon, whilst the "third hour" (nine a.m.) opening of the battle refers to the initial skirmishing that occurred when the leading elements of each army came into contact. I think as well, that the sorting out and reorganizing probably took somewhat longer to accomplish than c. half an hour.
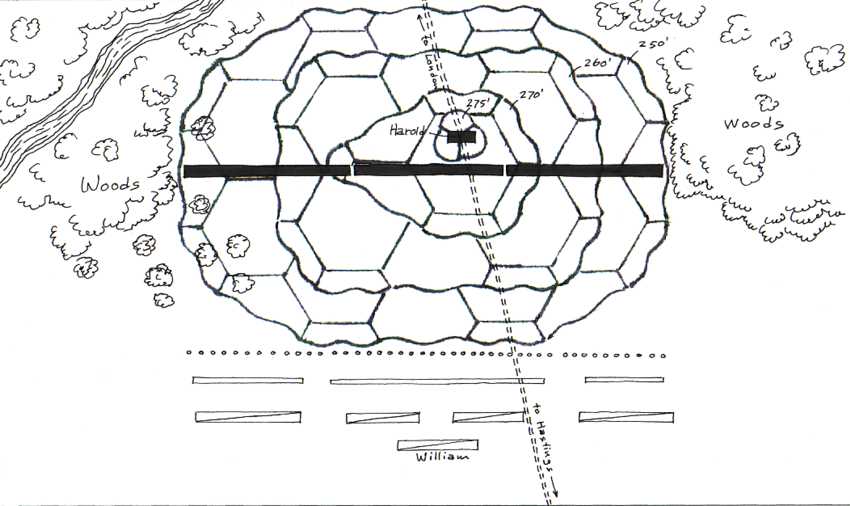
And finally, my own war-gaming map. It reflects a few changes in my thinking, from recent refights. The English line may not have bent back at the wings, or it may: but the fact is it would have made no difference in the outcome of the battle. And as a wargame, it is just easier to have the lines straight, so that is how I set it up now. The funky looking hill is created with GeoHex(tm); a more versatile method of representing hills (or ideally, a specific model terrain built for Hastings) would more closely recreate the contours.
HOME
