

Scroll up to find your green polka dot pattern we just made, click on it to select it, then click "OK" on your pattern option box.

Now open a new image, 200 X 200 pixels, Transparent background. Click Ok.
(I'm not going to show a picture of that because you know how to open a new image by now.)
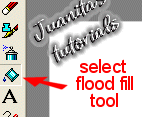
Now, (new tool, whooopee!) On your left again select your "flood fill" tool that looks like a paint bucket.
Place it over your transparent 200X200 new image and click to fill box. You now end up with this.

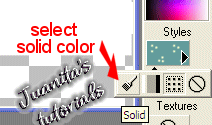
Now that we are thru with the pattern color, we need to change back to another color so go back to the little black triangle now located on your pattern box under your color palette. Click on your Solid color icon.
It should now change back to your "off white" color you used for your dots, but if not go back and get your medicine dropper tool and click on the 2nd dolls button again to get your "off white" color again.
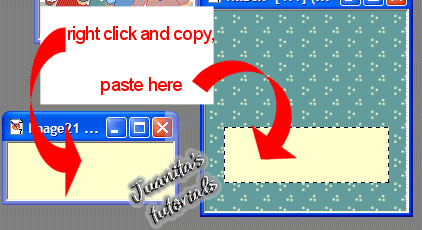
Next open a new image 165 X 56 and set the Background color on it to the "Foreground" color again. Click "OK" If you get confused go back to Sig Tag tutorial page 1 and see how we set the Background color to "Foreground".
Choose your "Arrow tool"
Now right click that new image we just made, copy, and "Paste as New Selection" inside your green polka dot image.
Now right click your "transparent backgrounded" dolls and Copy.
Paste as New Selection in your green polka dot image.
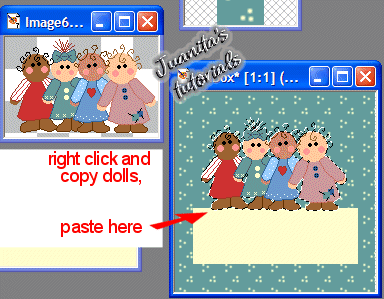
Go up to "Selections" and drop it down and click on "Select None" to get rid of the "marching ants" around your dolls.
Now we will put our name on the tag.
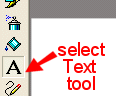
Select your "Text" tool.
Click on your tag inside the "white box" under the dolls.
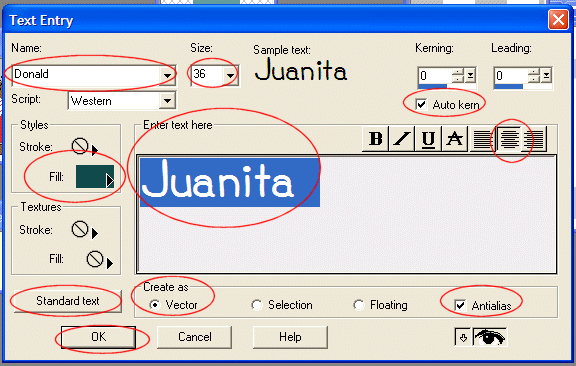
This opens your "Text Entry" box.
Inside your text entry box set the following options first. "Vector" dot selected.
"Antialias" checked. "Justification" center. "Auto kern" checked.
Under "Name" find the font you want to use. I am using "Donald font."
Under "Size" I chose 36.
Now inside your "Enter Text here" box, type your name.
Now, on the lower left hand side you will see a "Standard text" button. Click that.
Now click inside your "Fill" box (under Styles) to choose your color. I chose a dark green. Then click Ok.
Now, click "Ok" on your Text Entry box.
I hope you don't get too confused here...I'm just going to circle all the things I told you to do..maybe you will get the picture.
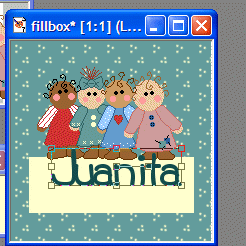
Now, since we Created it as vector it puts a box around it so we can move it and resize it. Notice that mine is not in the right place.
If you hold your mouse (with the Text tool still selected) in the VERY center of that vector box you can move it around. If you click in a wrong spot your Text Entry box will come up. If that happens just hit Cancel on the Text entry box.
When its held CORRECTLY in the center it will change to 4 arrows. You may then move it around.
The little squares on the outside of the vector box allows you to resize it to the right size if its too big, or hangs over or if its too small, etc.
Now that I have moved it and placed it in the right place, I go up to "Layers", down to "Merge"
and "Merge Visible."
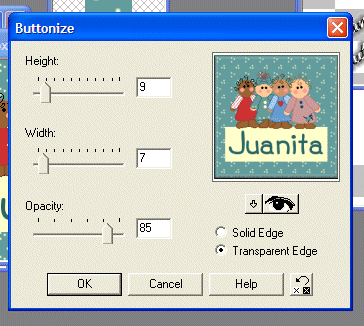
Now to Buttonnize it. Go up to Effects, down to 3D Effects, Buttonize.
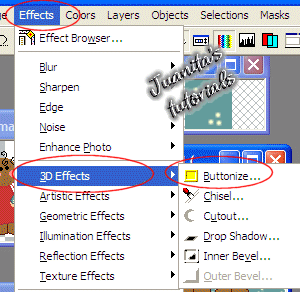
Set your Height=9, Width=7, Opacity=85, Transparent Edge selected. Click Ok.
And thats it.

Go up to File/save as and name it and save it.
I know this is not Very Beautiful but I wanted to teach you how to make a background and add your Text too. So you really learned several different things at 1 time. You can add shadows and effects later on as you learn more. This is just a very simple way to make a tag.
I hope I didn't confuse you.
