
With your glitter frames 1,2, and 3 open in PSP 7, go up and open a new Image 400 X 200 pixels, Background color set to "Transparent," click "Ok."
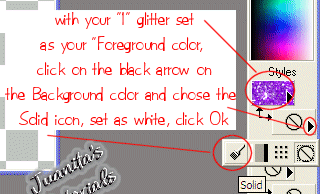
On the right side of PSP under "Styles" (if you don't see "Styles" under your color palette, hit C on your keyboard to open your color palette)click the "Black Arrow". Choose Pattern Icon. Click inside the "Pattern" to open your option box. Inside Option Box, click on the drop down arrow beside the pattern showing in the option box and scroll up to find your glitter "1" pattern. Set your "Scale" too 100, click "Ok."

Now set your "Background color" to white.
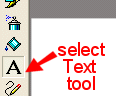
Now click on your "Text" tool.
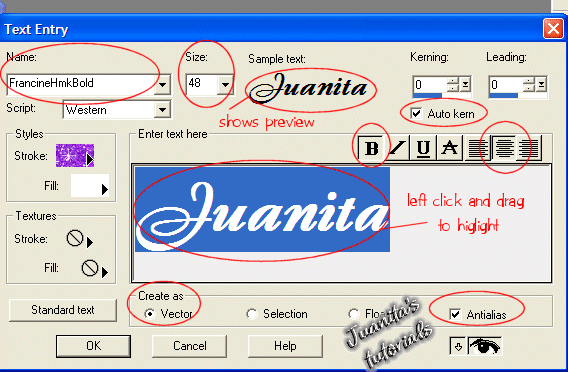
Click your text tool on your New Tranparent Image. It will open your "Text Entry" box.
Inside your "Text Entry" option box, type your Name in the "Enter text here" box, then left click behind your name and drag over your name to highlight it. (highlighting your name is optional if you don't understand how to. It just gives you a preview of what your name will look like.) Set "Size" to 48, click under "Name" to find your font.
I am using "FrancineHmkBold" font. Click on your "Bold" icon. Set "Justification" to center. "Auto kern" checked. "Vector" selected, and "Antialias" checked, click "Ok."
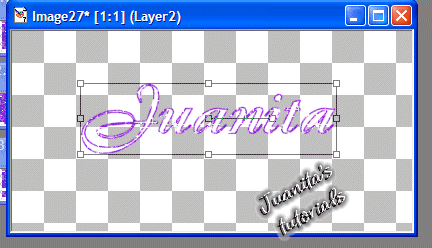
Now you should end up with your name like this.
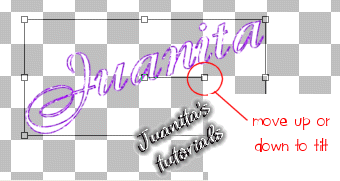
I'm going to tilt mine using the "Vector" tilt bar located in the center of that vector box. (with my "text" tool still selected) When you click on the right spot on that box on the end of your tilt bar you will see your mouse change to 2 curved arrows. Move it up or down to tilt.
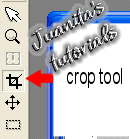
Now that I have my name placed the way I get my crop tool and I crop it....leaving the "Vector" box still around it.
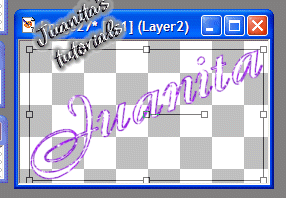
It now looks like this.
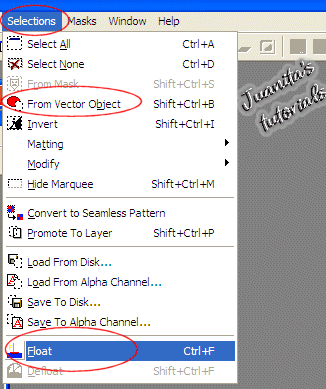
Now I go up to "Selections" and down to "From Vector Objects"
You will now see "marching ants" around your name.
Go back to "Selections" and down to "Float."
You will now see the "Vector" box gone.
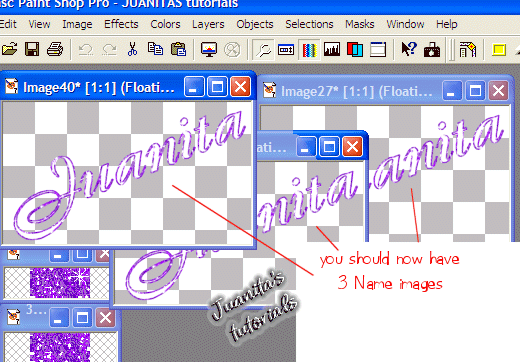
Now hold down your "Shift" key on your keyboard and hit your "D" key to make a copy.
Hit Shift + D a second time. You should now have 3 "floating" name images.
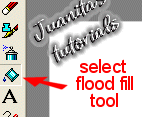
Ok, go to your "Flood fill" tool.
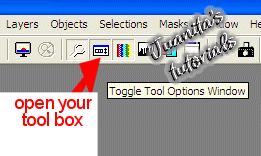
Go up to your "Tool box"
Set your Tool options for your Flood fill to these settings. Blend mode=Normal, Match mode=None, Opacity=100.

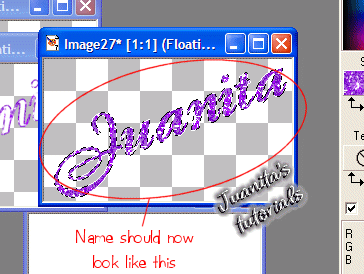
Now hold your "flood fill" bucket over your name and click to fill your name with glitter. It should now look like this.
Now move that image to the side.
Click on one of your other name images to select it.
Go back to your "Pattern" Foreground box, click inside, scroll up to find your glitter "2" click it to select it, then click Ok.

Inside your second name image, flood fill your name. Move it to the side.
Click on your last name image to select it. Go to your "Pattern" Foreground box again, click inside, scroll up and find your glitter "3", click on it to select it and then click "Ok." Fill your 3rd name with glitter.
Ok, now we "Merge."
Click on one of your name images, go up to Layers/Merge/Merge Visible.
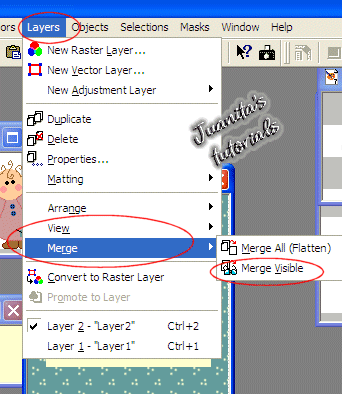
Repeat that with the other 2 name images.
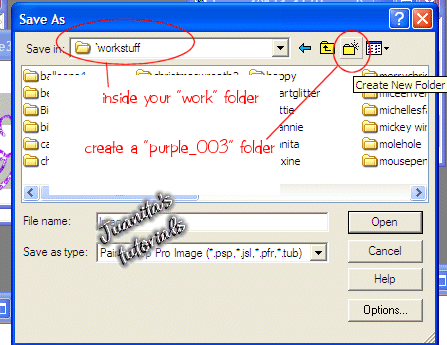
Now that all 3 name images are Merged, we now need to save them.
Click on one to select it and go to file/save as, and in your "Workstuff" folder that you created, make a folder called "purple_003" or (your own name) "juanitapurple_003" or something like that.
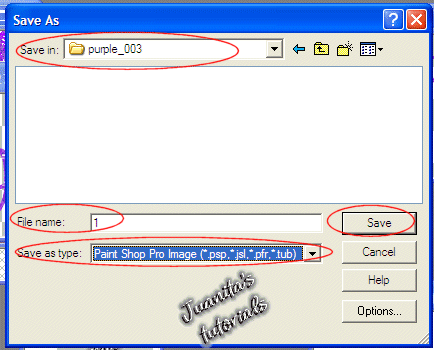
Now save your Name image as a number "1" and as a psp image in your purple_003 in your "Work" folder.
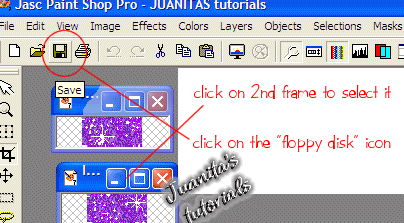
Now click on one of your other names and click on your "floppy disk" icon, and save as "2".
Repeat for the 3rd name and save it as "3".
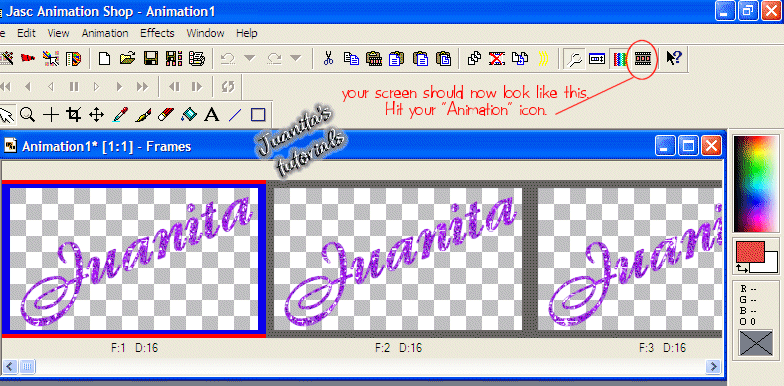
Now that they are all 3 saved, go to your Animation Shop.
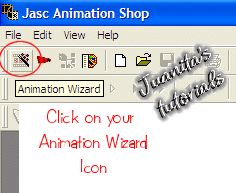
Click on your "Animation Wizard Icon."
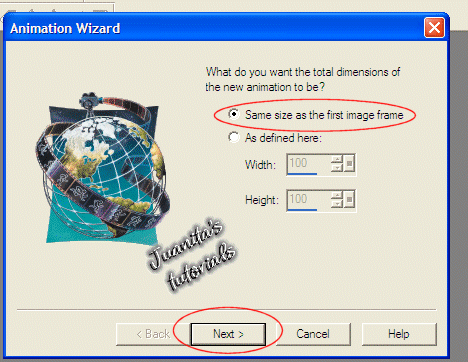
Set your Settings to these: select " Same size as the first image frame" choose "Next"
(I'm not going to put all these panes of this wizard up, I will just call them "screen's")
Second screen, "Transparent" selected, choose "Next."
Third screen, "Upper left corner of the frame" selected, "With the canvas color" selected.
choose "Next."
Forth screen, "Yes, repeat the animation indefinitely" selected, and on "How long to you want each frame to be displayed" scroll it up to "15".
choose "Next."
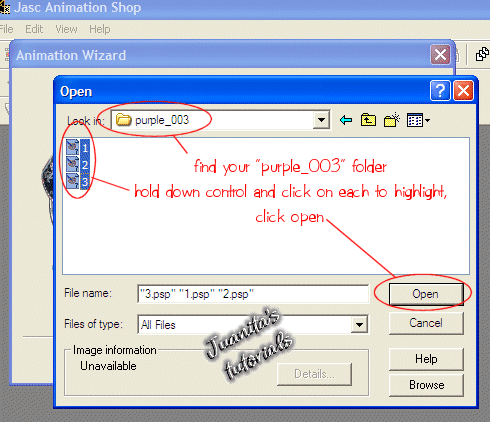
Fifth screen, click on "Add Image", look thru your files to find your "Workstuff" folder, then click on your "purple_003" folder and you will see 1, 2, and 3." Hold down your control key and click on your 1, 2, and 3 files.
Click "Open"
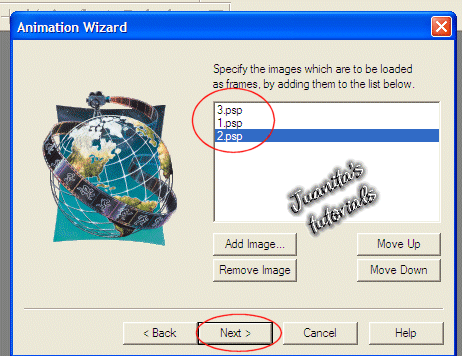
It should now look something like this. (if you missed one, just click add image again and get it, no worries)
Click "Next."
On the next screen click "Finish."
Your screen should now look like this. Now hit your "View Animation" icon
Your name is pretty huh? *giggles*
Go to file/save as/ and find the folder you want to save it in.
It will name itself as Animaition 1, but you can rename it, now click "Save."
I'm not going thru all the next screens of the wizard..cus I'm tired and brain dead now..but just click "Next" on all the panes.
And that's all there is to it! Now go find it and look at it some more to admire your work!
Hope you had fun!
Back to Getting prepared for Glitter Name
