Nikon Alphaphot-2K
Compound Light Microscope with Köhler Illumination
| Contents Introduction
Parts of the Microscope
Transporting Your Microscope
Removing Microscopes From the Cabinet
Preparing to Use Your Microscope
Setting Up the Microscope
Illumination System
Initial Setup
Ocular Diopter Adjustment
Aligning the Microscope for Köhler Illumination
Adjusting the Condenser and Field Iris Diaphragm
Adjusting the Substage Diaphragm
Oil Immersion
Using the Oil Immersion Lens
Cleaning the Oil Immersion Lens (100x Objective)
IMPORTANT ADDITIONAL INFORMATION
Putting Away the Microscope (Storage)
|
MICROSCOPE NUMBER: ______
|
Introduction
The Nikon Alphaphot-2 Compound Light Microscope is a very expensive
piece of equipment that must be cared for properly. This includes its transport, use, and
storage. This document was prepared for students and faculty to ensure that these
microscopes will have a long life span. FOLLOW ALL INSTRUCTIONS CAREFULLY!
Parts of the Microscope
Please take a few moments to familiarize yourself with the parts of
the microscope using the illustrations provided in Figure 1. Once you have reviewed this
material, you may proceed through the rest of this document so that you can identify the
parts on the actual Nikon microscope.
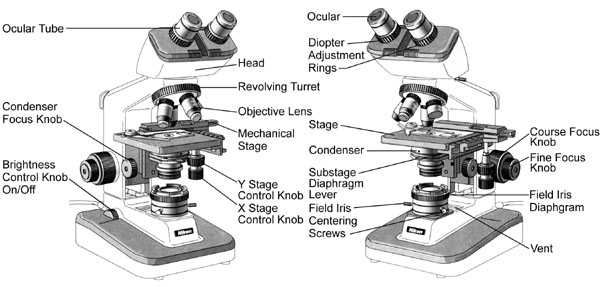
Figure 1. Parts of the Nikon Alphaphot-2 Microscope with Köhler
Illumination.
| Oculars |
The oculars have lenses that magnify
images 10 times (10x). Inside the right ocular is a pointer
which can be moved by rotating the ocular. The right ocular is loose, while the left
ocular is secured in place. This is for Köhler illumination. The oculars sit in the
ocular tubes. |
| Diopter
Adjustment Ring |
This ring is used to accommodate the fact
that both of your eyes may not be focused the same. Instructions on how to use this part
are given below. This ring is found on both ocular tubes |
| Ocular Tube |
The ocular tubes hold the oculars, and
can be adjusted for interpupillary distance, the distance
between your eyes. |
| Head |
This part of the microscope contains a
delicate prism system which helps to send an image to the oculars and your eyes. |
| Body |
This part of the microscope houses the revolving
turret and objective lenses. |
| Revolving Turret |
This part of the microscope contains four
objectives at various magnifications. |
| Objective Lenses |
Your microscope is equipped with four
objective lenses with magnifications of 4x, 10x, 40x, and 100x. The 100x objective is an oil
immersion lens. The longer the objective, the more magnification it has. |
| Arm |
This part of the microscope essentially
holds all of the other parts, and is used in the transport of the microscope. |
| Course Focus Knob |
This knob located on both sides of the
microscope allows you to focus your image in the microscope. |
| Fine Focus Knob |
This knob "fine tunes" the
focus of your specimen. |
| Base |
This part of the microscope holds
everything in place, and is used in the transport of the microscope. |
| Mechanical Stage |
This is where the specimen is placed for
observation. The slide holder has a clamp which can swing out to hold the slide. The lever
which opens the clamp is on the left side of the microscope. With a slide in place, it can
be moved in the X and Y directions using the stage control knobs. |
| X Stage Control
Knob |
This knob will move a slide in the X-axis
(horizontally) on the mechanical stage. |
| Y Stage Control
Knob |
This knob will move a slide in the Y-axis
(vertically) on the mechanical stage. |
| Condenser System |
This is a system of lenses which helps to
focus light directly on the specimen that is mounted on a slide. |
| Substage
Diaphragm Lever |
This lever is used to control the
diameter of the substage diaphragm for Köhler illumination. |
| Condenser Focus
Knob |
This knob is used to focus light properly
on the mounted specimen. |
| Field Iris
Diaphragm |
This system is used to vary the diameter
of the field iris diaphragm, limiting the amount of light passing through the condenser
system and the specimen. |
| Field Iris
Centering Screws |
These screws are used to center the field
iris diaphragm to provide even illumination of the specimen in the field of view. |
| Brightness
Control Knob/Power Switch |
This knob controls the brightness of the
light, and also acts as the ON/OFF switch. |
| Illuminator |
Housing a 6 V 20 W halogen bulb within
the base of the microscope, this system provides light for specimen illumination. |
| Power Cord |
Supplies power to the microscope
illumination system. |
Preparing to Use Your Microscope
The Nikon Alphaphot-2 microscope is a very delicate and powerful
instrument. In order to fully appreciate the specimens that you will be viewing, you MUST
properly set up the microscope for YOU! By tailoring the instrument to your vision, it
will make it much easier to see the details that you want to observe. At
first, these steps may seem long and time consuming, but with practice, it should become
"second nature" to you.
Setting Up the Microscope
- If there is a DUST COVER, remove it and FOLD IT!
Flatten the dust cover along its seams. Fold it neatly and place it in the middle of the
bench, so that it is out of the way.
- The POWER CORD is neatly wrapped around the arm of the microscope
near its base. Carefully unravel the cord, straighten it out and plug the microscope in.
NEVER PUSH OR DRAG THE MICROSCOPE ON THE BENCHTOP!!! ALWAYS LIFT IT TO MOVE IT!!!
Pushing or dragging the microscope on the benchtop causes it to BOUNCE because of the
little rubber feet. This jars the optical systems of the microscope, which will damage
them over time!
Illumination System
The brightness control knob also acts as the ON/OFF
switch. To turn on the microscope, rotate the brightness control knob toward you
and select the desired brightness (Figure 2). Start out with a moderate setting.

Initial Setup
- Ensure that the 10x objective is in place.
If not, rotate the 10x objective using the revolving turret,
ensuring that the objective clicks into place. DO NOT ROTATE OBJECTIVES BY
GRABBING ONTO THE OBJECTIVES THEMSELVES!!! THIS DAMAGES THEM!!! ALWAYS use the
revolving turret as shown in Figure 3.
Use the course focus knob
to lower the stage as far down as it will go (Figure 4).
Turning the knob TOWARD you should lower the stage. On the left side of the
microscope, push the lever to open the slide clamp
and place your specimen in the holder on the stage, as shown in Figure 5. ENSURE THAT THE
SIDE WITH THE COVER GLASS IS UP! Release the lever on the clamp, and the slide will be
held in place.

- Use the condenser focus knob to move the condenser
as high as it can go underneath the stage (Figure 6A).
- Look through the microscope oculars. The
circle of light that you see is the field of view. Adjust the
interpupillary distance by grabbing the BASEPLATE OF THE OCULARS until you see only one
circle, or a single field of view, through the oculars (Figure
7).
Ocular Diopter Adjustment.
- With the 10x objective in place, look to the side of the microscope
so that you can see both the slide and objective. Slowly turn the course focus
knob to move the stage upwards until it is stopped. It should stop BEFORE
the slide reaches the objective. Turning the knob AWAY FROM you should raise the
stage.
You are looking at the side to ensure that the SLIDE AND COVER SLIP DO NOT RAM INTO THE
OBJECTIVE!!! If the slide rams into the objective, the objective will be damaged, and the
cover slip cracked, making the slide useless.
- Looking through the oculars, focus the
specimen using the course focus knob. The stage should move AWAY
from the objective.
- Continue looking through the oculars and
use the fine focus knob to make any minor adjustments (Figure
8). At this point, it does not matter if the image is perfect, you only need it to be in
relatively good focus.
- Rotate the 40x objective into place using
the revolving turret (Figure 3).
- While looking down the oculars, close your
RIGHT eye. The left eye should now be looking down the left ocular.
Using the diopter adjustment ring on the left ocular,
focus the specimen (Figure 7).
- Repeat the above step, but this time with the other eye. While
looking down the oculars, close your LEFT eye. The left eye
should now be looking down the right ocular. Using the diopter
adjustment ring on the right ocular, focus the
specimen.
- Rotate the 10x objective back into place, and look down the oculars
to see if the specimen is in focus. If not, use the diopter adjustment rings as indicated
in Steps 5 and 6.
- Rotate the 40x objective into place and repeat Steps 5 and 6.
You are repeating the ocular diopter adjustment to compensate for differences in your
right and left eyes, and to also correct for the body tube length of the microscope. This
will allow you to take full advantage of the high-quality optics and the parfocality of
the lenses.

Aligning the Microscope for Köhler Illumination
Adjusting the Condenser and Field Iris Diaphragm
- Rotate the 10x objective into place and
focus the specimen.
- While looking through the oculars, close
the field iris diaphragm (Figure 10B). You should see a hexagon.
Adjust the field iris diaphragm until about 2/3 of the original field of view is blocked
off, and you can still see the hexagon, as illustrated in Figure 11.
- While still looking through the oculars,
focus the field iris diaphragm by moving the condenser
focus knob. The field iris diaphragm is in focus when the edges of the
hexagon are as SHARP as they can be.
- After it is focused, open the field iris diaphragm,
making sure that the edges reach the field of view at the same time. This ensures that the
field iris diaphragm is centered. If not centered, use the field
iris centering screws to center the field iris diaphragm in the field of
view (Figure 12).
- Once centered, open the field iris diaphragm
until the edges of the hexagon just disappear from the field of view,
as in Figure 13.

Adjusting the Substage Diaphragm
- With the specimen still focused, carefully remove the right
ocular.
- With your right eye, look down the open ocular tube
that held the right ocular. You should see a circle of light.
You are looking directly at the back focal plane of the
microscope.
- While looking at the back focal plane of
the microscope, adjust the substage diaphragm using the substage
diaphragm lever as illustrated in Figure 14. You should see a hexagon
increasing and decreasing in diameter as you move the lever.
- Open the substage diaphragm until the edges
of the hexagon are just barely visible in the back focal plane.
Figure 15 shows the substage diaphragm being open 70-80%.
You want 95-99%.
- Carefully put the right ocular back into
the ocular tube. The microscope has now been aligned for Köhler illumination.
NOTE: All of the steps outlined in this section on Aligning
the Microscope for Köhler Illumination MUST BE COMPLETED EACH TIME YOU SWITCH
OBJECTIVES OR SLIDES!!! Each objective has slightly different optical characteristics,
such as reduced fields of view, so these adjustments must be made each time you switch
objectives. Slides with cover slips have variable thicknesses, which can also affect
Köhler illumination.
The field iris diaphragm controls the
amount of light traveling through the specimen. If opened larger then necessary,
extraneous light will travel through the specimen and enter the field of view,
reducing image quality and contrast. Use the brightness control knob
to control specimen brightness, NOT the field iris diaphragm.
The substage diaphragm also helps to set
the contrast of the image. If the diameter is wide, the image will be "washed
out," while if the diameter is too small, the image will have too much contrast, and
specimen details will be lost.
Köhler illumination was developed by Professor August Köhler to
strike the best balance between contrast and resolution in specimens viewed with the
compound light microscope.
Oil Immersion
Using the Oil Immersion Lens
The 100x objective is the ONLY
objective that can be immersed in oil.
To use the oil immersion objective:
- Focus your specimen using the 40x objective
and align the microscope for Köhler illumination.
- Rotate the revolving turret to the 4x
objective or to a position BETWEEN the 40x objective and the 100x
oil immersion lens.
- Place a small drop of immersion oil over the cover glass in the
circle of light that can be seen passing through the specimen. Ensure that there are no
air bubbles in the oil. Air bubbles will produce a poor image. To get rid of air bubbles,
add more oil, or rotate the 100x objective through the oil
droplet several times.
- Rotate the revolving turret so that the 100x
objective is in place. Focus the specimen and align the microscope for
Köhler illumination.
- When you are done, ENSURE THAT YOU DO NOT ROTATE THE 40X
OBJECTIVE THROUGH THE OIL!!!
Cleaning the Oil Immersion Lens (100x Objective)
The oil immersion lens does not have to be
cleaned UNTIL THE END OF THE LABORATORY SESSION! When you are ready to
put away your microscope, you must clean the 100x objective as
follows:
- TURN OFF THE MICROSCOPE!!!
- Use LENS PAPER to wipe off any excess oil from the 100x
objective and slides.
- Dip a cotton swab in the cleaning solution provided. WARNING!
THE CLEANING SOLUTION IS HIGHLY FLAMMABLE! DO NOT BREATHE IN THE FUMES!!!
- Use the end of the cotton swab to clean the 100x objective lens,
removing any excess oil.
IMPORTANT ADDITIONAL INFORMATION
| There is another ring between the arm and the coarse
focus knob as illustrated in Figure 16. DO NOT TURN THIS RING UNDER ANY CIRCUMSTANCES!!!
This is the coarse focus knob tension adjustment ring.
|
 |
Putting the Microscope Away (Storage)
Before putting away your microscope, please follow ALL of these
steps!
- TURN OFF THE MICROSCOPE!!!
- ROTATE THE 4X OBJECTIVE INTO PLACE USING THE REVOLVING
TURRET.
- Turn the coarse focus knob until the
microscope stage as LOW as it can go. You must do this to
prevent the power cord from scratching the glass components.
- If you have an ODD numbered
microscope, move the mechanical stage all the way to the BACK of the stage.
- If you have an EVEN numbered microscope, move the
mechanical stage all the way to the FRONT of the stage.
- On the right side of the microscope,
ensure that the horizontal (X) bar of the mechanical stage is flush with the stage.
- Turn the condenser focus knob so that the condenser
is as close to the stage as possible (highest position).
- Unplug your microscope and wrap the cord around the base
of the microscope, underneath the stage and condenser
and around the field iris diaphragm.
- Unfold the dust cover if the microscope had one. Cover the
microscope. The word NIKON should be on the right side of the microscope.
- USING TWO HANDS, return the microscope to the
cabinets. ENSURE THAT THE MICROSCOPE ARM FACES OUTWARDS!
ENSURE THAT THE MICROSCOPE IS RETURNED TO ITS PROPER NUMBERED POSITION IN THE CABINET!!!
When placing the microscopes in the cabinets, DO NOT LET THE OCULARS HIT ANY PART
OF THE CABINET! The clearance should just be enough to push the microscope
straight in by the ARM.
NOTE: PARTS OF THE MECHANICAL STAGE HANG OVER EACH SIDE OF THE MICROSCOPE!!! BE
CAREFUL NOT TO DAMAGE THE MECHANICAL STAGES OR THE MICROSCOPES ON EITHER SIDE!!!
The space on either side of each microscope in the cabinet is EXTREMELY LIMITED! BE
EXTREMELY CAREFUL!!!

