DAY FIVE - EVOLUTION
CHINATOWN
This day actually starts at the main map, so choose Chinatown. Once there go
north and in the second area get a chest to your right containing an armor power-up
and a chest to your left which holds a 180HP+ vial. Go north and get the two chests
to your left here that contain a weapon power-up and a new gun...then save at the
phone if you wish. Go north again and you will see Kunihiko looking into a sewer,
speak to him and he'll give you a key. Now get the chest in the upper left that has a 30
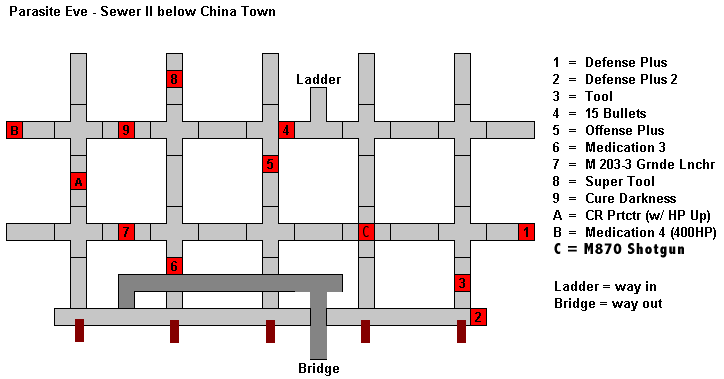
bullet clip, and enter the sewer. NOTE: This section is a maze type area and I have
given one of the fastest ways through it here that still gets you the good armor (with
only ONE out of the way item noted, other than the ones you get ON THE WAY). There
are about three other chests that I didn't mention here, and they don't contain anything
interesting anyway. Still, if you wish to find them...more power to ya. Anyway, in the sewer
after you first go in take a left and get the chest for a 15 bullet clip, go left, left again, then
north for an upgrade tool. Go south, left (get green potion here), left, south (get great
armor in a chest here), south, south, and south. You have now reached an open type area,
climb the ladder to your right and go all the way right to get a chest containing a new
police stick.

SEWER MAP
Now backtrack and take the way down that you just passed to reach a new area. Here
you will see an FMV sequence, then go down/right and down the ladder...get the chest
here that has an upgrade tool. Now go back up, take the stairway leading up, and
enter the door. Here just enter the door on your left and get the chest in the next
area with a 30 bullet clip inside (save your game here too). Now click on the console
in front of you and choose the top option and the next top option. Do it again but this time...
top option, then bottom option (watch FMV). Now click it and just push the first bottom
option. Go through the door to your north and you'll see the results of what you did.
Go straight to the right and exit through the door there, then go straight up the steps
and through the door. Now you are in the subway, so go left and climb the wall. Here
get the two chests containing a 180HP+ vial and a weapon power-up. Take the left path up
and get the chest containing a 30 bullet clip on the way. You are now on a new boss.
CENTIPEDE BOSS - 1st FORM 800 HP - 4 SECTIONS 150 HP EACH - TOTAL
1400 HP
This boss can be tough if you don't know his strategy, simply because if his moves hit
you...they hurt! His moves include his simple smash in which he brings his head down
on you, his poison balls which he fires into the air and lets them land on you for
damage and poisoning, and his lightning bolt in which he swirls around about 45
degrees and lets loose a MAJOR killer bolt at you. The strategy actually makes him
pretty easy though! Just stay right at his side towards his tail on his left (his real left) side.
Just keep moving with his tail, firing, moving with his tail, firing, etc. With this method, the
only move he has that is any threat is his poison ball attack...and that alone is no big deal.
As long as you are towards his hind area and right at his side, he can't use the lighting
bolt attack where he turns 45 degrees very fast, and he'll still miss you barely.
This strategy is tried and true...you can't lose if you do it right.
After you do about 800 HP damage he explodes into four segments that dance around
you and fly into you for big damage. This part is difficult at first because there are no
safety zones! Just concentrate on killing one of them very quick so you'll open up a
safe zone. Now there is an empty space so try to stay in it and blow the other little
bastards away. I can practically promise you that you will need to use your 280HP+
Parasite Energy spell at least once in this part of the battle so don't be afraid to do so.
Anyway, annihilate those pesky things and stand victorious in the end.
Now, continue north and go to the end of the bridge...search the dead cop and get
his key. Now you are instructed to insert DISC TWO...do so.
Go back down the bridge and back to where you where...go far to the right to find a
hidden path and follow it down to enter a subway car. Inside the car, get the three
chests that have body armor and two upgrade tools. Now leave the car and take the
middle or left path down. Go down again to end up at the save point area...no go down
a screen and get the chest containing an armor power-up. Exit the area through the
iron gate now that you have the cop's key. At the map it will be dark now so choose
the Warehouse or Museum.
WAREHOUSE (optional)
This is an optional location, but it also gets you the strongest weapon in the game...
your choice. Anyway if you decide to go here there is a cop at the gate who
eventually runs off and you can enter...get the chest directly to your right which
has a new weapon (this one is not the one that is the best...obviously). Now
go north and enter the warehouse. In the first room, get the chest to your left
that contains some body armor and exit the area to the north. Here, go
down/right and get the key glimmering on the floor. Exit the area through the
door in the upper right and in the next area go directly down and enter the door
on the left. Here get two chests...one has some body armor, the other has a clip.
Go up the steps to the left and go past the save point, up a ladder, and to another
chest which has a weapon power-up (now save). Exit the room through the door
on the left, go across the straight bridge, and enter the next door. Here get the
three chests which have two armor power-ups and an upgrade tool. Now climb
down the elevator shaft to the north. Here you will face a boss.
CRAB BOSS - LT. CLAW 400 HP - RT. CLAW 400 HP - BODY 800 HP - TOTAL
1,600 HP
This boss has killer attacks, so strategy is a must. He has about four attacks
including his regular stab attack where he stabs at you with one of his claws
for some damage. Then there is his bubble attack, which hits you once or twice
for about 90 HP damage each time. He also has an eyeball laser attack where
his eyes pop out of their sockets and let loose two deadly beams. His final attack
is also his most dangerous...his claw grab, in which he grabs you with one claw
and nails you with the other reducing your HP to 1. The tactic on this boss is to
stay at his side (much like the Centipede Boss). If you are at his side you are
completely safe from his bubble attack, and as long as you are at least a little
distanced from his side you are free from his stab and claw grab. So the only
attack that there is to fear is the deadly eyeball lasers. These are complicated to
dodge...as soon as you see the eyes come from the sockets just tear ass in a
certain direction and don't let up until the lasers disappear. If you succeed
good, if not...oh well good luck next time and just heal the damage. While fighting
this creature go for his claws first because his body has ultra high defense while
the claws exist...kill the claws then go for the body. If you get weak, you'll want to
use your 280HP+ Parasite Energy spell. Once you defeat him you get the best
weapon in the game (a rocket laucher type weapon...save it for later). Then get
the upgrade tool in the upper left hand corner and leave the warehouse the way
you came.
MUSEUM
Enter the museum and you'll see a person dressed in white disappear into a door
on the left...save your game and pursue him/her. In this room exit down/left and
reach a room where you can get a 180HP+ vial in the lower left corner from a chest.
Now exit this room by another door and witness the man in white again. Now get the
two chests; the one on the left contains a 180HP+ vial, the one on the left has a new
gun. The man in white has locked the door he exited through so backtrack to the
museum lobby now. Here go north and in the next area click on the machine to your
right and choose the bottom choice to get an Instant Revive potion. If you search around
on the right side of this room you should be able to find the entrance to a pair of secret
rooms that contain some ammo, upgrade tools, and some armor. In the lower right
area of the first secret room, push a box aside to reveal a second secret room that
contains a trading card. Now return to the forest room and go north, and in this area go
north and left. You will see a huge scorpion (not a boss, don't worry) and a machine...click
the machine and select the middle button to get a 15 bullet clip. Now take on the scorpion
to clear the way...he looks intimidating, but he's really quite simple.
In the next area go north to another area and get the chest here that has a new gun.
Go north (don't take the stairs) and once you reach the next area look around and then
just leave...as you leave a sequence happens. Now go back from where you can,
take the stairs this time, click the machine at the top and choose the second option
to get a 30 bullet clip. Go down in this room and grab the contents of the two chests
that are in between the red partitions. Now go north and in this area you will see the
result of the sequence that just happened. A door has been cleared in the corner so
enter it and find yourself at a ladder going up or down. Go down quickly and get the
chest with an armor power-up, then enter the door. Behind one of the statues you'll
find a tool. Go back outside and climb up to the third floor. Get the chest with a few
rockets and then enter the door. Inside click the machine and select the
top choice for a 30 bullet clip. Now go south to the next area and south again (after
clicking the bottom choice for a 30 bullet clip at the machine here) to get to the next
area. Here take a right and go right again here after getting the chest containing a
400HP+ vial and then follow the hallway to another area. From here just go south to the
next section and go through the double doors on the left here, which gets locked
behind you by someone.
In here get the chest with new body armor and then go up to the broken window and
choose the top choice which makes Aya climb outside onto the ledge. Walk to the right
and you'll be given a choice again, choose the top one to have Aya drop down a
floor...then enter the room to your left. Exit this room to the right and then in this area
go North. Here there is a Museum shop and inside is a chest holding an armor
power-up (you can't see it, but it's there under the canopy). Now go north, and follow
this hallway to a large red carpeted area where you must go through the northern door.
Go north in this hallway to reach the museum security office where you can save finally!
Also in here push the button to the right to turn on the elevators, watch a security camera
video of Eve, and get the chest to the left that has a new weapon. From the spot where
you deactivated the alarm, head right, and keep moving until you end up in an elevator
and choose the 4th floor. When you walk out of the elevator you will be in a storage room
with a new piece of armor, a shotgun and a tool. Grab these items and then ride the elevator
back to the second floor and keep moving around until you can see yourself in the security
room. Leave the room, go down the hall again, and watch the cool FMV of the T-REX
coming to life. Now go left and in this area get the chest containing an Instant Revive potion,
then go North. Here get the two chests containing an armor and weapon power-up. Now
you are at the area where the destroyed room is (the one above all of the stone heads). Go
down the stairs, then down and follow the way back to the museum lobby. In the lobby go up the
stairwell and then into the door that is now slightly cracked. Here you see Kunihiko and he
gives you a new weapon. A scene takes place (with Daniel kicking some ass) and then Aya
gets a key. Now make your way back to the security office to save your game because the boss
is close by to there. Once you save it, exit the office, go down the halway, take a left at the red carpet
area, go up the stairs, and exit this area by the southern door. Here you will face a boss.
TRICERATOPS BOSS - 1st FORM 1,000 HP - 2nd FORM 1,050 HP - TOTAL
2,050 HP
This boss isn't too hard despite his relatively high HP. He has moves that absolutely
hurt like hell so the key is, of course, dodging them. He hasn't many moves, just a
lightning bolt ground attack and his charge which hurts especially if he does three
in a row. The way to beat this guy is simple...just fire at him with your best weapon
(other than the rocket, save that) for about two turns then get ready to dodge his charge.
At first he will only be doing one charge at a time, but as you weaken him...he'll move up
to three. The dodging isn't as easy as it looks, but it can be done. However, when he
does three at a time you'll most likely get hit by at least one. Anyway, when you see him
about to do it just be right in his line of sight and dart quickly to the side so he goes
past you...that's the basic "dodge" on this guy. As for his lightning bolt attack...just get
lucky and be in the middle of its circular path, that's all I can say. He shouldn't be too
tough for you, and once you've drained 1,000 of his HP his head armor comes off and
you can deal even bigger damage per hit and he doesn't do his charge anymore. He's
purely a lighting bolt kinda monster after you destroy his head shell. He runs about on
the screen like a little fairy and stops to shoot his lightning...this form is easy beyond
belief. So KILL HIM! Afterward you may want to go back and save your game because
when you continue downward after the Triceratops boss it's time for another boss (but
first get the chests containing a 30 bullet clip and a 180HP+ vial).
T-REX BOSS - 2,900 HP
Uhhh...this guy is kind of tough. However, at this point in the game you may have a
certain Parasite Energy spell that makes the battle much easier. The spell I'm talking
about is the best one in the game (the Knights of the Round Table of Parasite Eve
so to speak...not literally!). Anyway, it causes Aya to transform into an angel like being
and she does about 250 HP damage 7 times in a row! I guess you can understand
why this would help out a lot... Anyway, if you use that the T-Rex will still be alive so
it's time to tell the strategy. This guy has quite a few moves in his arsenal. His basic
move is his slash attack, where he just hits you if you're too close. Then there is his
main attack in which he is basically a flamethrower and a huge tower of fire from his
mouth bathes the area back and forth. He also has his electric ball attack where he
charges up and fires two balls of energy at you (these are easily dodged). He has more,
but these are his most deadly and most used. Now, the strategy isn't too hard to learn
and it is once again a side based strategy. When he is about to blow his fire you must
run up to him and choose the correct side of him to stand on...you can tell by his body
shift...go to the side farthest from where his body is pointing. You should be able to
dodge the fire easily this way...as for the electric balls, just run around and those
pathetic things will miss you. He's not so hard after all eh? Just to let you know, I have
beaten him without using that special PE spell, so don't go and learn it just for this boss
if you don't have it. Good luck!
After he's dead, exit the area by the hard to find door in the corner and you'll be
in the museum lobby again. Take the elevator to the fourth floor and get the chest
with an Instant Revive by the gross looking door. Ignore the door and follow the
path down the stairs. Here go north, then north again, then follow this path north,
then go left, the south and you will be back in the triceratops room. Exit to the south
to trigger an FMV sequence. In the next room go through the broken glass case into
a secret room with two chest holding a new weapon and an upgrade tool. Now
back track until you get to the room that has a quiz and a dinosaur in a display case
(it's on the 1st floor). Walk through the shattered glass to reach a secret room with
a new piece of armor and a super tool. Afterwards, fortrack (I know that this isn't
a real word, but it should make perfect sense) to the spot where you backtracked
from. Now exit this room by the southern muck covered stairway and in the next area
enter the cracked door.
Note: Once you enter this room and trigger the next event, you will no longer be able
to return to the Police Station or any other location in Manhattan. However, you will
get a chance to see Wayne again.
Here you will see Eve and a huge non-interactive section begins. You can't play it, but
you can watch it...and the FMV in these sequences will have you screaming out in glee.
We're talking truly awesome stuff here. Once it is all overwith... you find yourself on an
island of slime...go north to face Eve one last time.
EVE FINAL BATTLE - TOP PORTION 1,800 HP - MID SECTION 1,600 HP - BOTTOM
SECTION 2,300HP - TOTAL 6,100 HP - SECOND FORM 2,300 HP - GRAND TOTAL
8,400 HP
This is, in my opinion, the hardest battle in the game. Eve is one tough bitch. By
the way, after fighting the T-Rex you should've gained enough levels to have that
super PE spell, and you practically must have it here unless you are packing a bunch
of rockets! Yes folks, it's time...time to use the Rocket Launcher. Eve has three parts
to her body so the best way to beat her is to use a weapon that hits all parts...the
R. Launcher is definately that weapon. Anyway, Eve has quite an impressive arsenal
of moves on her side. She has two hands in front that shoot fireballs at you. She
has two hands in back that go apeshit and fire energy boomerangs at you in quick
succession! Also, she has a move where her top portion shoots a fast string of
energy needles at you. She has a move where she just flies right up to you and
bashes you bigtime! She also has several very annoying moves where she flies up
to you, picks you up, and totally kicks your ass. She has three of these, in one she
picks you up and just hits you about four times in a row...ouch! In another she picks
you up and hits you less times, but confuses you as well. Then is her worst of all,
when she picks you up and drains your HP to 1. Your basic tactic on this chick is to
stay away and pummel her from a distance. Her fireballs are easy to dodge by
running in one solid direction and her energy boomerangs usually won't hit you if you're
far away. As for her pick up/kick Aya ass moves...what can I say...just RUN!!! Anyway,
once you start the battle immediately use the super PE spell. Then just fire your R.
Launcher at her and keep yourself alive until your PE is fully charged again...and use
the super spell again. After this, a few more R. Launcher blasts should do it. Uh
oh...the battles not over though...time for Eve's second form.
EVE FINAL BATTLE - TOP PORTION 1,800 HP - MID SECTION 1,600 HP - BOTTOM
SECTION 2,300HP - TOTAL 6,100 HP - SECOND FORM 2,300 HP - GRAND TOTAL
8,400 HP
Phew...at least her hard form is history and since this is counted as a new battle
your PE meter should be filling pretty quickly. All you have to do is survive her three
wimpy attacks. She has a wing slash for close encounters, an earthquake type
attack that appears right under you and is fairly unavoidable, and her super attack
in which she flies high into the air and fires a huge purple beam down on you. All of
these attacks (except the earthquake) are easy to avoid, so just stay alive until
your PE meter fills and let her have a taste of your super spell. A few more rocket or
gun blasts should do it after that. Congratulations, you did it! After a cool FMV it's the
end of the day!

