What is your color system? How are numeric color names better than word ones?
1. Introduction to color basics
As you probably know from art class, there are 3 sets of primary colors. The primary colors of pigments, or cyan, magenta, and yellow, light, made of red, green, and blue, and paint [? don't know], made of red, yellow, and blue. Computer graphics refer to the 3 primary colors of light. Mixing them in different amounts produces varying numbers of colors. Ever wonder what you get when you mix, say, sky blue [color code 6074F2] and dark yellow [color code 808000] in terms of light? It turns out that you end up with a greyish color with a small touch of cyan, or color code 707A79. What does all that mean? Where did I get that resultant color from?
2. The hexadecimal coding
Web page designers using HTML color naming should understand this, but if you've never used HTML color naming outside general words like "red", "green", "yellow", "pink", etc., it's unlikely you'll know what these "codes" are. What it is is a hexadecimal numeric code. Hexadecimal is a number base with 16 different digits instead of the normal 10 we know of and actively use. Base-10 is also known as the decimal numeric system, which use the digits: 0, 1, 2, 3, 4, 5, 6, 7, 8, and 9. For hexadecimal, you have 6 extra digits involved including the 10 in the decimal numeric system [or decimal system for short]. The extra digits, which are letters of the alphabet, are: A, B, C, D, E, and F in the same counting order.
If there are 3 primary colors of light, how does these numbers tell how much of each to use? There are 3 primary colors of light and 6 digits. Break 'em up into groups of 2 and you get the individual values. For the color of the sky, or 6074F2, it can be broken up into 60 74 then F2. 60 is the hexadecimal number for red [equivelent to 96 in decimal if you're using a graphics program like MSPaint and Photostudio], 74 is the hexadecimal number for green [equal to 116 in decimal], and F2 is the hex number for blue [242 in decimal]. In all hexadecimal color code numbers, the first two digits is the amount of red used, the middle two is the amount of green, and the final two is for blue. Where did I get the 707A79 color from when mixing two colors? This concept is called "averaging" or, if you have consecutive pixels of these two colors next to each other, it is called "dithering".
3. From hex to decimal and back
First, to understand averaging and what to do to average colors and/or use dithering, you need to know the basics of hexadecimal numbers. Unless you can add and divide hexadecimal [which, surprisingly, is the same as doing it in decimal], you'll need to know how to convert hexadecimal values to decimal values and back to hexadecimal. Doing so is easier than you think, especially since only two digits are involved. These tables below are shortcuts to the hex <�> decimal conversions:
Hex
Decimal
Hex
Decimal
Hex
Decimal
Hex
Decimal
0x
0
1x
16
2x
32
3x
48
4x
64
5x
80
6x
96
7x
112
8x
128
9x
144
Ax
160
Bx
176
Cx
192
Dx
208
Ex
224
Fx
240
How to use these tables to convert to decimal
Given a color, say the color of the sky, which is roughly 6074F2, you need to convert it to decimal.
Break the hex codes into the three sections for each color of light: 60 74 F2.
On the top table, find the "60" value above. The ones value makes no difference for now. 60 on the table above is 96.
On the bottom table, find what the ones digit is equal to and add that to the value found for the tens digit. 96+0=96.
Repeat steps 3 and 4 for green and blue.
To test that color, open up MSPaint, Photostudio, or whatever graphics editor you're comfortable with and enter your decimal values you got. The color should be very close to this text color.
How to use these tables to convert back to hexadecimal
Given a random decimal set, say 56 for red, 112 for green, and 224 for blue, converting it back to hexadecimal is almost the same as the above, only backwards.
Always start with the value of red first.
Find out what the value of red is for 56 on the top table that is closest to the hex value mentioned previously, but without going over. 56 is closest to 48, but 64 would be over. 48 is a 3 for the "tens" digit*.
Take the decimal value for red and subtract the value you found on the top table. 56�48=8. Find 8 on the bottom table to find out what to use as a hexadecimal digit. 56 converts to 38 in hexadecimal.
Repeat steps 3 and 4 for green and blue.
Checking this color is a bit harder, but on the forums, you can make a test post in the testing area and put some text as "[color:xxxxxx]your test text[/color]" where the six x's stands for your converted hex code. The best way to test it is to create a very simple HTML document of your own and in the body's BGcolor tag, use this color to find out what it is.
Hex
Add
Hex
Add
Hex
Add
Hex
Add
x0
0
x1
1
x2
2
x3
3
x4
4
x5
5
x6
6
x7
7
x8
8
x9
9
xA
10
xB
11
xC
12
xD
13
xE
14
xF
15
4. Averaging and dithering
Averaging is the concept of blending two colors to get a new one. At the beginning of the document, you saw that if you mix the color of the sky, or 6074F2, and the code 808000 [dark yellow], you get 707A79 as your end result. This value came from averaging these two colors together in a 1:1 ratio. Averaging is easy. Here's how you do it:
First, convert the hex values to decimal using the steps described between the two above tables.
Sky blue, or 6074F2 converts to 96 red, 116 green, and 242 blue.
Dark yellow, or 808000 converts to 128 red, 128 green, and 0 blue.
Take the two values of red and average them. (96+128)/2=224/2=112. Here, you'd use 112 for red.
Repeat step 4 for green and blue to get 170 for green and 169 for blue.
Convert your decimal values back to hexadecimal to get the 707A79 value I came up with.
Testing this is far harder than the other two ways to test. The best way is by a graphics program.
Create a new file in true color [24-bit color] about 300 pixels by more than 50.
Split the document in half by a black line and widen it to about 16 to 32 pixels to make a box.
Edit your colors to get one of the two colors you're wanting to mix. In my example here, bucket fill sky blue on either one of the two sides of your image.
Edit your colors once more to get the other color, which is dark yellow and bucket fill it on the opposite side.
Edit your colors for a final time using the mixed color results and bucket fill this color in the center and bucket fill those black lines you made.
This'll create the illusion that the two colors are perfectly blended in together.
You can try the magical color changer below a ways to see it for yourself. Note to get the true overlapping effect, the color ratios must be identical.
Dithering is the concept of using two different colors perfectly side by side in an alternating checkerboard pattern to mix colors. Using the sky blue and dark yellow example in the testing part of the list above, you can also mix these two colors together to get this result. Using your graphics editor, this is how you use dithering:
Create a new document of any size greater than at least 32 pixels on both sides. Zoom in to at least 4 times the zoom, but more you zoom in, the better it is to do.
Edit your colors to get the sky blue color again.
Create a very small square [must be one pixel at a time] inside your document and create a sky blue and white checkerboard pattern. Hint: It's much faster if you just do 4 squares across the top row alternating and a layer below. Stop when you finish two rows of squares.
Edit your colors a final time to get the dark yellow color.
Between your sky blue squares paint your dark yellow squares alternating to create a simple 8x2 sky blue and dark yellow checkerboard. If you accidently cover a sky blue square with yellow, press Control+Z to undo it [or go to edit, then undo].
Using your select tool, select this square grid you made and copy and paste it to make an even bigger checkerboard. Keep copying and pasting until your whole document is filled [Hint: If you're using a large document, you might want to select the bigger groups of squares, copy and paste those a few times, select the even bigger square and repeat.]
Finally, zoom out so that the image is true size.
This makes it seem as if the color wasn't really sky blue and dark yellow, they seemed to have blended together. This is a trick of the human eye and it's even more effective if you're using a small screen, using a high resolution, and/or viewing it from a great distance.
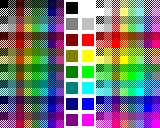
If you were to average all the 16 colors you get with the palette for 4-bit color, you'd have 50 total colors if you use the dithering concept. For those who don't know what colors you get with a 4-bit palette, this list consists of all these colors as well as their apparent brightnesses to the human eye:
color
color sample
hex code value
approx. brightness*
black
000000
0
grey
808080
128
dark red
800000
38
dark yellow
808000
113
dark green
008000
75
dark cyan
008080
90
dark blue
000080
15
dark magenta
800080
53
white
FFFFFF
255
light grey
C0C0C0
192
red
FF0000
76
yellow
FFFF00
226
green
00FF00
150
cyan
00FFFF
179
blue
0000FF
29
magenta
FF00FF
105
If you were to go through the entire continuous spectrum from red back to red again monitoring the constant brightness of all 1536 colors and graph it out, you'll see something resembling this "wave":
Brightness is useful for checking your averaged or dithered color. In this giant image 769x531 pixels in size, the line represents how bright/dark the color is in the spectrum assuming that there is no greys involved. The more black there is for a color, the darker the color. The more white, the lighter the color. It resembles a line graph, only with the points a pixel apart. Note yellow and blue on this. Note how they are the extremes in this chart. Also note that from cyan to blue there is a huge spike in the brightness value around 0080FF. Between 0070FF and 0090FF, there is a huge difference unlike from FFFF00 to C0FF00, twice the gap range.
5. Putting averaging and dithering to use
If you were to cross these 16 colors in every which way you can, you'd get a total of 50 colors. If you were to express all these colors on a color chart, this is what you'll see:
How to use this color chart:
The palette is arranged in the same pattern. The colors being averaged [or dithered with] are between the two. The color closest to the coresponding palette is the color being averaged or dithered. The palettes to the right of the focused color is always in the same order. The colors in order from the top to the bottom of the left side in the central area is the top row in each segment. The right colors from top to bottom make the bottom row of the segment.
Let's cross true blue with gray as an example.
Find either the gray or true blue color in the central area [it doesn't make a difference].
Find the coresponding color in the segments to the side of the main.
Using gray as the key color, the second square from the right edge of the segment on the bottom is where this color would be.
Doing the averaging, you should get the color 4040C0, a blue-gray color. Using the eyedropper tool in your graphics editor using the true color image would reveal this exact color.
The top image is the results of crossing the two colors in true color. The bottom image is an illusion as there's only 16 colors involved, not 50. If you were to zoom into this image by a magnification of 4 times the normal size, this is what you'll see:
This effect is called dithering. The first image doesn't have dithering, but the mixing is the same. This is called averaging [or color-crossing].
Simulating transparency is seemingly impossible as far as drawing images, yet, it's easier than you think. Consider these two images. The first one is the root image. The second one is with 3/4 transparency 404040 colored box with 1/2 transparent FFA000 text in it. Real transparency in 2D drawings cannot be easily used with general programs like Paint and Photostudio. Instead, you need to average the colors out to give the sense of transparency.
This image is of a small greenish beach with a cloudless sky. Here, you can see how little of a change there is in the background, but the transparent object still shows well. This is an animated image. Every 2 seconds, it'll change. The second one has a "spell failed" notice***.
One other use of averaging is involved with making animations and something lasting for a fraction of a frame. With averaging, you can make a simulation that an animated image or a video is seemingly played at a faster frame rate that what it really is. For example, if your animation was played at 10 frames per second and you want an effect of a sudden, white flash lasting for a 20th of a second, you'd average all the colors in the previous frame with one part white, save that frame, then revert back to normal.
Averaging is far more useful when you want finer-looking videos or animations. If you use averaging with 6 parts total [a mix of 0 parts color 1 and 6 parts of color 2, 1 part color 1 and 5 color 2, etc.], you can give the sense that your image has six times the resolution, though this is limited to a certain point. Using this in an actual animation can give you this:
Watch the green bars closely and carefully. It won't take long to notice a significant amount of movement. Try placing your mouse arrow over one of the bars and keep it still for about 5 seconds. You'll notice that those bars have moved about 8 pixels [or so it seems about 50] to the left. Though, the only minus side on using this [for this type of pattern] is, if you look closely enough, that it appears as if the image suddenly gets brighter, even though you're constantly seeing the same color center. If you were to magnify this image by 4 times it's width, you'll see the real secret that there is no extra fineness to the image, though it seems like it at true size:
At four times the width, seeing the secret is not much of a problem, though the effect of the appearant brightness changing still occurs, but it's somewhat less noticable.
If you'd like to see how this averaging works, try it yourself with this instant-change image:
Note: To get the image to appear as if the two colors were overlapping, the two ratio values must be equal, but the colors can be of anything.
6. Going to 12 digits instead of 6
My color system, as it is, actually goes out more than just 6 digits. Consider a color like 0123456789AB. As you should know, 01 is red, 23 is green, and 45 is blue. The 67 part is transparency. If an object is fully transparent almost like Earth's atmosphere, it'd have a transparency of 00. If it was fully visible, the default in most cases, the transparency would be ff. The next two digits, the 89, indicate reflectivity. Reflectivity is the amount of light [all colors] reflected back. It is based on how clear the reflected image appears. A true mirror has a reflectivity of ff, the highest. Something not-at-all reflective, like a cardboard box, has a reflectivity of 00. Most objects are around the 08 to 20 areas. A highly reflective paint may get something like 70. Your monitor [provided that it is a curved one], is about 50 [the glass part]. The last two digits indicates brightness, how how much light in relation to the average is pouring onto the object. A 60-watt lightbulb would be way up there, about E0 during the nighttime brightness range. The night sky compared to this light bulb would be near 00. The average, by default, is 80. Because objects tend to receive light at different amounts during different times of day, brightness is often not listed as the color, thus 10 digits are used instead of 12. An example of the extended version for that of water, accurate to within 16 units for each of the 5 main groups, is estimated to be of the color E0E0E01030. That means that pure water is of the color E0E0E0, is 15/16 transparent, and the reflected image is 3/16 as clear.
7. The advantages of numeric color names
There are so many uses for using numeric color names versus word color names. Consider the averaging effect. You can't figure out what your result would be if you mixed brown and yellow-orange just knowing the color names. Brown happens to be 604030 and yellow orange is FFC000. Do the averaging yourself to see what the result is and create an image similar to what the overlapping illusion effect is with brown on the left [or right, whichever you choose], and yellow-orange on the opposite side leaving the center where the overlapping is. Doing this is described in the beginning of the "averaging and dithering" section. Just only knowing the word names, you can't tell but only guess. Also, with averaging, you can make a simulation that an animated image or a video is seemingly played at a faster frame rate that what it really is. For example, if your animation was played at 10 frames per second and you want an effect of a sudden, white flash lasting for a 20th of a second, you'd average all the colors in the previous frame with one part white, save that frame, then revert back to normal.
Another advantage over numeric color names is that they can be hard to forget once you have a fair amount of experience recognizing colors and their color values. Let's say I told you that there was a color called "dawn green". If you were to look at it, you might think it resembles yellow-green but dawn green has a bit more gray to it [less saturation]. The color code for this imaginary color is 70B050. After you know the color system for a very long time [like I have], later on, you're quite likely to forget the color name "dawn green". But if you look at it carefully enough, you might be able to pick out the 70B050 color with great accuracy. An expert like myself can get as accurate to within 16 decimal units from the real value.
Another use is finding opposites of colors with ease. You do know that black and white are opposites, but did you know that red and cyan, yellow and blue, as well as green and magenta are opposites too? The color opposite that of the color of the sky is 9F8B07, a yellowish color. The color opposite of yellow-orange [FFC000] is 003FFF, a bluish-cyan type color. Given a random color, say 44896B [a weird blue-green-gray color], you can easily find the opposite by taking 255 and subtracting the converted versions of these color codes. Note that in the 4-bit palette image above, when you mixed true red with true cyan, you end up with 808080, a color already on the palette. When you mix the darker versions of the colors, they cancel out and make a dark gray, which is obviously 404040. The color, 404040 is not an opposite as it's opposite is BFBFBF. If it didn't have an opposite, it would be 808080, or true gray. In a sense, this color has an opposite: 7F7F7F, a difference too close to tell the difference between. That image you see on the top literally has 390,152 *different* colors!
8. The disadvantages of numeric color names
There are two disadvantages over numeric color names over word color names. One, it does not apply to general art using paints, colored pencils, etc. I believe, however, that it *IS* very possible to create a numeric system for pigments as well with cyan, magenta and yellow being used instead of red, green and blue. Currently, this is very hard to test.
Naming colors outside computer data [like that of the color of your computer's monitor or wall paint color] is very difficult to do, but if you're very experienced with numeric color names and know hexadecimal very well, it can be easily done. The way I name colors outside the computer is by simply doing the following:
Organize the color's detail into three categories: hue, saturation, and brightness.
Estimate the hue of the color as accurately as you can. I base the values on a scale from 0 to 240. 0 is red, 40 is yellow, 80 is green, 120 is cyan, 160 is blue, 200 is magenta, and 240 is back to red.
Estimate how gray the color appears. This effect is called "saturation". A color with absolutely no sign of gray is given a rating of 240. If it's 100% gray, it's 0.
Estimate how bright the color is. 0 is pure black and 240 is pure white. 120 is the true version of that color.
I compile this data to make an estimated hexadecimal color for it. How this is done is not fully certain, but there is a pattern involved and I'm trying to find a formula**.
Footnotes:
* In hexadecimal, there is no such thing as a "tens" digit. Rather, it's called the "sixteens" digit. I expressed it this way as hex and decimal are very closely related to each other, only with one difference: the number of digits.
** The concept of naming colors completely away from computers is quite difficult and I only just started this.
*** Spell failed notices appear when some various effect happens. To learn the complete list of spell failures, what they mean and how to prevent some, read this list of errors.