Coptic Bag Project- Sprang
New Update
Well, again, I seem to be falling behind on updating. Hopefully, now that the days are getting longer, and the nicer weather is moving in, I'll be able to crawl out of bed and get some stuff done again! SAD is not a fun thing without meds!
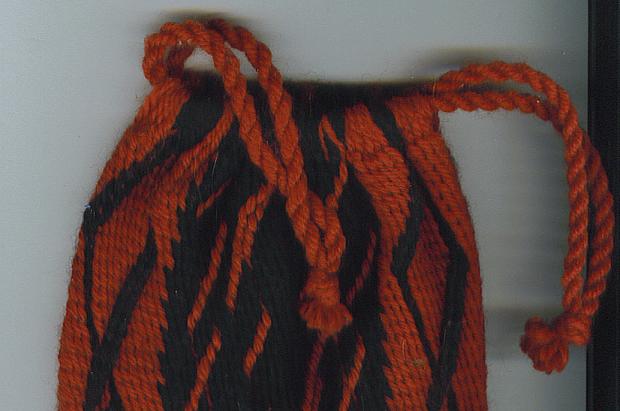
Anyhow... I've been practicing some of the methods found in those wonderful pictures mentioned before. I've been working on the Coptic Twining, as seen in the red and black pouch below, as well as incorporating S- and Z- twist, as seen in the yellow/green pouch below.
Now, I'm wanting to move on to some other fun stuff! One of the things that I've been enamoured with since I started doing sprang, was the double-interlinked sprang. This is where there are two separate warps, and they only come together when you want them to. The advantage to doing this type of sprang (because it's truly a PITA to learn the proper finger movements), is that you can make just about any design come through. Horizontal lines of differing colors can now easily be incorporated into the design. What's more... It's PERIOD! Well, a wee bit before period, but as the SCA defines it's time period as pre-1000 to 1600, that's fine. I have documentation, photos of an extant fragment of a cowl, that is dated to 500-600 AD.
I'm not permitted to use the photos online, but they are available in my color booklet on beginning sprang. (shameless plug ended).
I'll put up new pictures of the project I'm working on, ASAP.
In the meantime, I've also worked out how to make a wooden sprang frame that still looks nice, for those who have wanted to learn to sprang, but didn't want to do it on a PVC frame. Bear with me... as soon as I get pics of the new frame up, you'll be the first to know! Check back here for updates.
Hopefully, I'll have the next book done soon... it will work on S- and Z- twist and Coptic Twining. It will have plenty of documentation in it, as well as the links to get to the wonderful website (as long as it's available!), and where to find other information.
The more I do this, the more folks send me bits and pieces of information as they come across it in studies of other art forms. Please continue to send me these, as I'm hoping very soon to have a spreadsheet available, on what was made where, in what method/s, colors, etc, and when it all happened. I believe that getting all the information in one place will make it easier for everyone to get sprang spreading as a viable SCA art form. :)
**************************************************
Update! 10-08-05
I know it's been awhile since I updated this page, but there's been a lot of research going on since the beginning of the Coptic Sprang Pouch Project started. In short, someone on the sprang e-list kindly forwarded a website that has about 200 extant examples of Roman/Coptic sprang!!! I've been trying to go through that site whenever I can, to see all the various scraps of fabric that are available. There are a ton of pictures, as well, and some of the colors used in the Coptic sprang pieces are just incredible.
One thing that I did, just for fun, awhile back, was to incorporate both S- and Z-twist patterning in between the Coptic twining designs. I didn't have any documentation to support such a combination, but it made sense from an artistic perspective, so I did it.
Imagine my surprise and outright GLEE when I discovered that the Roman era Egyptians and the Copts USED THOSE DESIGN ELEMENTS TOGETHER!!!!
So what I had done instinctively, they actually did!
I love finding documentation for something I've already done. That just rocks. -grin-
So here are two pouches I made, using 100% wool yarn, in authentic colors, and in the two techniques that we now have proof existed... S- and Z-twist patterning with Coptic twining, and the red and black bag, which is simply twining designs. The pouches were made as wine bottle covers, to go in gift baskets for TRM and TRH Atlantia, at Fall Coronation, AS XXXX. (Unfortunately, they never found their way to these wonderful folks, as neither I nor the party I was staying with were able to go to the event. Hopefully, the bags will find their way to their new homes soon!)

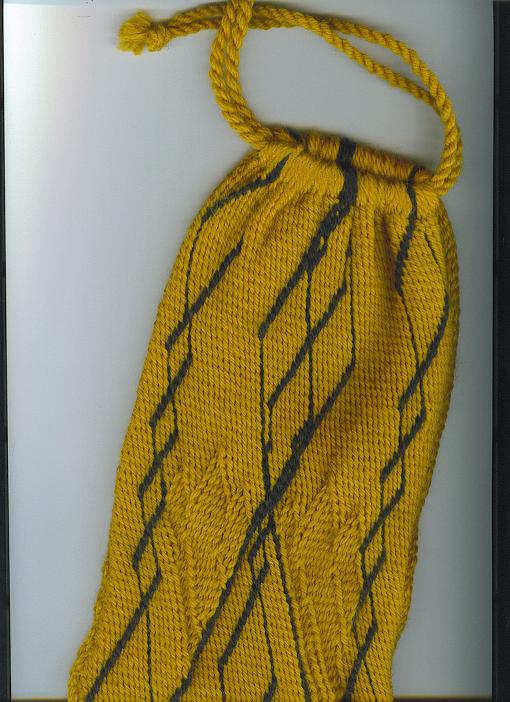
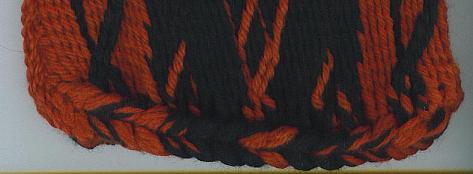
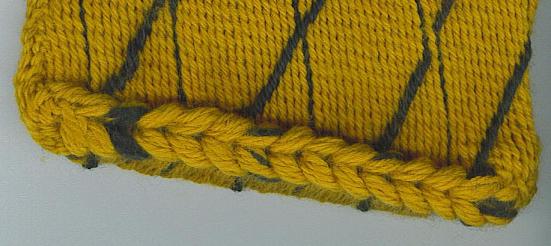
Also note the 'meeting line', or the bottom of the pouch. This closing technique is found in almost every single piece from the Kelsey museum, and in later pieces in my research. It is a very simple chained meeting line, and makes for a nice, sturdy closure.
You might notice, too, that instead of simple strings as the drawstrings (which I discovered at Pennsic 34 do NOT hold up to constant, daily use and abuse), I've plied several long pieces of yarn into a cabled cord. Very simple, again, and very sturdy.

******************************************************
This is where I'll basically do a visual journal on my progress for a Coptic Bag. I'm really intrigued by the intricate designs that you can do in sprang, with small enough yarn and enough skill.
My goal is to do a series of bags, all in the same colors (when possible), using the techniques needed to duplicate the designs of one of the Coptic bags. From there, I can go on to do nicely colored leggings, hairnets, etc, but for now, this is where I'll start.
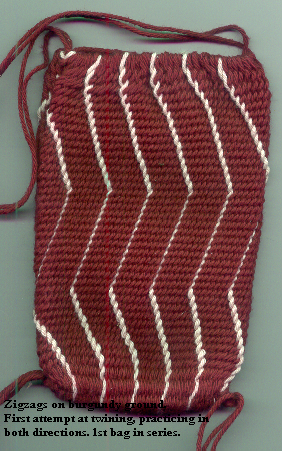
This first bag was my first attempt at twining, and it was a lot of fun, once I got the hang of it. My fingers didn't want to play that way, but I made them, and now it's natural.
I'm very happy with this bag as a first attempt! And those who thought my sprang was 'okay', when it was just one color and not really patterned all that much, are now much more interested in it! Yay!
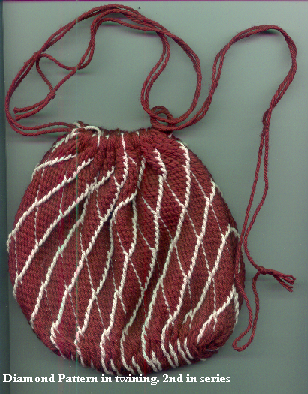
The second bag in the series was a little more complicated. I was trying to learn to make the appropriate crossings when two pairs of twining threads meet, but I ended up doing it wrong. It's still nice and pretty, but I need to work on it!
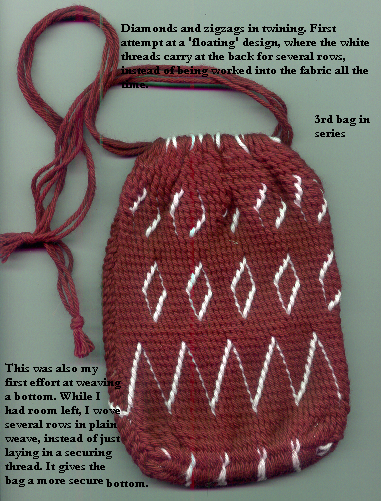
The third bag in the series was a LOT of fun! This was an attempt to learn how to make free-floating designs with twining pairs that are carried at the back of the work (the inside of the bag) when not needed. I really enjoy this method, and the possibilities for design are making my mouth water. :)
AND I finally got the X's right!
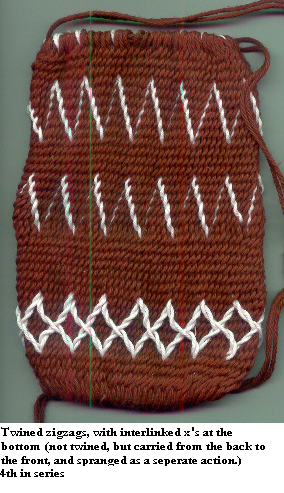
The fourth bag, completed on 3/24/03, was a joy! On a whim, I decided to interlink the carried interlinked threads on the back, and discovered that you can make a nifty fabric design that way. So here's the back, as I saw it and knew I had to carry the twining threads back to the front...
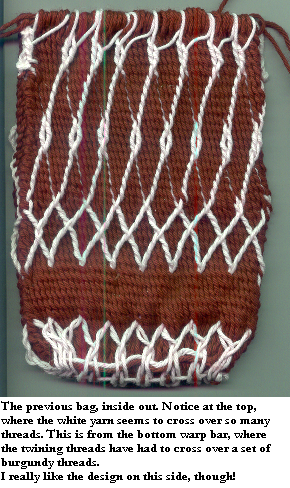
Here's the other side of the 'wrong side'. I put this in just to show the top, where the white seems to cross over the other threads. This is what happens when you lay in the twining threads. They simply carry over the others, to be tamped down on the very first 'foundation' row.

And the same bag, right-side-out, with the X's brought forward and worked in the front. It would be neat to use these threads, since they stand above the fabric, to hang site tokens or other things from... like a chatelaine's belt or something.
This is the fifth bag in the series, and my first attempt at a double fabric. I enjoyed making those white X's on the last pouch so much, I decided to go for it and try a larger scale project.
I've warped this one A,B,A,B, with blue and white. It took a bit to learn how to make this work. There's a particular way you have to pick up the threads that are going to be on the backside of the fabric, and it takes a bit to get into the rhythm of that. But once my fingers knew what they were doing, this started going fairly fast!
<
img src="/journal2/donisfuff/sprang/bluewhite1.bmp">
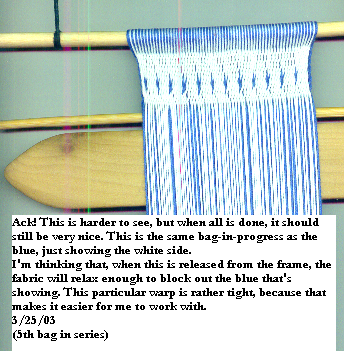
3/26/03
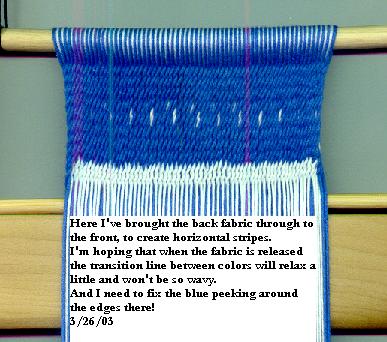
Here's the next step... changing from blue to white, to make horizontal stripes. Vertical stripes are easy. These were a bit more difficult!
It took a little bit to get my brain wrapped around the concept of switching, and figuring out how to start the row. Once I did that, this was a piece of cake!
Keep checking back for more on this project!
NOTE:
I'd like to send a special thank you to Peter Collingwood for his book on Sprang, who's wonderful illustrations and precise descriptions of hand movements have made learning to do the more advanced sprang methods a lot less frustrating! I could never have got this far without that book!!!
Links
Back to home page

Email: donistuff@charter.net

