Captain Evans-Kelly
1. e4, c5
2. Nf3, a6
Kelly Plays the O'Kelly variation.
3. d4, cxd4
4. c3

I offer the Smith-Morra Gambit. I often play this against the Sicilian. The normal move order is 1.e4, e5 2. d4, cxd4 3. c3, dxc3 4. Nxc3. White gives up a pawn for active piece play, open lines, and a whirlwind initiative.
4...dxc3
5. Nxc3, Nc6
6. Bc4, e6
To make the bishop "bite on granite".
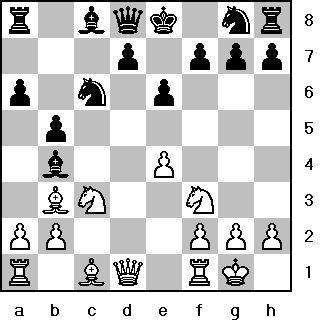
7. 0-0
White already has a commanding lead in development.
7...b5
8. Bb3
Blacks problems lie in his inability to play the break ...d5. For example the immediate 8...d5? fails to 9. exd5, exd5 10. Bxd5 with the double threat of Bxf7+, Kxf7 and white wins the black Queen, as well as an attack on the undfended knight on c6. And if 10...Qc7 11. Bf4! with a winning attack.
8...Bb4?!

The beginning of a dubious plan that will leave black weak on the dark squares.
9. Qe2
Ignoring Blacks "threat". White contines with typical Morra development.
9...Bxc3?!
The implementation of blacks faulty strategy.
10. bxc3, Nge7
11. Rd1!
Carries out whites plan of development. It helps suppress the break...d5. If now 11...0-0. 12. Rd6! is strong.
11...Na5
Black goes about a general plan of exchanging pieces following the principle that that exchanges should help the cramped player. However this plan fails to free his position.
12. e5
Putting a grip on the d6 square. Worthy of consideration was the immediate 12. Rd6!?
12...Nxb3
13. axb3, Bb7
14. Rd6!?
This gives compensation. If now 14...Nf5 15. Rd3, d5? 16. exd6 en passant, 16...Nxd6 17. Ba3 with advantage to white. Slightly better however was 14 Ba3!
14...Qc7
15. Bb2, Bxf3
16. Qxf3

Black remains a pawn ahead but his plan of exchanging off 3 sets of minor pieces has not improved his position.
16...Nc6
Removes the threat to the rook at a8 and attacks whites pawn at e5.
17. Rad1!
Seeing that 17...Nxe5?? is not playable due to Qax8+.
17...Rd8
18. Qg3
Protects the e5 pawn and also attacks the pawn at g7 invading blacks kingside.
18...0-0
Obviously lost is 18...g6 when blacks dark square weaknesses are fatal.
19. Bc1!
Preparing kingside maneuvers with an attack on the dark squares anyway.
19...Kh8!
Otherwise comes 20. Bh6
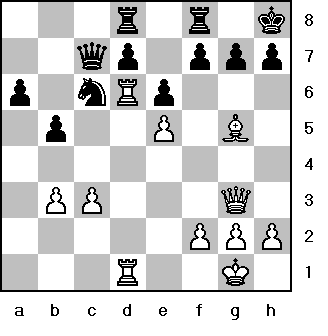
20. Bg5!

Attacking blacks rook at d8 and virtually forcing his reply if he wants to stop the invasion to the 7th rank at d7.
20...f6
21. exf6, gxf6
22. Bh4
Staying on the vital h4-d8 diagnol.
22...Rf7
To defend along the 7th rank.
23. Qf4
Attacking the pinned f6 pawn.
23...Rdf8
To free blacks pawn at f6 from the pin.
24. Qd2!
Switching to attack the d7 pawn with heavy piece domination of the d-file.
24...Rd8
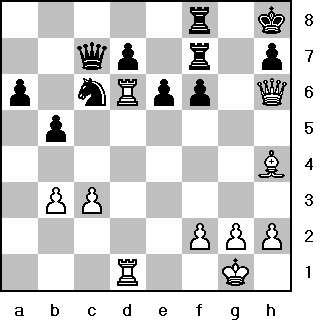
25. Qh6!
Whites Queen keeps up the pressure now the f6 pawn is under fire again.
25...Rd8

Now the d7 pawn must fall opening the d-file at last.
26. Rxd7
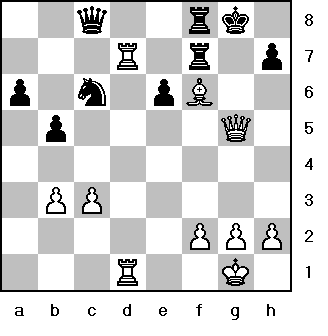
White regains his pawn with overwhelming positional superiority. Notice that 26...Rxd7?? fails instantly to 27. Qxf8#
26...Qc8
Also insufficent was 26...Qe5. 27. Rxf7!, Rxf7 28. f4! (guards e1 and frees the Rd1) Qxc3 29. Rxd7! a decoy sacrifice, Qc1+ 30. Kf2, Qc2+ 31. Kf1, Qc1+ 32. Be1 black is out of checks and faces a mating attack.
27. Bxf6+!, Kg8
27...Rxf6 then 28. Qxh7#
28. Qg5+,

Resigns
On 28...Rg7 29. Qxg7#
1-0
An instructive game showing what happens when one ignores the center and creates a weak color complex.