Gettin' Crafty
I am thoroughly convinced that we've all been blessed with talents. And
one of mine is the ability to make weird shit from household items.
And so now, I share my innermost martha stewart-esque secrets.
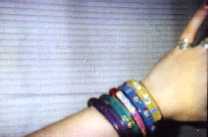
How to Make: Toothbrush Bracelets
My stunning bracelets, so lovingly comprised to OralB toothbrushes, have
made me cooler than velcro amongst my peers. At least once a week, some
random person stops me on the street, asking "How did you do that?!"
Well ask no more! The answers lie right infront of you!
materials needed:
- flat-necked OralB toothbrushes - no angled necks; they do not bend properly.
- a pot of boiling water (yea, you'll need a stove for this)
- nail or toenail clippers
- basin of cool water
- meat tongs or some other metal grabby device
- paper towels for clean up
step 1:
Gather materials above and place an average-sized pot of water on stove until boiling.
step 2:
Place head of toothbrush (where the bristles are located) in pot of boiling water with meat tongs. Hold for about 10-15 seconds. The bristles should appear almost puffy. Remove brush head and brush on paper towel. Pick up nail clippers and tear out bristles. Do this by first grabbing a section of bristle with the clippers, then yank upwards, twisting your wrist. If the bristles become stiff again, just redunk. Continue until all bristles are removed. Tip: for those hard-to-get bristles, use tweezers.
Step 3:
Place your new, bristle-free toothbrush once more into the pot of boiling water. In about 30 to 45 seconds, the toothbrush should become very soft and malleable. Remove the brush with meat tongs and place the steaming strip of plastic on a paper towel. Very CAREFULLY, mold the toothbrush into a circular shape by bending both ends upwards. Leave at least an inch and a half space between the tips of each end in order to put on and remove the bracelet. Also, to avoid nasty steam burns, bend the toothbrush with a papertowel or napkin in each hand. While holding the toothbrush in this position (kinda a cross between an O and a U as seen below) dunk in basin of cold water to seal the shape.
desired shape:

Step 4:
Place your new creation upon your wrist and marvel at your coolness. You can make as many bracelets as you'd like, but be sure to confine the bristle removal to a papertowel for easy disposal; those things are pesky to clean up.
end result...
|
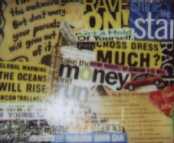
Joys of Decoupaging
(some info taken from decoupage.org and ehow.com)
The word decoupage comes from the French word decouper, which means to cut out. Basically, decoupaging is the art of arranging and sealing paper cut outs on to various surfaces. The end result can be similar to a collage covering an entire area, or a slightly artistic accent on a piece of furniture. Due to my *minor* obsession with decoupaging, I keep a pile of magazine phrases and clippings and a bottle of glue in my room at all times. The following is a slightly sophisticated meathod of decoupage, but when done correctly, the outcome will be far better than the crap I usually slap together.
materials needed:
- white glue
- water
- plastic cup
- primers - shellac, acrylic spray, or varnish (this will vary with each surface)
- a few paintbrushes
- paper cutouts - avoid using photographs, make copies of them instead
- newspaper and paper towels
- a final sealer - polyurethane or an acrylic sealant
- paint - we're not talkin' poster paints here, either.
- sandpaper
step 1:
Gather all materials and cover work area with newspaper. Mix one part glue with one part water in a small container, like a plastic cup. Oh let's call this the "glue base".
step 2: preparing the surface
Wood:
1.) be sure that the wood is completely clean, big rusty nails aren't good either.
2.) sand surface
3.) apply a coat or two of shellac
4.) paint surface for an even finish
(if you're lazy like I am, just skip steps 3 and 4)
Metal:
1.) clean surface and sand away any rust
2.) apply a primer
3.) apply paint that corresponds with primer (duh)
(again, if unconcerned with the painting thing, skip it)
Glass, stone, and plaster:
1.) clean surfaces
2.) for glass, apply 2-3 coats of acrylic sealer. use 2-3 coats of shellac for stone and plaster.
3.) paint surface
Everything else:
Most other surfaces (like plastics, cardboard, etc.) don't really require any extensive preparation.
step 3:
Arrange paper cutouts on surface, overlapping when necessary to fill in gaps. When satisfied, take your glue base and a paint brush and begin to paint on the glue. After fully saturating the cutouts, be sure to smooth out any bubbles or creases in your images. Blottoing up excess glue (those white droplets) with a paper towel is also a very idea. Some pictues may shift during this process, but most will slide back into place easily. However, take care not to tear the cutouts.
step 4:
After the glue base dries, and the surface feels dry, apply 2-3 coats of varnish, sanding between each. When those dry, apply a final sealant. My personal preferance is polyeurthane, but take care to stir the liquid beforehand. Allow your creation to dry completely, then sand the surface a final time. Viola! You have just rendered something boring into something exciting, and in most cases, tacky. But hey, it was pretty darn fun to do. And remember to clean up the mess!
end result...
|
Coming soon: How to make fun things from DUCT TAPE!