
Aluminum Cabanes for Your Lazy AceThis page shows the parts and the assembly sequence of the aluminum cabanes for my Standard Lazy Ace, but the method is the same, no matter which version you are building. |
 Starting from the top of the photo: 1/4" plywood jig (scrap piece) with 1/4" hole 3/8" from the edge. The outer edge of the jig is radiused.
Four strips of 1/8" aluminum, each 12" long and 5/8" wide. A 1/4" hole in the end of each strip centered 1/2" from the end of each strip. These will be the uprights on the cabanes. Four 6-32 allen bolts, with flat washers. Two of them have solder lugs for the rear wire fuselage brace. Ten 4-40 allen bolts, with flat washers and locknuts (to fasten the "X" braces and solder lugs). **Don't forget that there is a bolt through the center where the braces cross to eliminate any vibration. NOT SHOWN: 4 additional strips of aluminum for the "X" braces, a piece of 1/16" piano wire, copper binding wire, flux and solder.
|
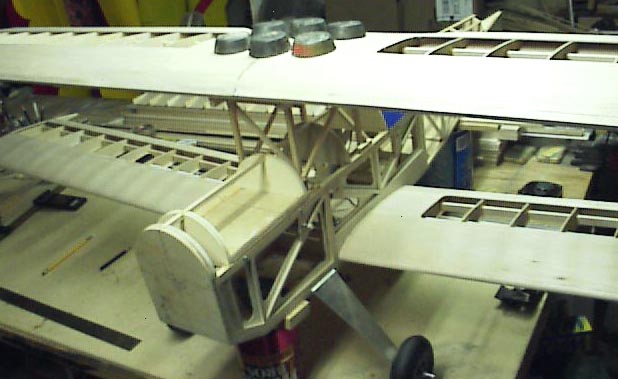
 Before sheeting the top forward section of the fuselage, check the stagger shown on the plans, and build a temporary wooden scaffold to hold the top wing in proper alignment in preparation of making the aluminum cabane assembly. Spot glue the scaffold to the inside edge of the fuselage. Once you have built the scaffold to hold the weighted top wing in proper alignment, double-check all measurements (stagger, skew, incidence, and lateral) and mark the relationship of the top wing to the jig.
|
 Place the top wing onto the scaffold (wing jig), put some weights on the center section to keep the wing stable on the jig. Re-check all measurements. When you're satisfied that all is correct, mark the location of the jig onto the bottom of the top wing.
|
 Spot glue the top wing to the temporary scaffold (wing jig). Put the weights back in place on top of the wing to keep it stable when fitting the cabane parts. Double-check all measurements (stagger, skew, incidence, and lateral) again to be sure the wing is indeed in proper alignment before proceding to the next step.
|
 Bolt a strip of aluminum to the wooden jig, clamp it firmly in your vise, and make a radiused bend for the top of the cabane. Bend a bit at a time, checking the fit at the bottom of the wing. When you are satisfied with the top attachment bend, you will need a slight bend near the fuselage to bring the upright back to vertical so it bolts to the fuselage. When satisfied with the fit, mark the location for the hole at the bottom, drill it, trim the excess length, radius the end to your liking, and bolt it to the wing and the fuselage.
|
 Repeat this procedure for the next upright. Remember--you must make the top bends so you have 2 left side and 2 right side uprights.
|
|
 This photo shows the 3rd upright in place. It really makes no difference which one you begin with. Just follow yourself around the plane.
|
 Here's the one you have been working toward, the final upright leg of your cabanes. Take your time and fit the fourth upright. It shouldn't take too long now that you know what you need to do.
|
 Once you have built the uprights, take a break and admire your handiwork. You're halfway done. The "X" braces are easy. Using one flat piece at a time, hold it in position against the uprights and mark where you will need to drill a 1/8" hole to bolt it to them. Also make a mark where you want to trim the ends to fit flush with the uprights. When you bolt the brace to the upright, add a solder lug to the inside face for the wire brace that crosses the fuselage. Do the second angle brace in the same manner, and remember to drill a hole in the center where the two braces cross each other and bolt them tight where they cross.
|
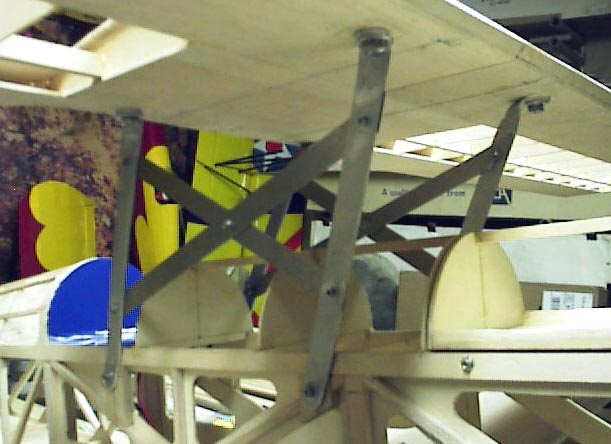
 When you have trimmed the "X" braces between the uprights, they should look something like the photo here. At this point, you can unbolt the cabane from the top wing and the fuselage, and remove it to trim the excess bolt length (You DID remember to use locknuts on those braces, didn't you??). When trimmed, re-install the cabane and know that in just a short while, you will be finished with the hard part of the plane.
|
 Repeat the procedure for the opposite side of the cabanes. Don't forget the solder lugs.
|
 Now that both cabane sides are finished, you can unbolt them from the wing and fuselage. Remove the weights from the wing, and take the wing off the temporary scaffold. Now, take the scaffold off the fuselage, cause you don't need it there any longer. When that's all cleared away, bolt your new cabanes back on the fuselage and then bolt the wing on the cabanes. After you have a coke and a smoke, take a picture to send to your online flying friends.
|
 At this point, you should have the wing bolted to your new metal cabanes and the bottoms of the cabanes bolted to the fuselage. Double-check all measurements again (stagger, skew, incidence, and lateral). When satisfied that all is correct, bend the solder lugs inward and fit a piece of 1/16" piano wire between them. Re-check all measurements. If all is still correct, solder the wire ends to the lugs and bind the wires where they cross with thin copper wire, flux and solder them. This makes the cabane assembly rigid in all directions.
|
|
 While the soldering iron cools, put away your flux, solder, and any other items that accumulated on your building table. Remove the top wing bolts and set the wing aside. Unbolt the cabane assembly (yup, it's all one piece now) from the fuselage and clean off any extra flux, fingerprints, or goo from your new cabane assembly. It's now ready for chrome or paint, or you could just leave it in natural finish. Nice thing about these cabanes--you can remove them to make covering easier.
Congratulations!! You did it!! (Hope this helped ya in your building process.) If you need bigger pics or have other questions, drop me a note.
Happy Landings!!
|
