
Making your Haku's and Haka's is fun and easy to make. You may use fresh flowers or flowers that dry well. You can also use silk flowers, which is what I used to make most of mine.
I was taught this art by a dear lady on Maui. I showed such interest in the making of these beautiful haku's that she taught me the art of making them. I will explain the basics of making your own Haku's and Haka's for your enjoyment too.
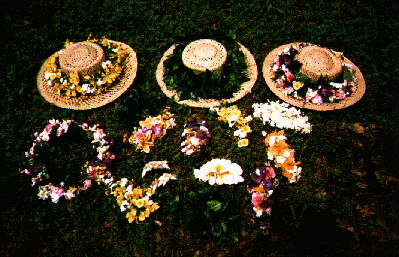
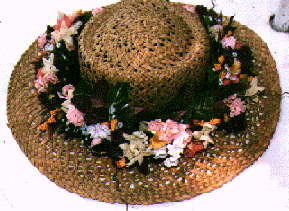
To begin, you must first decide what flowers you may want to use and if you want to add some greenery to your Haku or Haka. I made most of mine with silk flowers since they will last forever. The Haku is worn around the head or around the brim of a straw hat. The Haka, is worn in the hair on the side of the head. If tradition holds true, then the single ladies would wear the haka on the right side of the head. If married, then it is worn on the left side of the head.
Now, after we have chosen the flowers and greenery for our Haku we will start putting it together. In days of old, the ti plant was used as the base for weaving the flowers onto. The raffia was used as the fiber to weave the flowers onto the ti-leaf. Each flower or leaf is individually woven onto the t-leaf. This process is done with each flower or leaf that you add. So, a flower or leaf is added, and then is wrapped with the raffia.
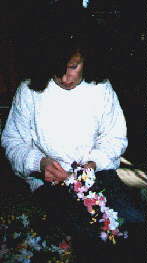
I was told to use yarn instead of the raffia, because the raffia would soon dry and the flowers would become loose. So, the yarn would last much longer. I have made many haku's and haka's with yarn and they are still being used to this day. So the yarn will last a long time. I also chose to use silk flowers, since they are everlasting.
First tie the yarn around the ti-plant very tightly and then wrap the yarn around a few times. Now you are ready to start your first flower. While holding the flower, wrap the yarn tightly around both the flower and the ti-plant. Add the next flower to the side and wrap again. Wrap the yarn tightly around the flower and the leaf about four or five times and then add the next flower to your haku. As you go, your haku will start to become longer. Every time you add a flower or a leaf, make sure that you wrap tightly. Continue this process until the desired length is obtained.

If you are making a haku for your head, you can measure around your head until you feel that it is the right length. You will have to add extra leaves for making your haku. To do this, just hold tightly and add another leaf to the haku. To make a haka, it doesn't need to be as long. About six inches should be enough. After you have the length that you need be sure to tie it with several knots. For tying around the head tie the haku tightly bringing both ends together.
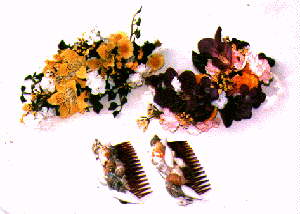
I am showing a close up of the haku that I made for my straw hat. As you see, you can use a variety of different colors of flowers to make your hat special. I also got the idea of taking my sea shells that I gathered from the islands and making an ornament comb for my hair. I used hot melt glue and glued each shell onto a plain hair comb. The results were spectacular. I have received many compliments from them. Such a simple way of showing off another accessory for your hair.
Now that you have made your haku or haka, you can be proud that you made it yourself. I know that I always take mine to the islands, or wear it for everyday or whenever I like. During the warm spring and summer months of the year, I wear mine daily. I get lots of compliments and I know that you will also. Have fun with making your haku's and use your imagination on the flowers or greens that you want to add in it. Remember that color is important, so try to repeat your flowers that you add. That way it will be balanced. I know that you will enjoy wearing your haku or haka. Just be proud that "you made it".
