

Supplies that will be needed for making your basket are as follows:
1/2" flat reed
3/16 flat reed
#2 round reed
1/2" flat oval for rim
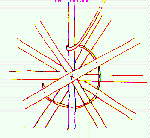
CUT: 12 spokes - 22" long from 1/2" flat reed
MARK CENTERS ON WRONG SIDE: With a pencil, mark the centers of the reed that you cut 11". That will be the center of each piece. On 6 spokes only, place a mark 2" from the center on each side of center mark.
1. Place 6 of the spokes on a T-pin with the pin through the center pencil mark. Mark an X on one end of bottom spoke.
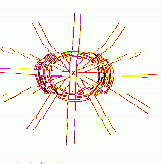
2. Starting on X spoke, twine with # 2 round reed at the 2" mark forming a circle. (Remove T-pin after one row of weaving). Continue twining until there are 6 rows all together. ending on X spoke.
3. Add 6 remaining spokes. Place a spoke across the base just to the right of the X spoke. then twine around that new spoke. Twine next spoke to the right of it. Continue the process until all new spokes have been twined in. COntinue twining until there are 3 rows on added spokes. Bury the ends of the #2 round reed. One on the X spoke, and one on the other spoke to the left of the X spoke. By this I mean to hide the ends of the #2 round reed.
4. Place base on table with smooth side up. Weave 3 rows of start and stop weaving with 3/16 flat reed. Start and stop weaving means, that when you run out of reed, stop on top of a spoke, and then add another piece of reed. Hide the end of the new piece of reed in behind one of the spokes.
This should be the way that your basket should look on the bottom now. Now you are ready to start the sides of your apple basket.
5. Holding the basket upside down in your arms, gently press the sides in to make sides come up straight. At the same time, weave 8 to 10 rows with 3/16 flat reed. Weave 3 rows of dyed 1/2" flat reed. Then weave another 8 to 10 rows of 3/16 flat reed.
6. Twine with #2 round reed for 3 rows.
7. SOAK. Fold spokes over top, trim and tuck into the inside of the basket. Hide the ends in the inside spokes. Leave 2 spokes on each side of the basket to form the handles. (Be sure that they are opposite of each other for a balanced look.)
8. HANDLES: Using 1/2" flat, place a piece on top and a piece on the bottom of the spokes chosen for the handles. Anchor under several rows of weaving and adjuist a nice tight fit with the 3 pieces of handle. Using 3/16" flat, wrap the handles very tightly with side by side wraps.
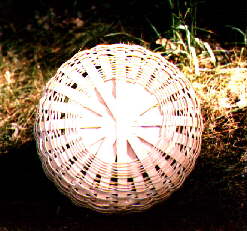
9. Using 1/2" flat oval, place rim on inside and outside. Soak the 1/2" flat over very well, so it will bend good. Being thicker, it will be a bit more difficult to handle. You want to keep the rounded side out, and the flat side to the basket. (Overlap about 3" and shave off overlap area) This will help it to be flat against the other piece of 1/2"flat oval. This will be the rim of the basket. With a long piece of 3/16" flat, lash the rims on tight. This will be the finished basket. Let dry well.
Let the basket totally dry. If you do not, it could mildew. That will be your biggest problem with your weaving. When dry, you can leave it natural or you can varnish the finished basket. It will look beautiful either way, because it was made by you. Remember to sign the bottom of the basket with your name, date, and the name of the basket. It is YOUR own creation of the Apple Basket.
6. Twine with #2 round reed for 3 rows.
7. SOAK. Fold spokes over the top. Cut and tuck the ends into the inside of the basket. Hide the ends of the spokes into the inside under the spokes that are inside. Leave 2 spokes on each side of the basket to form the handles. (Be sure they are opposite of each other for a balanced look).
