
Line routing
Auxiliary transmission coolers are more effective when routed in the return line of the transmission cooler rather than the feed line. To minimize the length of tubing/hose I tapped in at the hose/steel interface on the return line just behind the bottom of the radiator. Most auxiliary transmission cooler installs that I've read about tap into either the base of the tranny or the radiator. The tap I used is extremely easy to access and eliminates redundant lines, which can give a cluttered look.
Here is a simplified sketch of common return line taps and routing:

The "Tap at Radiator" doesn't look that bad, but after considering the tight fit and vertical travel (3 lines going up the side of the radiator?!), I didn't think it was my best alternative. Should you go this route, you'll need 5/8" fittings. Hayden makes a nice kit with the necessary fittings to connect 3/8" hose, part #390.
Here's a top view of how I routed the return line:
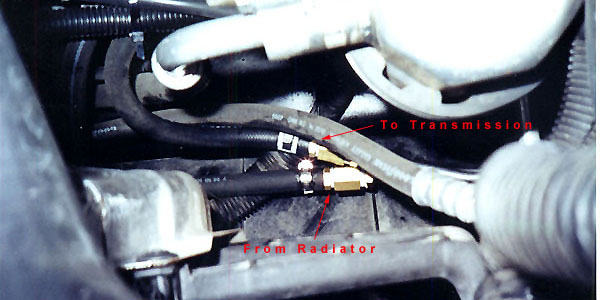
I've moved the A/C hose, so it now goes in between the two tranny lines for an even better fit with less contact. Once I ditch the band clamps for spring clamps, I'll have the look I was after. Even better, replace all the hoses with braided steel.
Parts
The largest obstacle I encountered during this project was obtaining a fitting to connect the steel line to the barbed ports on the transmission cooler. The Grand Prix Mailing List members that installed their coolers using aviation fittings had the B&M Race coolers, which come with female 1/2" NPT fittings. My original thought was to cut off the barb and flare the end of the port. However, there wasn't enough tubing sticking out of the bottom of the transmission cooler to fit both the flaring tool and nut, so I grinded down the barbs and used compression fittings. I'd recommend the Race cooler for anyone considering this type of install, the NPT fittings offer higher integrity and grinding would not be required.
Here is the parts list:
Using this route, with a new cooler and the supplied hose, the only extra part you'll need is a double ended 3/8" hose barb and clamps.
Pre-installation assembly
To obtain a rough fit:
Here is a pre-installation shot of the assembly. Some minor cutting and bending was performed after this shot to achieve a suitable fit.

When bending the tubing, instead of bending one tube completely and than the next, I recommend switching back and forth between tubes after each bend. This will enable you to match each bend and the tubes would run parallel around that radiator. Since I just used a hand held tube bender and not a laser guided tube-bending machine, the bends weren’t perfect, but the tubing is malleable enough to make minor corrections by hand to get an approximate match between the two tubes.
Installation
After tightening the fittings and pressure testing, I mounted the cooler onto the radiator using the zip lines from the Hayden kit. I would recommend customizing a bracket instead of running the zip lines through the radiator fins. The zip lines kept bending and wandering off instead of coming out of the other side of the radiator. After a few failed attempts, I used a portion of a rubber coated wire hanger to establish a path through the radiator fins. I then slipped a straw from a juice box over the wire, pulled out the wire and let the straw guide the zip line through.
Now, attach the new plumbing. Remove the spring clamp from the existing hose/steel line interface in the return line. After a few failed attempts at separating the two by pulling, I cut the hose. First cut around the hose about an inch from the end and then cut axially. This enables you to peel the hose off the steel line. Be prepared, a small amount of tranny fluid will drain from the severed connection.
Swing the hose from the original line to the new line. Slip the hose over the barbed fitting and slip a clamp on. Cut the 1’ tranny hose to length and attached the return line to the remaining cooler line, secure with clamps.
Start the car – test for leaks – replace air dam
Front view
This is what drove me to use steel lines:

IMO a clean look. I did mount the cooler a bit high though.
I recommend perusing the transmission cooler write-up by Steve Calbert at GrandPrix.Net for further insight, instructions, and illustrations.
Please send me an E-mail
![]()
