|
Using the Pen Tool - Tutorial
by Matt 'Fox' Laskowski
First
Tutorial - Basics and junk to get to know what the heck this thing does.
|
|
Ok.
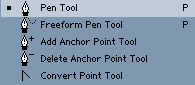
First, you need to know what each of the Pen Tool's tools are.
- The Pen Tool itself, is obviously, a tool that allows you to
make free-form shapes with lines.
- The FreeForm Pen Tool allows you to draw with the pen tool as
you would with the Paintbrush. Basically, it turns your stroke
into editable Pen Tool lines. This is useful for things that may
be a bit complcated to do by the normal Pen tool. (Gotta have
a steady hand, though, if you do it by mouse.)
- Add Anchor Point basically adds a new dot to a line so you can
make a new bend in it.
- Delete Point Tool basically deletes a dot from a line to make
it less editable, or more linear
- Convert Point Tool allows you to move lines around, or edit
dots without making a new line or dot.
|
|
|
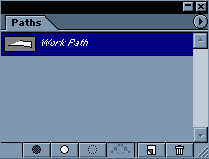
Now,
the other tools are located in the 'Paths' whindow. If it's
not on, be sure to select 'Show Paths' in Windows. (Second image
to left)
- The button with the black circle is the Fill Path tool. That
button will fill in the path/shape as it would like a mask.
- The button with the White Circle is the Stroke button tool.
This button will draw all of the lines that are currently in
teh work path. The stroke will use the last tool you've chosen
with its properties. (So, if you've chosen the Paintbrush tool
with a 2 pt line before the Pen Tool, the stroked like will
be a 2 pt line. Same goes if you choose the Eraser tool, or
Airbrush tool.)
- The button with a dotted-line circle is the Path-to-Mask button.
This button will make your Pen Tool shape into a mask. This
is USEFUL for make smooth, rounded, complicated masks for editing
specific parts of images.
-
If you have a mask, you can push the next button to convert
the Mask back into an editable Path.
-Then, you have the normal New Path/Delete Path buttons.
(These options can also be accessed by right clicking the highlighted
path in the Paths window. Hitting the buttons are just easier.
However, the Path-to Mask or "Make Selection" option
has more choices if you right click and access it. You'll be
able to choose feather, add-subtract-inverse options for the
path.)
|
 |
Basics:
Ok, if you follow along with this, make sure that the Grid is
turned on. (Located under View > Show > Grid. Or hit atl
+ ctrl + ' ) And make sure Snap is checked, and Snap to > Grip
is checked. This will cause lines/dots you make stick to the grid
lines. (Snap and Snap To are also located under View)
All right. As you can probably tell, when you make two dots with
the Pen Tool, a line is drawn directly from one dot to the other.
The line is straght, because it's the least distance it has to
travel to get to the other.
|
 |
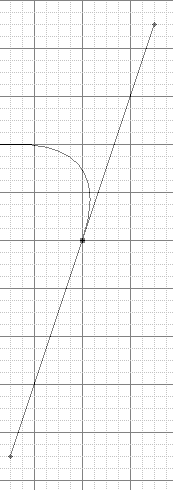
Making
a simple curve:
Yeah, now we can add Curves to the line. It's relatively easy
to do this. When you have the two dots placed down, you can
use the 'Convert Point' to add a curve to the line. When the
tool is selected, click on one of the dots and drag straight
down. You'll notice that two lines branch off of that one dot.These
new lines are not lines that will show up when the path is stroked,
filled etc. These new lines tell and the line which way the
curve is being pointed toward, and how far. When you dragged
down, the line on that side of the dot should have curved in
the opposite direction. Meaning there should be a curve going
up from the dot. If you drag the other dot down, to the same
distance as the first dot, you should have something similar
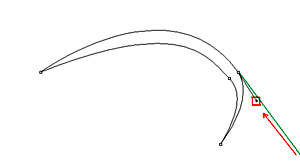
to the image to the left.
(The red areas/arrows in images display what was moved, and
in what direction. The green lines display where the line was
before the move was made. Note: I added those green lines. They
don't show up in Photoshop.)
(I will also refer to those lines branching off of a dot as
'Point-Lines')
|
 V
V
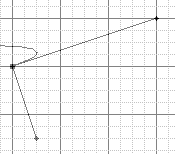 |
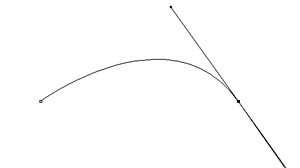
Explanation
of Point Lines:
Before going any further, I must explain how Point-Lines work.
Now, the new point-line that branches off of any dot when edited
looks like that to the left. Both sides to the point-line are
always at equal distances. However, each side to the point-line
can be edited with the Convert Point Tool.
In the second image here, you can notice that dragging the point
at the end of each side of the point-line can cause the curve
to change. You can drag each side of the point-line to any distance
of direction to make your curve look right.
Editing the Point-Lines are extremely useful, and manditory to
make a curve look right. Or else some parts will bulge out from
the curve of the previous dot.
|
|
|
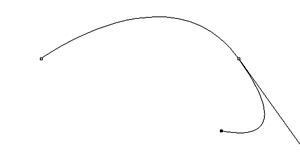
In
the first image, I'm in the process of making an Anime eye. In
the first image, got the top line for the eyelash in by making
two points and adding a curve. (You can automatically add a curve
to a point when you place it down. Just hold down the mouse button
and drag when the dot is placed.) On the line, notice the direction
the Point-Line is in.
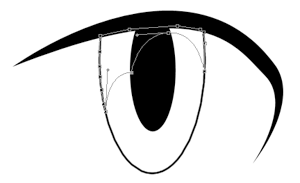
When I add the next line... Oh, now that isnt right. Notice how
that line is bulging out? That happens because the point-line
of the previous dot is affection this line. (It affects the line
because the line is attached to the previous dot.) Well, I can
fix that bulge by using the Convert Point tool and dragging that
Point-Line extending from the previous dot.
The main problem was that the point-line from the dot was too
far extended. So, I just shorten that side of the point line to
put the curve into the right place. After, I add two more lines
to the Eyelash to make it complete, using the Convert Point Tool
if necissary to fix any bad curves.
|
 |
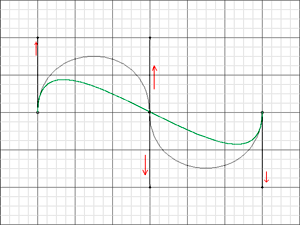
Make two curves in one line:
Now,
here I'll show what happens when you make the Point-lines of both
dots point in oposite directions, now that you know how to move
Point-lines. When you drag one Point-Line in opposite from the
other dot, the curve will still try to follow the direction that
both point-lines are facing. The poin-line facing up give thes
curve hight, and the point-line facing down makes the curve drop
at the other end. This gives the line an S shape. Also, notice
inthe image how the curve corsses on the exact middle on the grid.
|
|
|
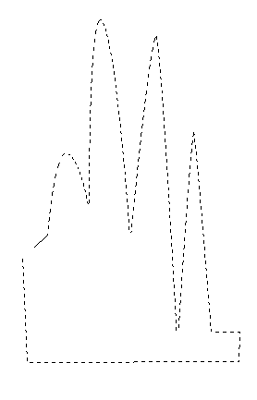
Adding
Points:
Still
using the same line, I'll add a new dot in the center of the line
with the Add Anchor Point Tool. Adding this dot made the line
now become 2 lines. The Point-Lines on this new dot are already
facing the correct direction to make the curve retain its shape.
For this new dot, you can change its Point-Lines as well. If you
make the point-lines aim upward and downward at the same distance
as the point-lines of the other dots, you'll get something like
second image here. See how much the curve changed?
Now if you were to move the point-lines of the new dot similarly
to the third image here, the curve would correspond to the point-lines
direction and distance, changing the curve to a more defined S.
|
When Stroked:
Example of Path-to-mask
|
Path-to-mask
and Stroke options:
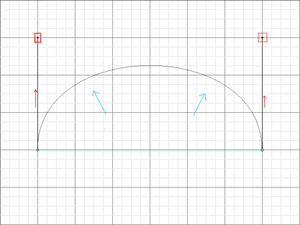
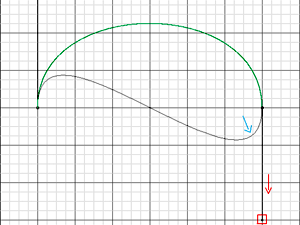
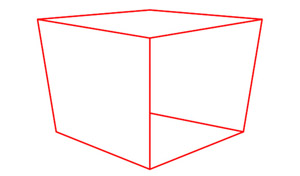
All
right. Here's a box I drew with the pen tool. (Box's are very
easy, no curnes needed.) You can use whatever shape you wanna
make to experiment with this. (I suggest its an enclosed chape.)
In the second image, that is what happens with you use the 'Stroke
Path' button. (Remember, the Stroke Path button is located on
the Paths window, and it is a button of a black outlined-circle.
I also removed the grid for that image.) The Paintbrush was used
for that stroke, 2pt width and red.
In the third image, (yes, this is a new shape,) you can convert
a pen tool shape into a mask. Normally, you would'nt be able to
make a mask that shape with perfect curves. Its very useful. This
option is VERY USEFUL for Coloring Cell Style in Photoshop. I'll
be making a tutorial on that later.
|
 |
Finishing
that Anime eye...
Remember
that Eye in the 'Explaining Point-Line' part? Well, I'm going
to finish it to show a few more things.
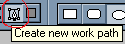
Before going on, select the Elipse tool. (Shown to left.) This
tool will create the iris and pupilof the eye.
Located in the top options bar, select the 'Create New Work Path'
option for the Elipse tool. This will cause the oval you make
for they eye to be drawn as a line for the Line Tool.
|
|
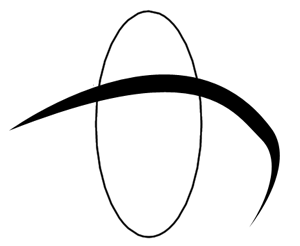
When I stroke the oval, I put the stroke on a layer beneath the
eyelash. (I filled the eyelash on a transparent layer above the
white bg layer.) Notice how the iris outline is visible above
the eyelash (in the first image)? I put the iris outline on a
lower layer for this reason.
See, I was able to erase the visible part with out damaging the
eyelash.
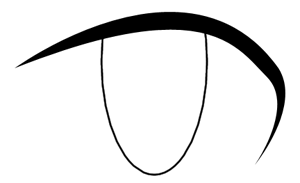
In the third image, I added another oval for the pupil and I'm
getting ready to make a mask for some detailing. On a new layer
below the iris outline, I start to make a series or dots with
the pen tool and follow the outline. This will be the edge to
the shading-detailing mask.
In the forth image, you can see the completed shape for the shaded
area of the eye. (I'm doing this in Greyscale. Add any colors
you want.) Then I convert that line-shape to a mask, and make
it grey with a black-to-transparent gradient for the shading.
|
|
|
Basically,
thats about it. You can add a shine to the eye by just drawing
an area of white. You can make another shape for some other shading,
(i.e. that dark circle in the bottom of the iris.) You can also
make small pointy shapes to the eye and fill them with white for
the small detailing reflections/shines in the eye. If the background
color of the eye is still white, you can make a new layer on the
bottom and color it to make it look like the image to the left.
|
|
What, Is that all?
|
No,
'course thats not all. This is just the first tutorial. This was
your basic tutorial to let you learn a bit about the Pen Tool.
If anyone wants to know more about this thing, tell me and I'll
make a tutorial about it. (Afterall, I don't know entirely what
you people need help with.)
|
|