2. Make 2 copies so you have 3 images.
Set your forground to your pattern or gradient. I used a gradient I made
,Christmas Ribbon.
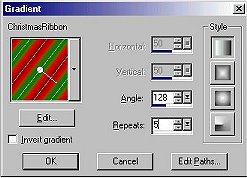
On your first image set your gradient using these
settings... angle 126 - repeats 5
3. You are working with your first image
only.. Minimize your other two as you will be using these later.
GO to Image / Add Border /
Yes/Symetric checked / 20 /ok.
4.Click on Border with magic wand to select.
5. Fill with your gradient
6. Go to Effects / Plug-in Filters / Greg's Pool
Shadow and use the default settings except for change the lightness to
100. Click ok.
This is how it should look now.
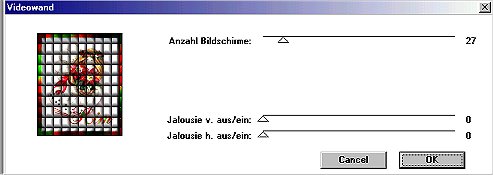
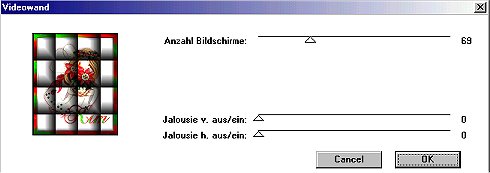
7. Effects / Plug - In Filters / *V* Kiwi
Oelfilter / videowand and use these setting:
Click Ok. Select none.
save as psp Image1
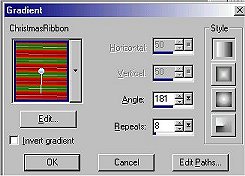
Bring up your second image and repeats all the
steps above with the exception of these:
#5. Change angle to 181 and repeats to
8
as shown..
#7. Use default setting as shown:
Save as psp.Image 2
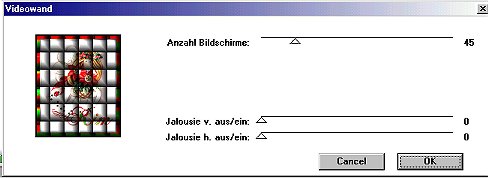
Bring up Image 3
Repeat all steps with these
exceptions:
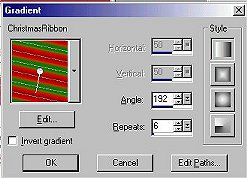
#5. Change angle to 192 and repeats to 6 as
shown:
#7. Use these settings:
Save as psp.Image 3
Open your animation shop . Animation wizard with
these all checked:
Same size as first image frame
Next
Transparent
Next
Center in frame
With canvas color
Next
Yes, repeat the animation
indefinitely.
How long do you want each frame to be
displayed = 10
Next
Add your 3 images
Next
Finish and save as ( name your
tag. )
Here is the finished tag.
I hope I haven't made this seem difficult . It is really
easy.
Enjoy,
Jastang :o)