How to get rid of a dreaded code 34 (faulty detonation
sensor) by relocating a new detonation sensor in the VG30DE(TT) engine
90+ Nissan 300 ZX [Z32] Twin turbo or NA.

My Z are a 1990 (AUTO) and a 1992 (MANUAL, "Continental
European" Nissan 300 ZX Twin Turbo, 2+2 (!!) (left hand drive).
All the tests have been done on these cars.
Hopefully, the following "How-To" applies to all
the Z32 all over the world.
4 years ago (damm, I'm getting old), I had a problem with a failing
detonation sensor, bypassed it, and wrote a "How-To"
about it.
Go there first if you don't know what is a code 34, how to diagnose
your detonation sensor, and if bypassing it would solve your problem.
However, I never was actually completely satisfied about my "temporary"
fix that turned out to be a quite permanent one.
Of course, the Nissan Official way is to remove the upper and lower
plenum, remove the old & damaged detonation sensor & sub harness,
and re-assemble the engine. As you might imagine, it takes quite some time,
and thus is costly (often quoted in the vincinity of US$1000).
Alternatively, you can drop the gearbox, and from under the car, if
you have the right tools, and very tiny hands, you can manage to reach
the detonation sensor, unscrew it, replace it, and re-screw it in place...it's
akward, and not easy.
So, finaly, I decided to find an aternate solution to this problem that
would work for me.
After a lot of thinking, looking around in the engine bay, reading the
Z32 manual(s), discussing with other Z-Nut (thank you for your time, friend-Z),
I finally found and implemented the following....Hope it'll help you.
First of all, a couple definitions.
-
Front = Direction towards the front of the car.
-
Rear / Behind = Direction towards the back of the car.
-
Left = The side where the fuel port is. (In US, CDN and Continental Europe
: Driver's side).
-
Right = The side opposite to the left side. (In UK, JPN and Oz : Driver's
side).
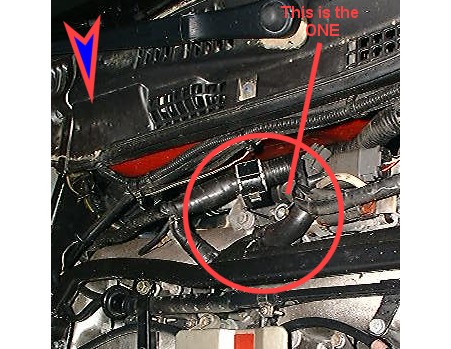
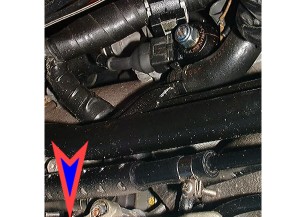
To clarify this, in the pictures, I put a blue/red arrow pointing to the
FRONT of the engine/car.
For the following, you will obviously need a detonation sensor, and
a detonation sensor sub-harness.
AFAIK, for the Z32-TT (please DBL check for the NA engine), part numbers
are
-
detonation sensor : 22060-30P00
-
detonation sensor sub-harness : 24078-30P00
You can either manage to get both of them from a damaged Z (from an individual
in the Classifieds of TwinTurbo.net
, from a Junkyard like Autogator),
or new from an on-line auto-parts supplier like Courtesy
Nissan (with a 25% discount on Nissan Stock parts for TwinTurbo.Net Members)
Let's start !!!
Locate the area
This is the area where the new detonation sensor will be installed.
Just by the detonation sensor connector.
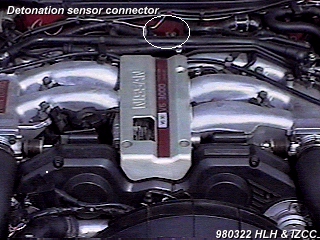
If you have a close look in there, you will see the hexagonal heads
of two bolts / studs, just in front of the detonation sensor connector.
I decided to use the left one because it was easier to put the detonation
sensor here (in my LHD). In case you have a RHD Z, it MIGHT be possible
that the right one might be the one to use, as some parts in the RHD engine
are reversed, but I'm not 100% positive, you've got to be creative.
Now, unplug the connector.

Start to work
Remove the left bolt with a ratchet (and a 12mm socket), and have a
look at it (it's the upper one in the picture).
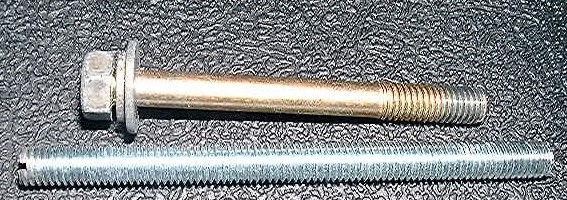
The thread pattern are M10 (Metric 10)
The depth of the stud is 75mm (that is, NOT counting the head)
The 2 captive washers are metallic, and are 3mm thick (both of them
together)
This bolt directly screws into the engine, and I figured that if detonation
would occur....
-
The detonation noises would be transmitted through the metal of the block
-
The two detonation-prone cylinders are # 5 and # 6, right at the back of
the engine, and this location is just on top of the rear of the engine.
-
There are NOT noisy moving parts in the area, thus not disturbing the detonation
noises
However, I completely understand
that the BEST possible location for a detonation sensor is where the Nissan
engineers put it....right in the middle of the engine. I feel this alternate
location is acceptable, but if you're not comfortable with it, go with
Nissan and have the detonation sensor properly replaced.
I decided to replace this bolt with a longer one, that would be long
enough to accept the detonation sensor on top of the block.
The detonation sensor is 20mm high
Unfortunately, I could NOT find a M10 bolt that would be long enough
to do that, so I bought the following
-
1 METER long M10 threaded rod (for about US$2.00) [because it was the only
M10 that was long enough...but of course 1m was way too much]
-
1 box of 10 safety M10 bolt (eye bolt), the ones with plastic inserts,
that will NOT vibrate loose (about US$2.00)
-
1 box of M10 crush rings / crush washers (US$1.00). Initially I used some
plastic washers, but later swapped them to copper one, in order to have
the best electrical connection possible.
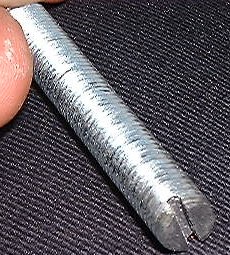
Using an electrical metal saw, the M10 threaded rod was cut according to
the following :
-
75mm (stock) + 20mm (height of det sensor) + 8mm (height of M10 eye bolt)
+ 2mm (height of crush washer) = 105mm.
Given that I wanted to be able to REMOVE that "home made" bolt, I cut a
slit on one side, making it easy to install / remove with a flat head screwdriver.
You may decide to do it or not, your call, but if you don't, and you have
to remove the bolt, you'll be in trouble.
It's VERY important to deburr your home made bolt (bolt is steel, block
is aluminium), and check that its threads are NOT damaged.
In order to have a working detonation sensor, it's MANDATORY to have
a good electrical connection though the BASE of the detonation sensor.
To achieve that, do the following
-
Degrease the detonation sensor base
-
Degrease the engine where the sensor will be installed
-
Polish the base of the detonation sensor (using fine grit sand paper)

-
Polish the engine where the sensor will be installed
-
Re-Clean both parts (just to be sure)
-
Put some high-temp, anti seize on the base of the bolt (in case you want
to remove it, or work on the engine).
-
Screw-in the bolt until resistance is felt (and NOT MORE, it's IMPORTANT).

-
Put some dielectrical grease on the detonation sensor base, or even better,
some high-temp (1800°C - 3200°F) copper based electrical lubricant.

-
Assemble everything (in the pic, the detonation sensor is not yet installed,
so it's easier to see).

-
Put/place/align the detonation sensor, keep in mind that the sub-harness
will have to be connected. It's tight, but it fits. It might help to connect
the harness to make everything fit in place at once.
-
Put a crush washer / crush ring (in the pic, it has a plastic crush washer,
I later replaced it with a copper crush washer)

-
Put the eyebolt on top of everything
-
Using a torque wrench (and nothing
else), torque the assembly to 30 Nm / 20 lbft / 3 kgm. It's about the torque
required for the detonation sensor.
Keep in mind that
-
The block is aluminium
-
The bolt is steel
-
If you OVER TORQUE, you'll strip
the aluminium
-
Have again a look at the original
bolt, so you'll see WHERE the threads are in the block
-
Imagine yourself having to re-thread
THAT
-
SO....do NOT overtorque that
part !!!!
-
Connect the detonation sensor sub-harness to the detonation sensor and
to the ECU side.
This is the final result, no more code 34, no more safety boost, and hopefully
still some good protection against low RPM detonation (after 3500 rpm,
it's anyway not detected by the ECU)

PS : I couln NOT find the torque value for the stock bolt / stud, if
you have it, let me know.
The above assembly allowed me to successfully get rid of the code34,
and survived more than 100 temp cycles in one month, without any hiccup.
Alternate Method (not using
the M10 Safety Eye Bolt) (thanks Roy for the idea)
-
Instead of using a M10 Safety Eye Bolt, it's possible
to WELD a regular bolt on top of the M10 stud, do what's most convenient
for you.
Zee you
Written by H. Le Hir / 2002.04.10@22:55 email 100031.1520@compuserve.com

