
Flames in Photoshop
This tutorial works best for people who have access to some kind of digital pen and tablet. However, if you're comfortable using a mouse, then that works too. I personally can't stand 'em.
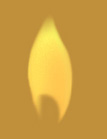 Step one is to draw your basic shape. Create a new layer and draw a shape
similar to the one here.
Step one is to draw your basic shape. Create a new layer and draw a shape
similar to the one here.
Blend the edges and darken the inside a little. It took me awhile to get a shape I liked, so fool around and try out different things till it looks right to you.
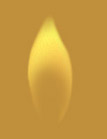 Erase a little of the bottom inside using the airbrush setting of the eraser.
This will give it a wispy look and the illusion of motion.
Erase a little of the bottom inside using the airbrush setting of the eraser.
This will give it a wispy look and the illusion of motion.
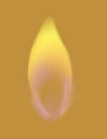 Next create a new layer and add a hint of bluish-purple at the base of the flame
using the airbrush tool. (It's a good idea to keep each effect on a separate
layer so that if you mess up it won't destroy your progress so far.)
Next create a new layer and add a hint of bluish-purple at the base of the flame
using the airbrush tool. (It's a good idea to keep each effect on a separate
layer so that if you mess up it won't destroy your progress so far.)
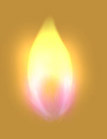 Now we add the glow. First take the dodge tool (65 pixels, 21% opacity) and
lighten the center of the flame. Then, on a new layer, take the airbrush and add
a very light yellow color for a glow. Use a large nib and a low opacity to avoid
overdoing it. Keep fooling around until it seems right to you. You might also
want to enhance the purple with the airbrush.
Now we add the glow. First take the dodge tool (65 pixels, 21% opacity) and
lighten the center of the flame. Then, on a new layer, take the airbrush and add
a very light yellow color for a glow. Use a large nib and a low opacity to avoid
overdoing it. Keep fooling around until it seems right to you. You might also
want to enhance the purple with the airbrush.
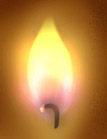
 Adding the wick is easy. Just use the paintbrush tool and a dark brown color.
Make the tip glow by adding some orange at the end.
Adding the wick is easy. Just use the paintbrush tool and a dark brown color.
Make the tip glow by adding some orange at the end.
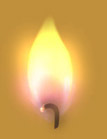
 All that's left now is some atmospheric effects. You can add a little halo of
light around the flame, or just darken the surrounding area using the burn tool.
Purdy, ain't it?
All that's left now is some atmospheric effects. You can add a little halo of
light around the flame, or just darken the surrounding area using the burn tool.
Purdy, ain't it?
Original Art - Fan Art - Inti's Circle - Gift Art - View / Sign Guestbook - Elfwood - Links
