Galkie's Solar Panel Tent Project

In early November
of 2007 I purchased a 12' X 14' Wall/Expedition tent from the Davis Tent
Company out of Denver Colorado http://www.davistent.com).
Up to then my little 30 year old 2-man Mountain Tent was the only tent
I have ever owned. This new tent's primary use would be as a fishing
camp sanctuary for four cold people fishing in predominately inclement
weather. For too many years my father and brothers have had to cook
and eat outside in our quest for giant Northerns in upstate New York and
we got cold. I didn't want anymore of that for either myself or
my 18-year-old son who would also be using the tent in the near future.
I decided a wall tent would be what was needed and began my quest for such
via the Internet. Most major sporting goods sites had wall tents
but they were all from foreign manufactures and I for one have had enough
of "Made in China" products. I wanted an American made tent that
would come from the mountain states, figuring what was good for all those
Elk hunters would be good for me as well. Of the several sites I
visited the Davis Tent site stood out as being the one to go with.
To start with it was my purpose
to utilize the space inside the tent to its fullest yet provide as much
as a home-like experience as possible. I figure I would have 2-3 years
of use of this tent before my son (now 18) begins his 20+ years of use.
Since I like fishing my primary  use of the tent includes island camping and lakeside camping.
It was my desire to make the tent as independent as possible so as to reduce
supply trips into town. I am budget limited but as per my father's
advice I have always tried to get the next size more expensive or the next
larger size with a "long term" mindset in mind. The tent I chose
is 12' X 14' with a 3-pole frame. I wish I could have gone
to 16-feet with a 4-pole frame but again I was budget limited and this
was my first experience with this type of tent. Before putting the
canvass on the fame I spray painted the ends of the frame's ridges and
rafters so they could be separately identified during setup. Before
taking the tent down I marked each of the ridges and rafters with a magic
marker as to their location, due to the riv-nut location.
use of the tent includes island camping and lakeside camping.
It was my desire to make the tent as independent as possible so as to reduce
supply trips into town. I am budget limited but as per my father's
advice I have always tried to get the next size more expensive or the next
larger size with a "long term" mindset in mind. The tent I chose
is 12' X 14' with a 3-pole frame. I wish I could have gone
to 16-feet with a 4-pole frame but again I was budget limited and this
was my first experience with this type of tent. Before putting the
canvass on the fame I spray painted the ends of the frame's ridges and
rafters so they could be separately identified during setup. Before
taking the tent down I marked each of the ridges and rafters with a magic
marker as to their location, due to the riv-nut location.
Now I have to step back a bit. I normally
fish an "electric motor only" little lake just 10-minutes away.
I like fishing with an electric trolling motor but my lake time was limited
by battery charge time so I purchased a 40-watt solar panel that I mounted
on the top of my Johnson 30. This panel was chosen for size limitations
so it could easily be adjusted into the sun after a turn yet still not be
in the way. It was my hope that the panel would be putting back into
the battery what the motor was taking out and it did but only at about 80%
of break even. So I figured out why not use that panel or another
one with the tent, which would eliminate going back to the marina every night
to put my battery on charge. By this time I had also purchased a high
quality ($650) Engel 12/120-volt cooler. The size I chose was the 32-qt
size, for lifting purposes, and later found to be only one of two sizes
that used only 2.5 amps to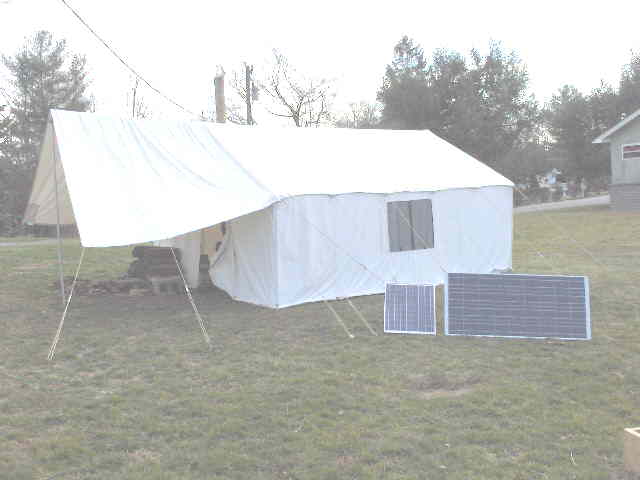 operate. Engel coolers can freeze things, are super quiet,
and apparently are made to last 20-years or more. They seem to
be highly recommended by outfitters for remote camp use.
operate. Engel coolers can freeze things, are super quiet,
and apparently are made to last 20-years or more. They seem to
be highly recommended by outfitters for remote camp use.
I had hoped that my 40-watt panel would
run the cooler but it fell a little short of doing that. What I
needed was another panel that would run that cooler even in overcast weather.
A call to my panel people at EcoVantage Energy (http://www.ecovantageenergy.com/)
put them on the problem. Later that day they emailed me telling
me what I needed to run that cooler was an 80-watt panel ($460) feeding
into one of the advanced AGM batteries ($225) in lea of the regular wet
cell battery. I then reasoned that since I would need another 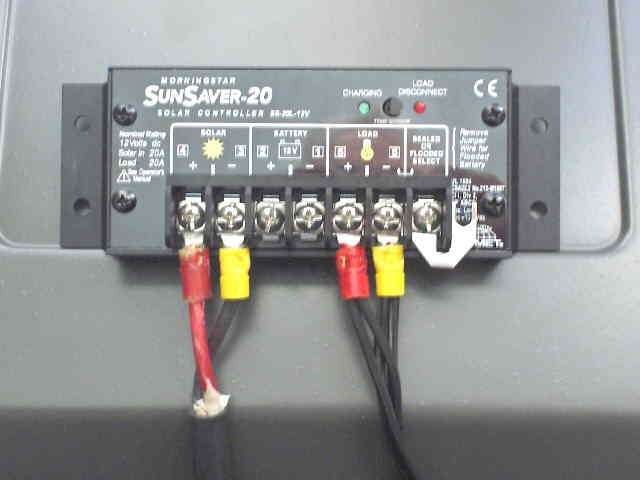 panel why not put a battery fed lightening system into the tent
and eliminate the need for lantern fuel as well. Doing that meant
a little deeper study into solar panels. I finally settled on a
Sharp 123-watt panel ($625), which is pretty much the largest size you
can get and still stay with 12-volts and not have to go up into the 24-volt
range. A solar panel needs a controller ($60) to operate properly.
The controller is the brains of the two and takes the varying voltage the
panel is sending out due to clouds and evens it out to 12-volts before
letting the battery have it. It also acts like a battery charger/protector,
when the battery gets below a certain limit it shuts down its power tap
so the battery is protected and can recharge. It is now August of 2012 and I have just purchased
yet another solar panel but this one is a 12 volt 140 watt panel (German/U.S.
made and has a 25 year warranty) from http://www.altestore.com.
It is called a Solar World "SW140". With shipping it cost me about $350
(Mid 2011). I plan on hooking this one up parallel with the Sharp
so I will have little problem doing what I have to do should the grid go
down entirely. The panel tested out better than expected and is putting
out winter time amps in August. I highly recommend it instead of the
Sharp and with the savings go with a MorningStar "ProStar-15" or better digital
controller, about $90 now but OH what a difference the digital makes.
panel why not put a battery fed lightening system into the tent
and eliminate the need for lantern fuel as well. Doing that meant
a little deeper study into solar panels. I finally settled on a
Sharp 123-watt panel ($625), which is pretty much the largest size you
can get and still stay with 12-volts and not have to go up into the 24-volt
range. A solar panel needs a controller ($60) to operate properly.
The controller is the brains of the two and takes the varying voltage the
panel is sending out due to clouds and evens it out to 12-volts before
letting the battery have it. It also acts like a battery charger/protector,
when the battery gets below a certain limit it shuts down its power tap
so the battery is protected and can recharge. It is now August of 2012 and I have just purchased
yet another solar panel but this one is a 12 volt 140 watt panel (German/U.S.
made and has a 25 year warranty) from http://www.altestore.com.
It is called a Solar World "SW140". With shipping it cost me about $350
(Mid 2011). I plan on hooking this one up parallel with the Sharp
so I will have little problem doing what I have to do should the grid go
down entirely. The panel tested out better than expected and is putting
out winter time amps in August. I highly recommend it instead of the
Sharp and with the savings go with a MorningStar "ProStar-15" or better digital
controller, about $90 now but OH what a difference the digital makes.
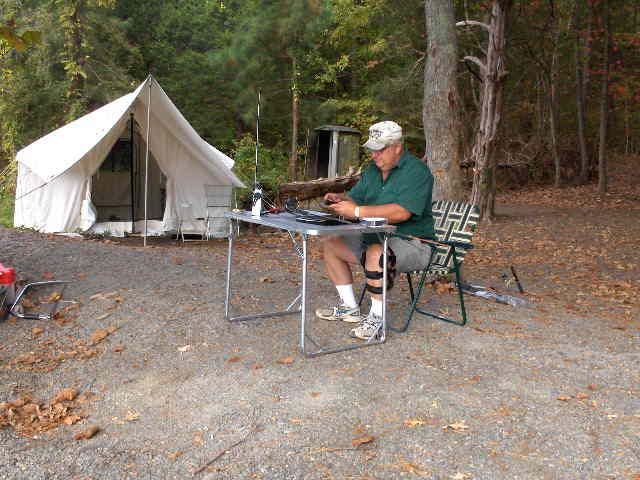
The tent picture shows the two solar panels
I now utilize with the little 40-watt panel which usually is mounted
on the top of my little Johnson 30. The larger one is the panel
I use to run the tent electronics.
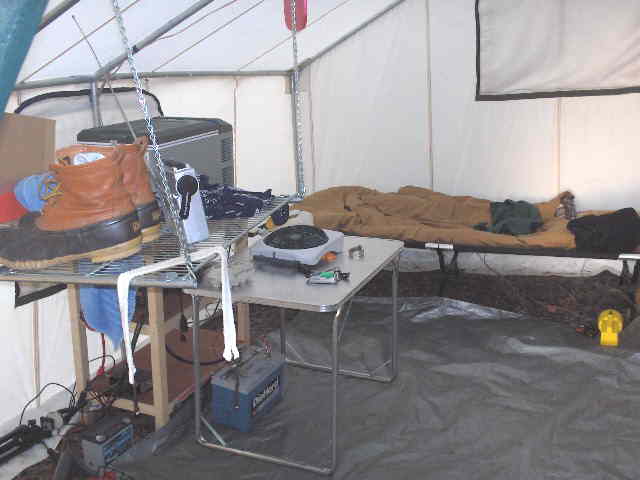
The tent is bunk-beded for five (5) people. No one piece
is over 7-ft in length so as to fit in the bottom of my boat. The
bottom left sleep section is Queen size to accommodate my son and his
wife when that time comes because when it really gets nasty outside I figure
she will want to be as close to him as possible. The bunk above that
is just over Full size. Both bunks on the right side are just under 7-ft long and are Full size. Both bottom bunks and the top
left bunk have LED lighting. All the lower bunk bottom panels are
hinged at the rear to allow for ease-of-access to items stored under
those areas. The plywood used is 1/2". By having the main
bunk top section not as wide as the bottom section there is now a
place for 2-3 people to comfortably sit and enjoy eating off of a small
aluminum fold up table, which sets up in front of that area. The
table recesses between both bunks when not needed. Two or three
additional fold up chairs round out the table seating area.
7-ft long and are Full size. Both bottom bunks and the top
left bunk have LED lighting. All the lower bunk bottom panels are
hinged at the rear to allow for ease-of-access to items stored under
those areas. The plywood used is 1/2". By having the main
bunk top section not as wide as the bottom section there is now a
place for 2-3 people to comfortably sit and enjoy eating off of a small
aluminum fold up table, which sets up in front of that area. The
table recesses between both bunks when not needed. Two or three
additional fold up chairs round out the table seating area.
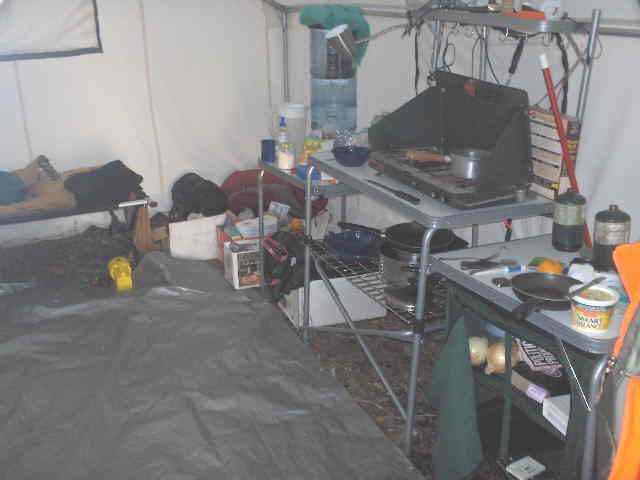
I wanted a decent cooking area and purchased a nice setup from Cabela's.
I was not able to extend the left section of the cooking area do to space
limitations (why I wish I now had the 16-ft tent). I have two multi-bulb
LED lights under the top shelve, which 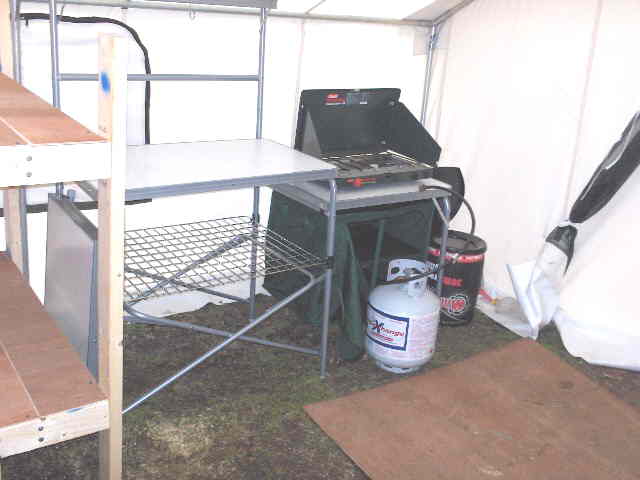 light up both sections of the cooking/food processing areas very
nicely. I then made use of the 2-ft section to the right of the
cooking area by installing a "privacy" area. A small bucket toilet
is in there for emergency use only. I used shower curtain rods
in three locations to give me additional locations with which to hang small
chains that hold up various things. I used "riv-nuts" at various
locations in both the frame and the shower rods for positioning and load
bearing purposes. The cut-to-size shower curtain used for the "Privacy"
area hangs from those
light up both sections of the cooking/food processing areas very
nicely. I then made use of the 2-ft section to the right of the
cooking area by installing a "privacy" area. A small bucket toilet
is in there for emergency use only. I used shower curtain rods
in three locations to give me additional locations with which to hang small
chains that hold up various things. I used "riv-nuts" at various
locations in both the frame and the shower rods for positioning and load
bearing purposes. The cut-to-size shower curtain used for the "Privacy"
area hangs from those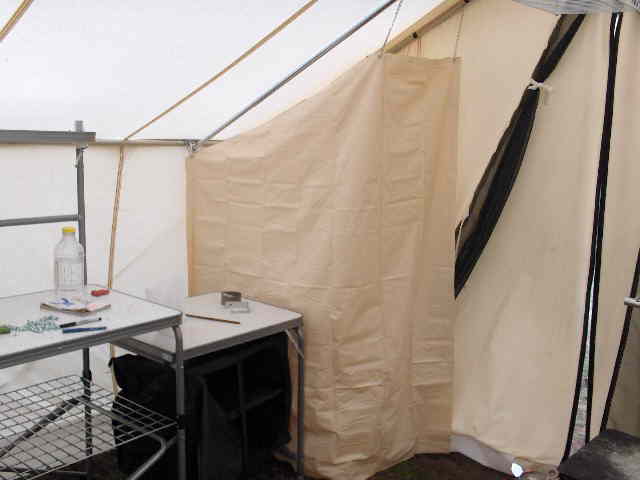 small chains. My son's future wife will appreciate that little
area. I made a small coat rack that goes on the top front of the
Privacy area that will hold four coats.
small chains. My son's future wife will appreciate that little
area. I made a small coat rack that goes on the top front of the
Privacy area that will hold four coats.
The next pictures shows the use of overhead racks for little things
like gloves, hats, wallets, cereal boxes and such. Neither rack
is intended for heavy objects. The racks also provide useful wire
routing routes. I have a 1-bulb LED hanging from the center of
the tent at the rack location, to be utilized at night as a permanent
night light for the tent. Both racks and all my chain runs are angled
inwards so as not to rub against the tent at any location during  a strong wind.
I used two oven racks as part of my drying area over the stove.
This is where the other two shower rods were used. The flat side
of each rack is positioned next to the stove pipe to minimize denting at
that location. The location/spacing of the rack is controlled by
chain length. I stayed in the tent when a really strong front came
through at night and not once did the tent flexing result in the racks
touching the stove pipe.
Now for a little of what I have learned about the stove. I consider
the stove a 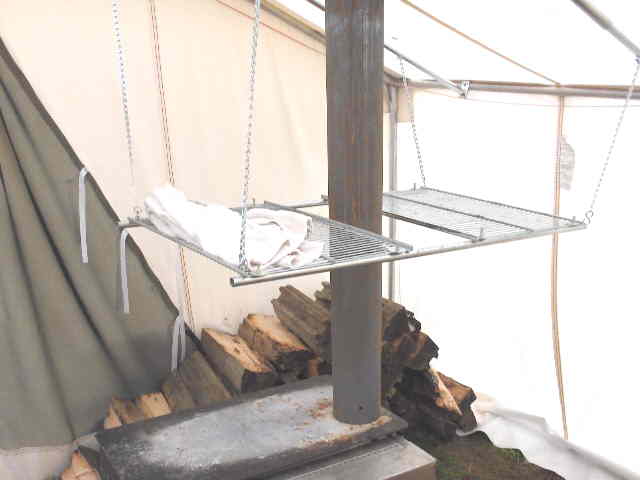 welcomed necessity and it does heat up that tent rather quickly.
Wood for the stove must be pretty much split wood and the bottom vent
can be pretty much left in the "full closed" position. In this
position there is still enough space for air to get in as you still see
the orangish glow from the right side. The damper is all that is
needed to control the rate of burn. My son stayed with me overnight
a few times and now sees the benefits of having a 60 year old in there
too. My 2-3 nightly pee breaks made me the perfect night stoker
for the stove. If I or my son wanted to stay nice and warm that stove
needed to be filled twice a night.
welcomed necessity and it does heat up that tent rather quickly.
Wood for the stove must be pretty much split wood and the bottom vent
can be pretty much left in the "full closed" position. In this
position there is still enough space for air to get in as you still see
the orangish glow from the right side. The damper is all that is
needed to control the rate of burn. My son stayed with me overnight
a few times and now sees the benefits of having a 60 year old in there
too. My 2-3 nightly pee breaks made me the perfect night stoker
for the stove. If I or my son wanted to stay nice and warm that stove
needed to be filled twice a night.
The hot water jacket for the stove is a nice addition but needs some
improvement. You best have a long handled wrench handy for
the tightening of that spigot nut when it comes loose due to thermal expansion.
It also tends to boil your water away too quickly. It needs
a handle at each end for easy removal and maybe some way to extend it out from
the stove a few inches in order to reduce its heat exposure in order to
control water temperature better. For my use I'm leaving it off and
going with a Lowe's galvanized bucket with lid on the top of the stove.
For me the fun part of making this tent as fool proof and independent
as possible was the electrical system. The electrical center fits
under the window between the stove and the front of the main bunk area.
The bottom section is adequate to hold two 12-volt batteries. I now
have an AGM battery, which is temperature tolerant, non spillable, and
should last twice as long as a normal battery. "Optima" makes a good
(Absorbent Glass Mat) battery for this use. I went with the Sears
Die-Hard model for cost and length of warranty. Cabela's also has
a line of these batteries. Most large auto parts chains offer the Optima
batteries though they will probably have to order the "marine" version for
you.
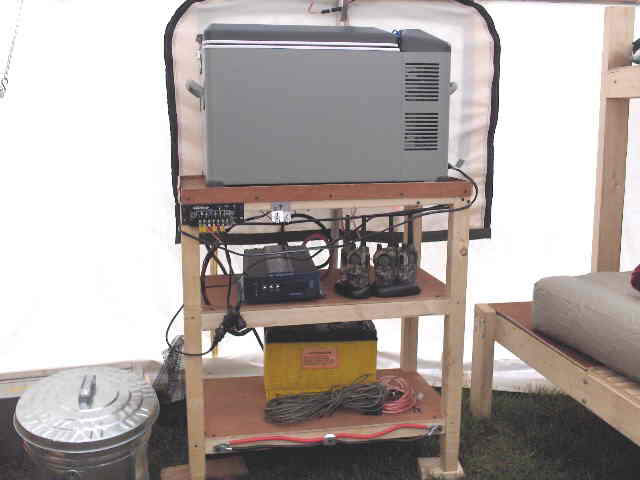 The center section houses the electrical
options for the tent like walkie-talkie chargers, small cell phone chargers,
camera battery chargers and in my tent a pure wave 1,000 watt inverter.
My son likes his little lap top and we can run that off of the inverter
but it has to be the much more expensive ($400) pure wave type.
To run an electric drill or such a Wal-Mart $70 model (modified or square
wave) will do just fine. I have a 12-ft extension for that
purpose, if more is needed then just move the battery/inverter combination closer
to your work.
The center section houses the electrical
options for the tent like walkie-talkie chargers, small cell phone chargers,
camera battery chargers and in my tent a pure wave 1,000 watt inverter.
My son likes his little lap top and we can run that off of the inverter
but it has to be the much more expensive ($400) pure wave type.
To run an electric drill or such a Wal-Mart $70 model (modified or square
wave) will do just fine. I have a 12-ft extension for that
purpose, if more is needed then just move the battery/inverter combination closer
to your work.
On the top goes an Engel freezer/cooler. The Engel line of coolers
are designed for 12-volt systems and draw an amazingly low amount of current
to do what they do. They are not cheap, mine was $650 (Cabela's)
but it will drop the temperature 80 degrees and draw little from the battery
to do it. My boat 40-watt panel would not stay ahead of it but the
123-watt panel sure did and after a long winter's night of use holding that
thing at 35 degrees (night loss was 1/3 charge) it had the battery back
to full charge by 8:30 AM and on a cloudy day to boot. Remember that
the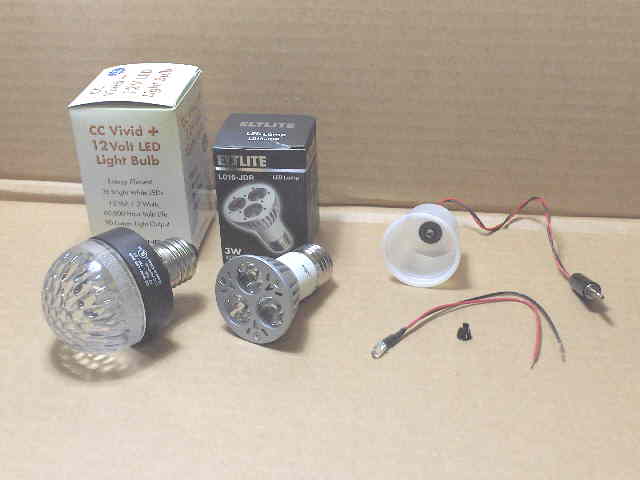 lights and chargers were in use as well. I tried my old style
12-volt ($100) plug-in cooler as well and it pulled too much current as
it needed to run continuously. I do not recommend the cheap cool/heat
type coolers for this type of 24/7 use.
lights and chargers were in use as well. I tried my old style
12-volt ($100) plug-in cooler as well and it pulled too much current as
it needed to run continuously. I do not recommend the cheap cool/heat
type coolers for this type of 24/7 use.
I chose LED bulbs for the lighting because they use virtually no current
to do what they do. I divided my tent system into two segments to
make it as son-proof as possible knowing he or his buddies will find some
way to screw the system up. Each segment is controlled by a single
switch and both segments are protected by marine 30-amp circuit breakers.
One segment is for the 1-bulb night lights and the other runs the brighter
main tent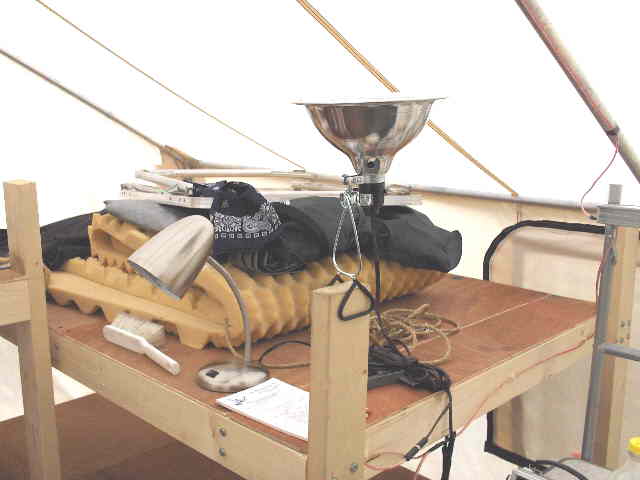 lights. The night light segment has multiple single bulb
LEDs with bulbs over the bunks and one bulb center tent off the overhead
racks for full night illumination. That one little bulb provides
more than enough light to keep from running into that stove or to head
outside for whatever reason. I also have one of those bulbs in the
"Privacy" area. To turn these bulbs on you simply plug them into
their female mate sections on the main line. Both segments use the
same connectors and both systems can use each other's connections.
I put little cones (plastic pill cups from a hospital stay, which I spray
painted white inside and potted on the outside with a hot glue gun) on all
the single bulb lights for better illumination/focus their light.
Not shown are two 12 bulb LED bulbs that can easily be use for reading in
one's bunk in place of the regular 1 bulb LED. Simply unplug and switch
out. You can get these bulbs at www.dav-electronics.com
and they are called "LED 12V", bulbs and are found in their "12 Volt
LED & Controllers" section. They also have an "Automotive
LED" section " where you can get brighter multi LED bulbs that replace
car bulbs. They do not sell the bases, which you can easily get
at any of the larger automotive parts chains. Also not shown are
several leads and various length extensions.
lights. The night light segment has multiple single bulb
LEDs with bulbs over the bunks and one bulb center tent off the overhead
racks for full night illumination. That one little bulb provides
more than enough light to keep from running into that stove or to head
outside for whatever reason. I also have one of those bulbs in the
"Privacy" area. To turn these bulbs on you simply plug them into
their female mate sections on the main line. Both segments use the
same connectors and both systems can use each other's connections.
I put little cones (plastic pill cups from a hospital stay, which I spray
painted white inside and potted on the outside with a hot glue gun) on all
the single bulb lights for better illumination/focus their light.
Not shown are two 12 bulb LED bulbs that can easily be use for reading in
one's bunk in place of the regular 1 bulb LED. Simply unplug and switch
out. You can get these bulbs at www.dav-electronics.com
and they are called "LED 12V", bulbs and are found in their "12 Volt
LED & Controllers" section. They also have an "Automotive
LED" section " where you can get brighter multi LED bulbs that replace
car bulbs. They do not sell the bases, which you can easily get
at any of the larger automotive parts chains. Also not shown are
several leads and various length extensions.
The main lightening
segment supplies two lights mounted under the cooking area shelve
that can be angled to cover both sections and each has their own switch.
This segment also supplies two 3-watt bulbs that provide the main lighting
for the tent. I utilize two different 3-watt LED bulbs for this use,
(You can find these bulbs at www.ledlight.com
in their "12 Volt Household" section with the first being #46856 @ $22 and
the other #87756 @ $33. You may also be interested in the much brighter
#45795 @ $27) The first throws out a nice soft light that I put
into a Wal-Mart clamp type fixture which I have pointed straight up.
Because the tent is white it pretty much lit up the entire tent. The
other bulb is more like a little spot light, I use that for close in work
or for reading purposes. This bulb though, the triangular one, will
knock out FM radio reception but not AM reception. It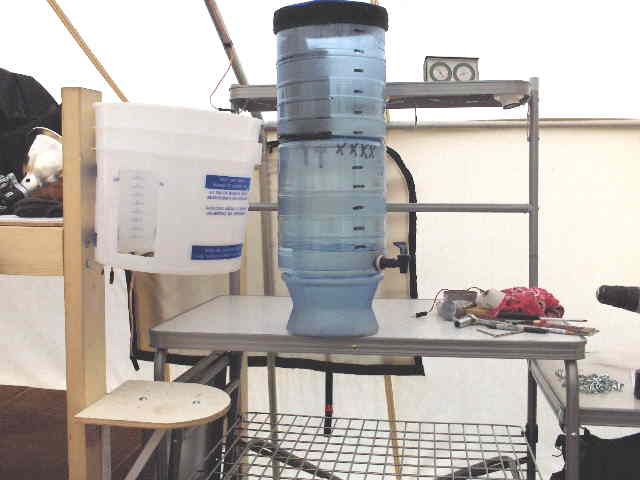 will throw a strong light to the other side of the tent.
I put that one in a Wal-Mart desk lamp fixture. When both systems
were fully activated the voltage drop was 1/10 of a volt, the battery didn't
even feel the draw. A note here; When you put these bulbs
into those fixtures you must cut off the 120-volt plug and solder on battery
clamps for the 12-volt batteries.
will throw a strong light to the other side of the tent.
I put that one in a Wal-Mart desk lamp fixture. When both systems
were fully activated the voltage drop was 1/10 of a volt, the battery didn't
even feel the draw. A note here; When you put these bulbs
into those fixtures you must cut off the 120-volt plug and solder on battery
clamps for the 12-volt batteries.
The last item I plan on also using in
the tent is my home Berkey water filtration system (http://www.berkeyfilters.com/).
Another web site that has taken the Berkey filtration system even further
and gone into solar panels and even KIO3 (the iodine blocker pill you
need right after a nuclear attack, if you make it) is (http://www.berkeywater.com/start.main.html). I recommend you
check both these sites out. I have been using this water purification
system ($209) for over a year now and really like it. With the Berkey
system I can use filtered lake water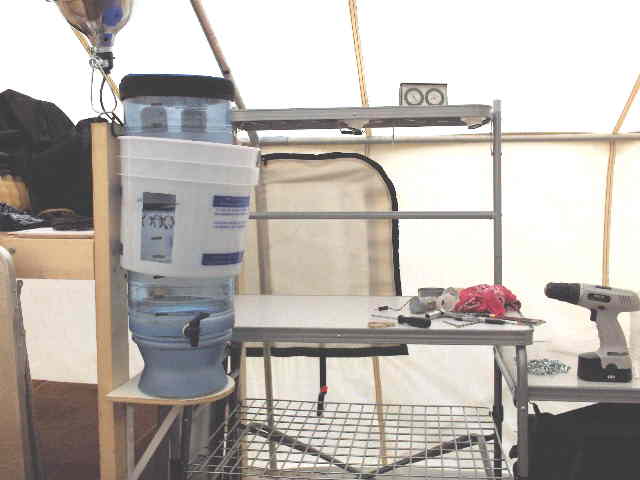 for all my needs. Because I went with the plastic version
I had to make it horse-play proof as best I could due to my son and his
buddies. The best location I had for that was right next to the food
preparation area, which would also be just out of the way of the fold-up
dining table. I chose a Lowe's heavy duty plastic bucket for that
purpose. I cut the bottom out of it and cut a little slot in the side
so I could see the water levels in the filter. I use two heavy duty
screws with fender washers to mount the bucket with the top screw going
through one of the square handle mounts while the other goes straight through
the bucket and utilizes fender washers for positioning. The bucket
is tilted due to the tilt of the square handle mount, which I left that
way to keep it as stress free as possible. It is my hope that when
someone gets pushed into that thing the bucket will absorb the blow and prevent
damage to the filter assembly. You lose that and you lose your clean
water. The little support shelve pivots to let the filter up into
the bucket. When properly positioned the filter does not contact the
safety bucket.
for all my needs. Because I went with the plastic version
I had to make it horse-play proof as best I could due to my son and his
buddies. The best location I had for that was right next to the food
preparation area, which would also be just out of the way of the fold-up
dining table. I chose a Lowe's heavy duty plastic bucket for that
purpose. I cut the bottom out of it and cut a little slot in the side
so I could see the water levels in the filter. I use two heavy duty
screws with fender washers to mount the bucket with the top screw going
through one of the square handle mounts while the other goes straight through
the bucket and utilizes fender washers for positioning. The bucket
is tilted due to the tilt of the square handle mount, which I left that
way to keep it as stress free as possible. It is my hope that when
someone gets pushed into that thing the bucket will absorb the blow and prevent
damage to the filter assembly. You lose that and you lose your clean
water. The little support shelve pivots to let the filter up into
the bucket. When properly positioned the filter does not contact the
safety bucket.
My son and I have slept in the tent several
times now in windy snowy weather and I am quite satisfied with what I
have accomplished here. It is about as stand-alone a tent setup
can be while providing a small group of people with pretty much the comforts
of home. A neighbor of mine who does a lot of camping watched me
working on this the entire time. His initial comments were that it
was much too immobile for practical use but he really liked the quality
of the tent material. When the tent was fully operational he then
thought of it as being ahead of it's time as he was quite impressed with
the finished product. Granted you aren't going to be backpacking this
set up into the back woods but you sure can pull it from the inside of a
van to setup on a lakeside camp site or put it in a boat for set up on a
remote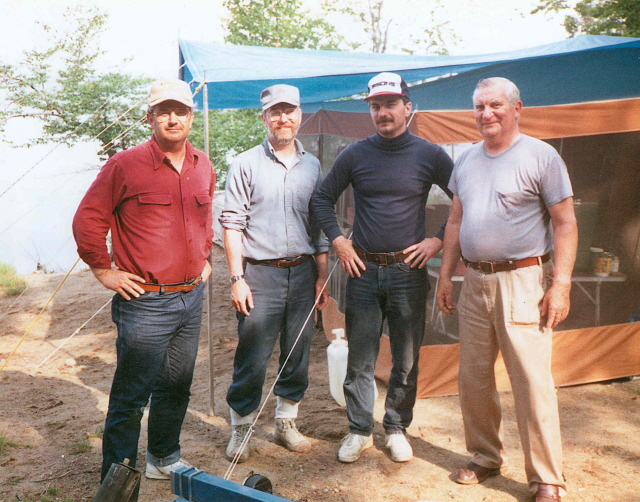 island. Some of the visitors saw it as somewhat of an "end-of-times"
shelter, referring to the "Book of Revelation" predictions. If you
look at it in that perspective it sure would be nice to have if there was
no more electricity or water being pumped anywhere. In any case it
has been a fun project, which pretty much seems to be the first of it's
kind. As word of what I have done here gets out I do believe more
folks will be running with at least some of what I have done here.
island. Some of the visitors saw it as somewhat of an "end-of-times"
shelter, referring to the "Book of Revelation" predictions. If you
look at it in that perspective it sure would be nice to have if there was
no more electricity or water being pumped anywhere. In any case it
has been a fun project, which pretty much seems to be the first of it's
kind. As word of what I have done here gets out I do believe more
folks will be running with at least some of what I have done here.
As for me, I hope to be putting that tent
up on an island at Dale Hollow Lake on the high plateau in central Tennessee,
just 3-1/3 hrs away. I am 60 now so I will be taking my time doing
it. Though Dad is no longer with us he surely would be impressed
with the set up considering what we had to go through with when we were
 going after that record Northern in upstate NY just a week or so
after ice-out. That was when the fish there went on a feeding frenzy.
That's me in my younger years with the red shirt. We usually only
had two actual fishing days out of the five days we could allot for the
trip, the rest of the time we were weathered in (4-ft waves) spending most
of it just chatting away on the picnic table we brought into the bug net.
By the way, the Black flies were terrible except when out on the water.
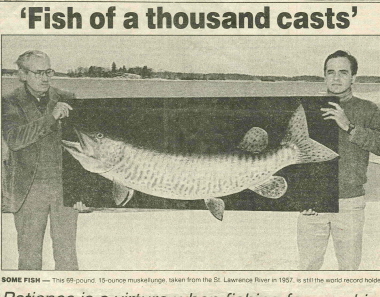
Now I'm after the record Musky and I believe I know where she lives
on Dale Hollow. She will be just over 75-lbs. I have some nice
light salt-water gear from my oil rig days and will be using some special
made lures made years ago just for me. If your going after the record
Musky you have to have a meal and not a snack. That lure is called
a "Lindel Lunker" and looks just like a dying sucker on the surface when
pulled slowly. So now I have the time, the desire, and now as well
the equipment to do it with
going after that record Northern in upstate NY just a week or so
after ice-out. That was when the fish there went on a feeding frenzy.
That's me in my younger years with the red shirt. We usually only
had two actual fishing days out of the five days we could allot for the
trip, the rest of the time we were weathered in (4-ft waves) spending most
of it just chatting away on the picnic table we brought into the bug net.
By the way, the Black flies were terrible except when out on the water.
Now I'm after the record Musky and I believe I know where she lives
on Dale Hollow. She will be just over 75-lbs. I have some nice
light salt-water gear from my oil rig days and will be using some special
made lures made years ago just for me. If your going after the record
Musky you have to have a meal and not a snack. That lure is called
a "Lindel Lunker" and looks just like a dying sucker on the surface when
pulled slowly. So now I have the time, the desire, and now as well
the equipment to do it with 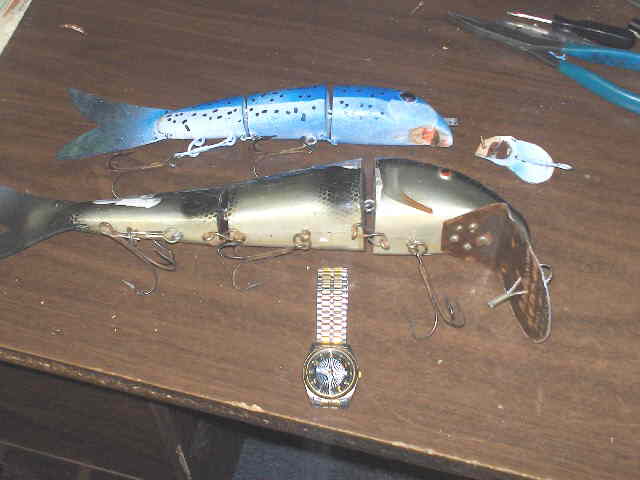 and do it in comfort with that Davis tent. I sure
hope that what I am starting up here once again can be continued with my
son and his friends as a regular thing. I call it "Musky Camp" and
now its done in style.
and do it in comfort with that Davis tent. I sure
hope that what I am starting up here once again can be continued with my
son and his friends as a regular thing. I call it "Musky Camp" and
now its done in style.
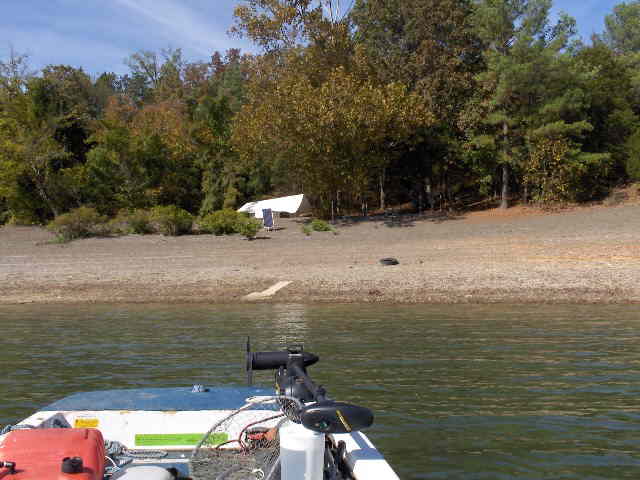
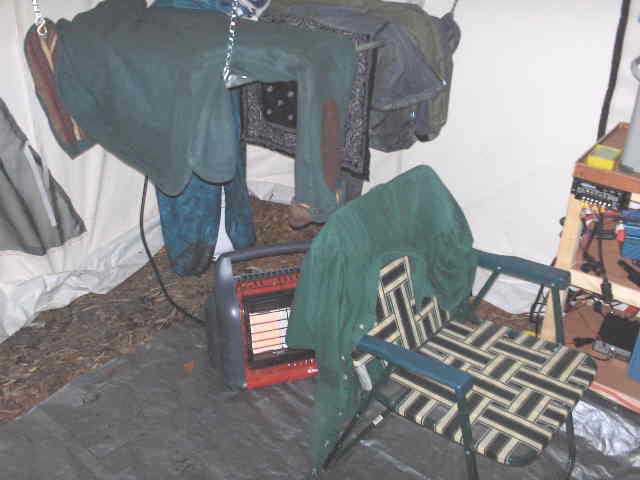
Here are some pictures of how the tent is set
up for "Musky Camp". This is my tent set up at Dale Hollow Reservoir
in central Tennessee. Though the tent seems somewhat crowded it
did not seem that way once inside. I use a Mr. Buddy propane heater
for heat during my 10-day stay and use about 2/3 of the 30-lb tank. It
sure was nice knowing a warm tent was waiting for me whenever I needed
it and in mid-April it did get chilly. It was also nice to know that
I could dry damp or wet cloths in about half an hour. Deer would
sometimes run through the camp site and I was visited almost daily by
a flock of turkeys who's apparent "scratch" site I had set up on. There
was a little island about 100-yards away and sometimes the eagles would
come and sit there, seemingly watching what I was doing. What a relaxing
time those trips there were/are. It is something a 10-year old should
be experiencing. The solar panel was positioned on the shore line
with its cord running under the lake side of the tent. Due to the
large pine tree stand behind the tent and in the way of the solar panel
I had only about 85% panel sun exposure. It took about 3 hours
to fully recharge the battery after a day's use. During a 4 day period of
off and on rain with 100% cloud cover, the battery (Sears Diehard Platinum
1,150 amp AGM battery) dropped to 1/3 capacity but recovered by mid afternoon
the next day. I also noticed that the little LED "on" light on my
Engel electric cooler gave me all the tent night light I needed. It
sure is a nice little set up.

John Galkiewicz
POB-20
Harrogate, TN 37752
John Galkiewicz