
richnelson@hotmail.com
ADVANCED WORD PROCESSING
INSTRUCTIONS
USING MICROSOFT WORD
******
PREPARED BY
RICHARD NELSON
******
07/10/25
ATTENTION:
WHEN IT SAYS CLICK IT MEANS
LEFT CLICK. If it says right click it means to click with your right mouse
button
Along with
using this instruction, it is desirable to read other instructions identified
below:
These are
included on Richard Nelson�s web page www.angelfire.com/planet/richnelson
Beginning Word
Processing Instructions
Creating and
Managing Hard Drive Folders
Creating and
Managing
+++++
GENERAL
This is a
comprehensive instruction for using Microsoft Word. However, it can not
possible cover all the different operations that can be accomplished with
Microsoft Word. Instructions for those operations are cover in a textbook of
several hundred pages because Word is a very powerful software package.
This instruction covers how to
save to folders that have been created on your hard drive (Local Disk C) or a
For instructions covering how to
create a new folder on a hard drive please see my handout titled �Creating and
Managing Hard Drive Folders�
For instructions covering how to
create a new folder on a flash drive please see my handout titled �Creating and
Managing Flash Drive Folders�
In addition, this instruction
coves how to change the format of a document and how to move text within a
document with cut and paste and copy and paste, how to download text and
graphics from the internet and finally how type in a short memo letter and how
to print it.
STARTING YOUR
COMPUTER
TURN ON THE MONITOR BY PRESSING THE BUTTON ON THE FRONT
BELOW THE SCREEN USUALLY ON THE RIGHT SIDE; THEN TURN ON THE COMPUTER BY
PRESSING THE POWER BUTTON ON THE FRONT PANEL OF THE CONSOLE. WAIT WHILE THE
COMPUTER COMES UP IT MAY TAKE QUITE AWHILE. EVENTUALLY YOU WILL SEE THE DESKTOP
SCREEN. (IF THAT DOESN�T WORK, HOLD DOWN THE CTRL AND ALT KEYS, AND WHILE STILL
HOLDING THEM DOWN, PECK THE DELETE KEY)
STARTING
MICROSOFT WORD
FROM THE QUICK LAUNCH AREA
If you have your Quick Launch
area open with the Word icon in it, you can start Word from that area with just
a single left click on the icon that looks like a child block with a W on it.
FROM THE DESKTOP
The easiest way to start the Microsoft WORD program from
the DESKTOP is to SINGLE CLICK ON THE WORD ICON, (THE WORD ICON LOOKS LIKE A
W.) THEN PECK THE ENTER KEY. IN A FEW SECONDS YOU SHOULD NOW HAVE A �WORD�
SCREEN ON YOU MONITOR WITH A BLINKING CURSOR IN THE UPPER LEFT CORNER OF THE
SCREEN.
Another way is to start Word is to
RIGHT CLICK on the Word icon and then left click on Open
If you are good at using your mouse, Double click on the
WORD icon on the Desktop. I DON�T RECOMMEND THIS FOR BEGINNERS
FROM THE START MENU
A third way is to go to the �Start� button at the lower
left of you screen and click. Then go up to �Programs�, or �All Programs� and
then go over to Microsoft Word on the next menu and click
DETERMINING THE PURPOSE OF THE
CURSOR
The cursor is the little blinking vertical
line on your screen. The cursor tells you where the next character (letter)
will be inserted when you type it in from the keyboard. The cursor has other
names like: insertion point and place marker. Actually the cursor marks the
insertion point on the text screen. (Please see the attached �Diagram of
Microsoft Word Screen� display) at this point we will identify the many
different parts of this diagram, like the Title Bar, the Menu Bar, Tool Bar,
Task Bar, etc.
TYPING IN TEXT
Type in the letter N for the
beginning of the word Now, and see what happens. What happens is the
cursor moves over one space to the right. Next type in the character o; notice
that again the cursor moves one position to the right. Type the character w,
and then peck the space bar. Notice that there is a space between the character
w and where the cursor is blinking ready for you to type in the next word. With
computer logic a word is not a word until a space is put at the end of it.
DETERMINING THE PURPOSE OF THE
I-BEAM
In addition to the cursor there is
also and I-Beam on the screen. The I-Beam is the presence of the mouse when it
is in the TEXT area of the word processing screen. Notice when you move the
mouse the I-Beam moves around the screen. So now we have learned there are two
things we have to deal with on a word processing screen, a cursor and an
I-Beam.
DETERMINING THE PURPOSE OF THE
ARROW
However if you move the I-Beam up
into the top of the word processing screen, notice it turns into an arrow. This
is so you can select a command from the many possibilities from the menu or
tool bars.
THREE IMPORTANT CONCEPTS
So all in all there are three things
that we have to deal with:
1 the cursor
2 the mouse as an I-Beam
3 the mouse as an arrow
TYPING IN YOUR DOCUMENT
Without touching your mouse, type in the rest of the
paragraph as follows:
is the time for every good student to come to the aid of
their school, and now is the time for every good school to come to the aid of
their students.
NOTICE! See how the computer
automatically starts a new line when it gets to the right margin. This is
called automatic line folding. Also notice that misspelled words are underlined
in red, and grammar problems are underlined in green.
SAVING YOUR NEW DOCUMENT FOR
THE FIRST TIME TO THE HARD DRIVE (C:)
This next paragraph assumes that you have already created
folders on your hard drive under the My Documents master folder. However
subsequent paragraphs cover how to create a new folder on a hard drive or flash
drive.
Using your mouse, go up and click on the �File� button in
the upper left corner of the Menu bar. This will give you the �File� menu.
Now click on the �Save as� button. This will give you a
dialog box titled �Save As�
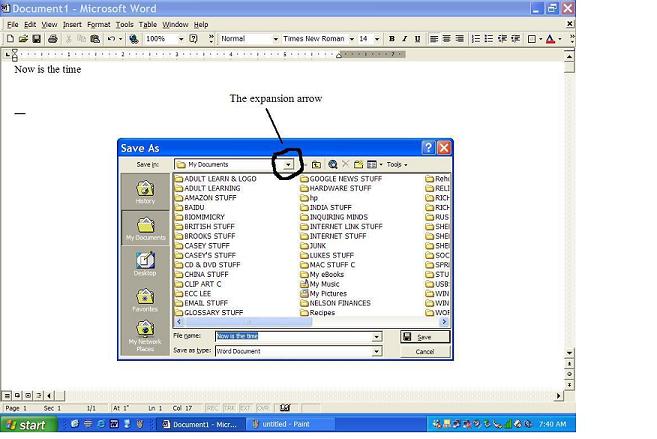
In the Save In box it will say My Documents
In the body of the My Documents save as screen you should
see all the folders you have created. Choose the folder where you want to store
this document and click on it, then click on the Open button.
This will activate the folder where you want to save your
document, and the folder name will now appear in the Save In box.
Next go down to the �File Name� box. Drag over the words in
the File Name box to highlight them. Peck the Backspace key to clear the box.
Now you should type in a new name for the document. (I suggest you use: time or
students as the file name) In addition it I wise to use a date with your file
name so if you use time as the file name to total file name would be name
06.07.27
Now click the Save Button in the lower right corner of
the frame.
IF YOU DO NOT HAVE A PROPER FOLDER TO PUT THIS DOCUMENT
THEN HERE IS HOW TO CREATE ONE ON THE FLY
Where it says My Documents in the Save In box, go to the
right of that box and find a little icon that when you put your mouse arrow on
it, it says �Create New Folder�. Click on that icon. Now without doing
anything just type in a proper name for the new folder, and click the
OK box. The new folder will appear in the Save In box ready for you to save to
it. Proceed as described above.
SEEING IF YOU SAVED OK
Look up in the Title bar on the Word screen. The name you
gave the document should appear there.
Another way to check to see if the document saved OK, click
the �File� button again, and then click the �Open� button. You should now see
your documents name on the screen.
Click on the �cancel� button to get back to you document
STARTING A NEW PARAGRAPH
Using the mouse, bring the I-beam cursor to the end of the
second sentence and click. That will move the cursor to the end of that
paragraph.
Now peck the Enter key. This will put the cursor at the
beginning of a new paragraph and a new sentence. Now peck the Enter key once
more of give more space between paragraphs.
ADDING MORE TEXT TO YOUR
DOCUMENT
Now we will add another sentence to your original document
Any student that
does not support their school is short sighted, and any school that is not
student centered needs to correct the situation quickly.
SAVING ADDITIONS AND CHANGES
To save your additions, click on File and then on Save.
(notice this time you click on
Save not Save As).
Another way to save the additions you made to your document
is by holding down the Ctrl key and pecking the S key. (S of course stands for
Save)
A third way of saving a document is to go up to the
Tool Bar and click on the disk shaped icon.
PRINTING YOUR DOCUMENT
Before you print your document you should add your name so
we can whose document is printed.
To do this take your I-beam and put it at the end of the
last sentence and click. Move the I-beam away. That will put the cursor at the
end of the last sentence. Now peck the Enter key twice. That will start a new
paragraph.
Now type your full name.
You will find there are several ways to do anything on a
computer. This is true for printing a document.
ONE WAY TO PRINT A DOCUMENT IS TO SIMPLY GO UP WITH
YOUR MOUSE AND CLICK ON THE PRINTER ICON THAT IS THE FOURTH ICON FROM THE LEFT
ON THE TOOL BAR.
TRY IT.
A second way is to click on the �File� button, and then
click on the �Print� button.
A third way is to Press and hold down the Control key and
peck the P key.
The second and third way provides an intermediate
dialog screen that allows you to select the number of copies to print or
specific pages if you do not want to print the entire document.
All of these different methods have their usefulness from
time to time.
MOVING THE CURSOR AROUND
Reminder: wherever the cursor is, is where the next
character you type will land, so it is very important to understand how to move
your cursor around.
There are several ways you can move your cursor around in
your document:
Using the I-beam is the most common if you are moving the
cursor any distance from where it is.
The rule is wherever you put the I-beam within the text,
and click, that is where your cursor will be put. Try it with the document that
is on your screen now.
Another way to move your cursor short distances is to use
the arrow keys. The right arrow key moves the cursor to the right and the left
arrow key to the left. The up arrow key will move it up if there is room, and
the down arrow key will move it down if there is room. We will now practice
moving your cursor both with the I-beam and the arrow keys.
CLOSING YOUR DOCUMENT
To close your document, go up to the Menu bar and click on
File. Now come down and click on �Close�. If you have not saved your latest
changes you will be ask if you want to. Click on yes
SHUTTING DOWN YOUR COMPUTER
Before you shut your computer
down you should close all the programs that are open on your computer.
Then to shut down your computer, click on the master Start
button on the lower left of your screen. Now click on Turn Off Computer. You
will get the Turn of Computer screen.
If you are using Windows XP Professional, be sure that the
bullet is in Shut Down. Then click OK. Your computer should now shut down.
If you are using Windows XP Home just click the Turn Off
button.
OPENING A SAVED DOCUMENT
Before you open a saved document you
must have your computer on and MICROSOFT WORD started, and the floppy
containing your document. Go back to page 1 for these instructions.
Go to the Menu Bar and click on File,
then click on Open
Now you have to remember where you
saved your document, on a floppy, in the My Documents folder, or a folder on a
flash drive. .
IF YOU SAVED TO A MY DOCUMENTS
FOLDER OR TO A FLASH DRIVE FOLDER
OPENING A FILE FROM THE MY
DOCUMENTS FOLDER
On the Open dialog menu, the �Look
In� box should say My Documents, if it doesn�t, click on the little down arrow
on the right end of the �Look In� box. Now click on My Documents in the list
shown. You can see MY DOCUMENTS IN THE LOOK IN BOX. Find the folder where you
saved the document, and click on that folder. Now click on the Open button on
the lower right of the frame. That will open the folder and now you should see
your file in the list of files..
Shadow your file by clicking on it.
(This is called �SELECTING�)
Click the Open button on the lower
right of the frame. That will bring you document onto the Word screen ready for
you to make changes and additions.
MORE WORD PROCESSING OPERATIONS
We are going to do some of the
operations that can be done with any word processor.
Like: Inserting, selecting, changing
the size of the text, deleting, cutting, copying, pasting, etc.
INSERTING TEXT
To insert text you must put the
cursor where you want to insert a new word
Take you I-beam and place it in
between the words every and good in your document and click. Now move
the I-beam out of the way.
You should see your cursor blinking
between every and good.
Now just type in the word very, and
peck the space bar.
Notice how the word very is inserted
into the text
ERASING TEXT
Highlight you first name by dragging
your I-beam over it. This is called �Selecting�
Now just peck the Backspace key.
Gone! Erased!
You can also highlight a word by
double clicking on it
CHANGING THE SIZE OF THE TEXT (FONT SIZE)
In most cases the default for the text size is 12. (Look
for the number on the Format bar)
Sometimes it is desirable to change the size of the text to
either bigger or smaller. To do this, select the whole document by holding down
the Ctrl key and peck the A key. That will highlight the entire document.
Now go up to the little arrow on the right side of the Font
Size window and click. That will give you a drop down menu with numbers on it.
Now click on a larger number than 12. Now click in the white area in the text
part of your screen. That will get rid of the highlighting.
BOLDING YOUR TEXT
Highlight the text you want to bold by dragging over it.
This is called selecting it
Once the text is highlighted, go up to the Format Bar and
click on the Capital B about in the middle of the Format Bar. That will bold
what is highlighted.
Now just click in space to remove the highlighting.
UNDERLINING YOUR TEXT
Highlight the text you want to underline by dragging over
it. This is called selecting it
Once the text is highlighted, go up to the Format Bar and
click on the Capital U about in the middle of the Format Bar. That will
underline what is highlighted. Now just click in space to remove the
highlighting.
CENTERING YOUR TEXT
Highlight the text you want to center by dragging over it.
This is called selecting it
Once the text is highlighted, go up to the Format Bar and
click on the page-centering icon about in the middle of the Format Bar. That
will center what is highlighted.
Now just click in space to remove the highlighting.
NOTE: You can underline and bold and center all at the same
time.
SELECTING TEXT
Before we go much farther we must
learn the rules for selecting text. Note: when you select text you also highlight
it
Actually you have been selecting
things already. When you started Word you clicked on it.
That is also called selecting. And
when you selected Word you highlighted it.
Remember!
Now we are going to concentrate on
selecting text. First words, then lines, then sentences, then the entire text
document. You can also select pictures (graphics)
SELECTING WORDS
The best way to select a word is to
put the I-beam on top of it and double click. If you are not good at double
clicking then you can just drag across it. By putting the I-beam in front or
back of the word and holding the left button down, drag across the entire word.
SELECTING A LINE
NOTICE when you take your I-beam
outside the text area on the left side of the text screen it turns back into an
arrow. If you want to select a line (like a heading) take the arrow directly
opposite the line on the left side of the screen until it turns into an arrow,
and click; that will highlight the entire line.
SELECTING SENTENCES
The best way to select a sentence is
to hold down the Ctrl Key and click in the middle to the sentence you want to
select (highlight). Another way is to drag across the entire sentence
SELECTING AN ENTIRE TEXT DOCUMENT
The best way to select an entire
document is to hold down the Ctrl key and peck the A key. Another way to do
this is to go up to Edit on the Menu bar and click, and then click on Select
All. You might have to click on the little down arrows to get the entire menu.
SELECTING PICTURES
With the picture on the monitor
screen that you want of select, right click in the middle of the picture. That
will select it. It will also give you a menu. To copy the picture just left
click on Copy
CUTTING, COPYING AND PASTING
REMEMBER HIGHLIGHTING IS THE
RESULT OF SELECTING
CUTTING
Decide what text you want to cut
1. Highlight that text by dragging
the I-beam over it.
2. Go up to the Menu bar and click on
Edit and then on Cut
You have now done what is called a
Cut. A cut puts your highlighted text in a special place in memory called �Clip
Board� and removes the text from your document
NOTICE: WHEN YOU CUT YOU REMOVE THE
TEXT WHERE IT APPEARS FROM YOUR DOCUMENT.
PURPOSE OF CUTTING
Cutting is used when you want to move
text from one part of a document to another part.
COPYING
Decide what text you want to copy
1. Highlight that text by dragging
the I-beam over it.
2. Now go up to the Menu bar and
click on Edit and then on Copy
Note when you copy you have not
removed the text from your document..
Again a copy puts your text in a
special place in memory call �Clip Board�
NOTICE: AGAIN WHEN YOU COPY YOU DO NOT
REMOVE THE TEXT WHERE IT APPEARS ON YOUR DOCUMENT.
PURPOSE OF COPYING
Coping is done when you want to reuse
text within a document or on another document
PASTING
After doing either a cut or copy you
can now do a paste
Place the I-beam of your mouse where
you want to paste the cut or copied text and click. That will place the cursor.
Now move the I-beam out of the way.
Now click on Edit on the Menu bar,
and then click on Paste. That will put the text that is on the clipboard where
the cursor is. Notice that the cursor moves over.
You should also know that pasting
does not remove the text from the Clip Board.
USING COPY AND PASTE TOGETHER
One of the handiest actions that you
can do on a word processor is to do a copy and paste. For example you can copy from
one document without disturbing the text and paste to another document. In many
cases this will save you lots of typing. We will practice copy and pasting,
sometimes called c and p.
USING COPY AND PASTE FOR EMAILS
Also it is easy and handy to use the Copy and Paste method by copying from a word processing document
and then pasting it to an email message. In this case you will usually copy the
entire word processing document.
First you must prepare your document on your word
processor, edit and save it. Then with the document still on the screen go into
Edit on the Menu bar a click on "Select All". That will highlight
your entire document. (As a short cut you can also use Ctrl and A keys together
to highlight your entire document)
Then go up to your Menu Bar and click on Edit and then on
Copy. That will put a copy of your document on your Clipboard.
Now go into your email and prepare to send a message. Fill
in the To space and the Subject space with the usual information. Now put the
cursor in the text area of the email.
Go up to the Menu bar and click on Edit and then click on
Paste. That will put the text that you copied from your word processing
document into the text area of the email ready to send. It is always wise to
check what you pasted before you send the email.
MOVING TEXT USING CUT AND PASTE
You can move text by doing a cut and
pasted together. We will practice that now
Select (highlight) the text you want to move by dragging
over it. Now go up to the Menu Bar and click on Edit, and then on Cut. Now move
your cursor using the I-beam to where you want to move (paste) the text on your
document. Again go up to the Menu bar and click on Edit and then on paste. That
will paste (move) your text where the cursor is.
TRANSFERRING TEXT FROM THE INTERNET TO A WORD DOCUMENT
TRANSFERRING TEXT USING COPY AND
PASTE
You can transfer text from a document
on the Internet to a word processing document on your computer by doing a copy
and pasted together. We will practice that now.
Open your Internet browsing software and go to a web site
that has the text you want of copy.
Select (highlight) the text on the Internet site you want
to transfer by dragging over it. Now go up to the Menu Bar and click on Edit,
and then on Copy.
Now start your word processing software move your cursor to
where you want to paste the text and again go up to the Menu bar and click on
Edit and then click on Paste. That will paste your text where the cursor is.
TRANSFERRING A PICTURE FROM THE INTERNET TO A WORD DOCUMENT
You can transfer a picture from a
document on the Internet to a word processing document on your computer by
doing a copy and pasted together. We will practice that now. the way we do it
is somewhat different from transferring text as you will notice below.
Open your Internet browsing software and go to a web site
that has the picture you want of copy.
Put you mouse arrow on top of the picture on the screen and
right click. That will give you a menu. RIGHT CLICKING ALWAYS
GIVES YOU A MENU
On the menu presented find Copy and left click. That will
put a copy of the picture on the Clip Board of your computer.
GREAT! You have TRANSFERRED an image of that picture from
the Internet site to your computer Clip Board.
Now start your word processing
software, and move your cursor to where you want to paste the picture. And
again go up to the Menu bar and click on Edit and then click on Paste. That
will paste your picture where the cursor is.
PAGE LAYOUTS USING VIEW
Go up to the Menu Bar and click on View
Click on the double down arrows at the bottom of the menu
You will presented with among other things
Click on
Now click on View again and this time click on Print Layout
and again observe the word processing screen
I normally use the Print Layout screen
ADJUSTING YOUR TOOL BARS
Go up to the Menu Bar and click on View
Click on Toolbars, you may have to click on the two little
arrows at the bottom of the menu to get the rest of the menu
Observe if Standard and Formatting have an arrow checked,
if not click on either Standard and/or Formatting to select them
Then click out of the menu space to get rid of the menu, or
just peck the Esc key
SEEING WHAT IS AVAILABLE ON
THE MENU BAR
Click on File on the Menu bar
Observe what you see on the dropdown menu.
Carefully move you mouse arrow over to Edit on the menu bar
Observe what you see on the dropdown menu.
Again carefully move your mouse arrow over to View.
Again observe what you see on the dropdown menu.
MORE ON PRINTING YOUR DOCUMENT.
You will find there are several ways to do anything on a
computer. This is true for printing a document.
One way to print a document is to simply go up with your
mouse and click on the printer icon that is the fourth icon from the left on
the Tool Bar.
Another way is to click on the �File� button, and then
click on the �Print� button.
A third way is to Press and hold down the Control key and
peck the P key.
The second and third ways
provide an intermediate screen that allow you to choose many different options
like:
Making more than one copy
Determining which pages you want to print
Selecting Properties like:
Changing your color options
Printing portrait (normal) or landscape (sidewise)
Print quality
SEEING
WHAT IS ON YOUR HARD DRIVE,
SEEING WHAT�S ON YOUR HARD DRIVE
Click on the Start button then on either My Computer (XP)
or Computer (
Click on the either the hard drive icon, or flash drive
icon and then peck the Enter key. You will get a new menu.
Now click on the folder where you what to see what is in
it.
Go to View and click. Now Click
on Details. This will show you what is on you that folder including the size of
each file and the type. If nothing is shown then the folder is empty
NEW
TYPING EXERCISE
TYPING IN A NEW DOCUMENT
Without closing your existing document, go up to the Menu
bar and click on File.
Now click on New. On the next screen click �OK� or Blank
Document.
A new screen will appear ready for you to type in a new
document.
Another way of opening a new document is to go to the left
end of the Tool bar and click on the icon that looks in a sheet of paper with
the corner turned over.
A third way is to hold down the Ctrl key and peck the N
key. (N for new)
PLEASE NOTICE THAT YOU CAN HAVE MORE THAN ONE COPY OF WORD
RUNNING ON YOU COMPUTER AT ANY ONE TIME. REMEMBER WE SAID EARLIER THAT YOU
COULD HAVE MORE THAN ONE AND MORE THAN ONE DIFFERENT KIND. ACTUALLY YOU CAN
HAVE SEVERAL DOZEN, BUT MORE THAN 5 OR 6 GETS TO BE UNMANAGEABLE.
Please do the following exercise:
Type To
Press the Tab key
Type Carol Simms
Press the Enter key twice
Type From
Press the Tab key
Type John Green
Press the Enter key twice
Type Regarding
Peck the Tab key
Type Calendar Order
Peck the Enter key twice
Type Call Mr. Kelly to check your calendar
order. The one you wanted is out of stock and will not be available until next
month.
Peck the Enter key three times
Type CC
Peck the Enter key once
Type you real first and last name
SAVING YOUR NEW DOCUMENT FOR
THE FIRST TIME TO
First plug a flash drive into a USB port of your computer
if it is not already plugged in
Using your mouse, go up and click on the �File� button in
the upper left corner of the Menu bar. This will give you the �File� menu.
Now click on the �Save as� button. This will give you a
dialog box titled �Save As�
The computer will always, try to save your document into
the My Documents folder on the hard drive, if the document has not been saved
before.
Again using your mouse, On the SAVE AS screen, click the
little down arrow at the right end of the �Save In� box.
Now click �Removable disk (E:) or (F) or (G). The Removable
Disk may have another name like TDK Trans-it (G:) Please see diagram below:
This will activate you flash drive, and �flash drive (G)
will now appear in the in the �Save In� box.
(If you do not see the flash drive see the procedure below)
At this point you would select the folder where you want to
save this document. To select the folder click on it and then click the Open
button on the lower right of the frame.
Now the folder name will appear in the Save In box.
Next go down to the �File Name� box. Drag over the words in
the File Name box to highlight them. Peck the Backspace key to clear the box.
Now you should type in a new name for the document. (I suggest you use: time or
students as the file name) In addition it is wise to use a date with your file
name so if you use time as the file name to total file name would be time plus
the date in year.month.day format (example time 07.07.03)
Now click the Save Button in the
lower right corner of the Save As frame
IF YOU DON�T SEE THE
Click on the Start button
Click on My Computer (XP) or
Computer (
Look for your Flash drive and
right click on it and then left click on open that should activate the flash
drive
Now go up and repeat the above
instructions
CHANGING YOUR DOCUMENT
Take you I-beam and put in front of the K in Kelly and
click. Now move the I-beam away. That will put your cursor in front of Kelly.
Peck your Delete Key until all the characters of Kelly are erased. Now type Jack
with a space. Remember no word is complete without a space
SAVING THE CHANGES AND
ADDITIONS
SAVE THE ADDITIONS YOU MADE TO YOUR DOCUMENT BY HOLDING
DOWN THE CTRL KEY AND PECKING THE S KEY.
Another way of saving a document is to go up to the Tool
Bar and click on the DISK icon, which is the third from the left
A third way to saving is to click on File on the Menu bar,
and then click on Save.
PRINTING YOUR DOCUMENT.
You will find there are several ways to do anything on a
computer. This is true for printing a document.
One way to print a document is to simply go up with your
mouse and click on the printer icon that is the fourth icon from the left on
the tool bar.
try it.
A second way is to click on File on the Menu bar and then
click on Print.
A third way is to hold down the CTRL key and while still
holding it down peck the P key.
The second and third ways will produce an intermediate
dialog box where you can tell the computer to print more than one copy of the
document or print specified pages of a longer document. Also many other options
can be selected from this dialog box.
+++++
GLOSSARY FOR WORD
PROCESSING
ASCII:
It stands for
American Standard Code for Information Interchange. This is a world wide
standard. All computers in the world use this code.
A WORD:
A word to a
computer is the characters that make up the word and then a space at the end of
the word. A word is not a complete computer word until you put the space at its
end. This is probably different from what you learned in grade school, where
spaces were put between words. Also a word at the end of a sentence is not a
word until you put a period and a space.
BACKUP:
This is when you
make a copy of your master disk to a backup disk, so if something happens to
your master disk; you have not lost all the files that are saved on the master
disk.
COMMANDS:
Commands are
operations the computer will perform for you. Examples are Save, Open and Print.
With Windows you can select a command by clicking an icon with the mouse on the
Tool Bar, or click on File on the menu bar.
For holding CD/ROM
disks (Compact Disk/Read Only Memory) commonly called the �D� drive. Many
computer programs now come on a CD/ROM disk.
COMPUTER STORAGE
UNITS:
There are several
different kinds of computer storage units such as:
CURSOR:
The curser is the
little blinking vertical line on your screen. The cursor tells you where the
next character (letter) will be inserted when you type it in from the keyboard.
The cursor has other names like: insertion point and place marker. Actually the
cursor marks the insertion point on the text screen.
DESKTOP:
The screen of your
monitor that displays some of your applications software icons...and is called
the desktop.
DOCUMENT:
A document is typed
in text to a computer monitor screen using word processing software. This text
is temporarily residing in the memory (Random Access Memory-RAM) of the
computer. To preserve this document, it must be saved to one of several
computer storage units such as:
In the process of
being saved, the document is given a proper file name that describes the text
on the document. After the document is saved it is referred to as a text file
or just file.
FILE:
A file is a text or
graphics document that has been saved with a file name to a proper folder in a
computer storage unit. A file can be plain text, plain graphics or a
combination of text and graphics. Note that music can also be saved to a folder
on computer storage units.
FLOPPY DISK DRIVE:
The floppy disk
drive is where you insert the floppy disk. Commonly called the �A� drive.
FOLDER:
A named space on a
computer storage unit used to save files. There is one folder that is created
when the computer is assembled. It is called My Documents. Computer users
create many different folders on different storage units to accommodate their
files in an organized manner.
FORMATTING:
Getting a floppy
disk ready to have files (documents) saved to it. You can format a disk by right
clicking on the 31/2 floppy icon. You should also format a
CD R/W. this
usually requires special software like Roxio.
HARD DRIVE:
A storage device
inside your computer for holding and saving software and the files you create.
It is usually identified as the �C� drive. Frequently call Local Disk (C:)
I-BEAM:
The I-Beam is the
presence of the mouse when it is in the Text area of the word processing
screen. Notice when you move the mouse the I-Beam moves around the screen.
However if you move the I-Beam up into the top of the word processing screen,
notice it turns into an arrow. This is so you can select a command from the
many possibilities from the menu or tool bars.
ICONS:
Icons are the
small-labeled pictures you see on your desktop. The technical name for icons is
desktop objects.
KEYBOARD
The keyboard is an
input device.
Keyboard Keys of
Special Importance
MOUSE:
The mouse is an
input device. It appears on the screen as either an arrow or a beam depending
on what part of the screen it is located. If it is out of a text area it
appears as an arrow. If it is in a text area it appears as a beam. On browser
software the mouse may appear as a pointing hand. Also the mouse has two buttons
on the top. When the instructions say click it means click with the left
button. Right clicking with the mouse usually brings up a new menu so you can
make a selection. The selection is then made by clicking with the left button.
MOUSE ACTIVITIES:
PARTS OF AN
APPLICATION PROGRAM
All applications
software have a main screen. On this main screen are normally a Title Bar, a
Menu Bar, a Tool Bar and a Task bar, and a text area where you prepare your
document. Each of these are described below.
RAM (Random Access
Memory)
This is temporary
storage on a computer. When doing word processing, it stores your file
(document). When you turn off the computer all that is in RAM is lost. RAM also
stores your applications software (like Microsoft Word) until you turn off the
computer. The main permanent storage unit for you all your applications
software is on the hard drive.
The process of
reading the contents of what you have typed into a computer applications
program and/or saved on a storage device such as a floppy disk, hard drive, or
flash drive.
WRITING:
The process of saving
a file to a floppy disk, hard disk or flash drive.
