|
WATER REFLECTIONS/RAIN TAG
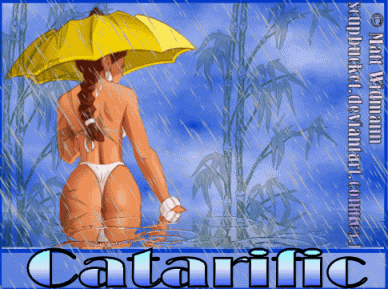
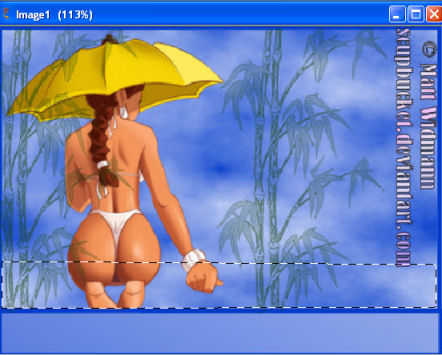
Supplies Jasc/Corel's Paint Shop Pro any version. Tube of Choice - This lovely tube image comes from the art of Matt Widdman. You can view his outstanding online gallery by clicking here. Spitz Water Reflection Freeware Filter which you can download here. This filter is actually a stand alone program. Upon downloading, you will have an execute file which you will need to install. When using this filter, you will not be applying it through Paint Shop Pro but will later use Animation Shop and Paint Shop Pro to finish off the tag. Mura Pro's Cloud Filter Font of Choice Optional: Tubes, Brushes, or Preset Shapes for added design.
SETTING USED IN THIS TUTORIAL Drop Shadow Setting: Vertical Offset 2, Horizontal Offset 2, Opacity 80, Blur 5, Color Black Magic Wand with this setting: Mode: Add/Shift, Match Mode: RGB Value, Tolerance 53, Contiguous checked, Feather: 0, Anti-Alias checked and outside selected.
Step 1 Open a new transparent image 500 width by 375 height. At your Material Palette, in the top color box, select the color black. In the bottom color box, select a deep solid camouflage military color that works well with your tube graphic. Step 2 At the Material Palette, the top color box should be null (no color) and the bottom color box should be a color you will use for the border of the tag. Left click the preset shape tool set to rectangle with these settings: Horizontal and vertical radius 0, solid line and line width 5.5. Nothing else should be selected. Going from left to right and down, draw a large rectangle. Step 3 Go to Layers/New Raster Layer and draw one more smaller rectangle, attaching it to the larger one. Once completed, go to Layers/Merge/Merge Visible. Your tag will look like this:
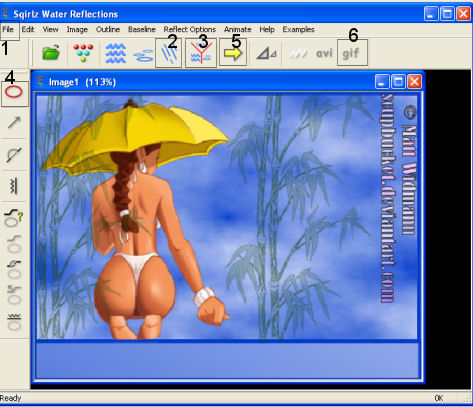
Step 4 Using the magic wand with the settings from above, left click within the larger rectangle. Go to Effects/Plugins/Mura's Meister Cloud and flood fill the larger rectangle with one of the cloud color presets at the default settings. Go to Selections/Select None. Step 5 Again using the magic wand, activate the bottom rectangle and flood fill with color of choice. Go to Selections/Select None. Step 6 In the top rectangle, add your tube, copyright and any decorative tubes, brushes, preset shapes. Once this is done, save the file as a jpg. We will apply the text later using the propagate paste method. Using the Spitz Water Reflection Filter Step 1 Go to Start/All Programs/Spitz Water Reflections/Spitz Water Reflections Step 2 Go to File/Open and locate your file. (#1)
Step 3 Left click box #2 which is where you customize rain/snow.
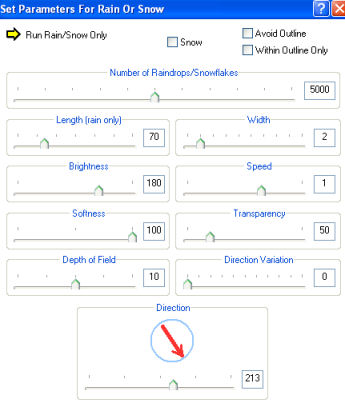
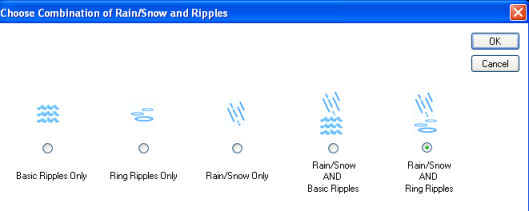
This is the default settings - which work well. But you may want to change your rain direction or length of droplets and/or brightness of rain - which you can do here. You can also change the speed and width of the rain and snow too. Leave everything as is but with experimentation, you may want to change the brightness (depending on the colors you are using), length of rain and the rain direction. Step 4 Left click box #3 to choose the combination of effects you will be using on the tag. The combination below will give you both rain and ripples.
Step 5 Left click box #4 to outline the area where you will want your ripple effect. Holding down the left mouse button, drag the line across and left click. Then holding the mouse button, draw the line down, and left click. Again draw the line across and left click. And once more draw the line to create a box. When your box is fully completed, this time right click and release. You will have something like this:
Step 6 Left click box #5 to see your animation. If your animation is not what you want, you can go back to boxes 2 and 3 to change the settings. Step 7 Left click box #6 to save as a gif. Click ok and save your file. The basic animation is now complete. All we have left is to add text to the tag. Completing the Tag with Text Open up the original jpg file you saved and go to Layers/New Raster Layer. In the bottom rectangle apply your text with a drop shadow using the settings from above or your own. Once you have your text applied, go to Edit/Copy and Edit/Paste as New Image. Save the New Image as a psp file. You can close the original jpg file without saving it since we no longer will be using that file in animation shop. Instead, we will be using the gif file you created with the Spitz Water Reflection Filter and the psp file. Close PSP and open animation shop. Click here to continue....
|