Using Tables in Front Page Express
For this Tutorial, you can use Tables to display family pictures, pictures of a cake from a recipe, pictures of vacation spots or whatever floats your boat :-) You can have the image on the top row and the text on the bottom row and Vise Versa. You can align the table on the left with another table on the right or you can center the table.You can create more than one table per page.
For those who have been following the Front Page express Tutorials, you can use the scripts for the colored borders as directed in the previous tutorial. Please feel free to combine information from prvious tutorials to this tutorial to Spice up the page.
Preparations:
For Each Table you create, you will need to save in the web page folder :
A Background image
A image to insert in Each Table ( approximately 350 - 400 Width)
1. Open Front Page Express
2. File---> New---> Normal Page--->
3. Type a Header message---> Highlight the
text. Select the font , size, and color. Select "Align Center"

4. While the Text is Highlightes, let's make it a Marquee. Go to INSERT----> Marquee and use the following Settings and click "OK"

After applying the Marquess, you should have this
![]()
5. Bring your cursor down two lines by hitting the "Enter" key on the keyboard. While your Cursor is aligned in the Center, select, "Table"--->Insert Table"----> Use the following Settings:
- Rows - 2
- Columns - 1
- Alignment - Center
- Border Size - 8
- Cell Padding - 2
- Check, "Specific Width" - 50
- Check,"In percent"
6. Now you will see your First
"Table" 
7. Right click on the Table and select, " Tables Properties". Use the following Settings. Click on "Browse" and browse to your web page folder and select the backround image

8. Place the cursor in the Top Row and type your text. Highlight the Text and selct the Font, color and size. In the second row, Select the "align Center" and type additional text to describe the image you will place in the table. While the Cursor is under the text in the second row, go to INSERT--->Image---->Select the tab, "Other Location"---> check, " From File"--> Click on "Browse" and browse to the web page folder and select your image.
Willie and Jeanie on the "Soverign Of The Seas" Cruise Ship |
This is My Best Friend
|
9.Once you have completed all your tables and you are finished, Go to Format ---> Background and select the background color you selected for the Marquee in Step #4
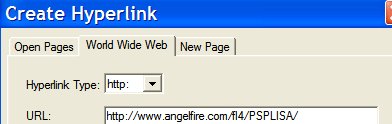
10. Hyperlink Text - When you are at the end of your page, we will use Text instead of a image to hyperlink back to our main Home Page and to our email.
Select, Align center and type the word, "Home"---> Highlight it and go to Insert--->Hyperlink and enter your Home page URL
Position the cursor where you want your Email link to be, type the words, "Send Me Email". Highlight the Text-->Insert -->Hyperlink. If you want the Subject line completed when a person clicks on the Email link, insert this using your email address and what you want to say in the subject line:
mailto:your email address@cfl.rr.com ?Subject=Your Subject here
11. Enter the Script for your Web page Counter as in previous tutorial.
12. File---> Save As---> Enter a Page Title ---> select, "As File" Browse to C:\Angelfire\---> double click on your Web page folder: Example : C:\Angelfire\family----> name the file, family.html click, "Save"