
How to make your own Patch,Guitar, or Microphone Cables!
Making your own Cables can be easier than you think. All it takes is a little basic knowledge, a willingness to learn, and a good soldering Iron. I myself prefer pencil types to the "Gun" type; I've found the guns to be too much heat too fast, and generally, uncomfortable to use. No, you don't have to invest in a Weller Soldering Station-but if you intend to do alot of soldering (as in you never plan to buy another factory cable ever -then you may want to!)
Okay what you need:
Cable (Guitar or Microphone) I suggest you start with making guitar and patch cables, because the 1/4" ends are cheaper to practice with!
an X-acto knife
a Wire Stripper
1/4" and XLR Jacks.
a Spool of "ACID-FREE" Solder (like Radio Shack sells for electronics)
A Soldering Iron
a Soldering Iron holder! (what did you plan to do with your HOT Iron when not holding it?)
First you must cut the cable. I suggest that you use a Pencil/ X-acto knife or a Wire Stripper.Preferably the wire stripper, even though I've used an X-acto for so long, that I'm about the same speed as a Wire Stripper.

Place your Iron in the Station and turn it on. Take the little sponge and dampen it, then place it back in the station.
When the Iron's hot, you must TIN the tip.(This means cover the tip with solder, then wipe the excess off on the Dampened Sponge in the station.)Now you have a nice clean/tinned tip to work with!
Unroll/"straighten" a bit of the solder on the spool (NO, don't break it off!) Make it about 5" long.
You must Tin the bare wire. Twist the wire so that it's "solid", but try not to break any of the strands off, and don't let the shield meet the carrier wire(s).Otherwise, your Cable will be "shorted out".
Heat the bare copper wire with the soldering Iron. Then apply a little solder. Let it flow over the copper wire, until the copper wire is silver.

Once you have done this, I suggest that you Tin the leads on the 1/4" Jack or Mic end. You do this exactly as you did the last step.
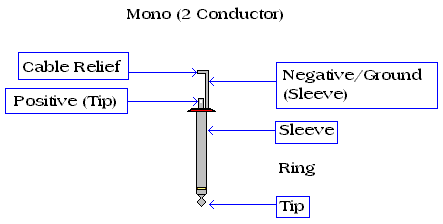
Next-make sure that any parts that Need to go ON THE CABLE (such as the BARREL of the 1/4" end) are put in place. You'll feel like a complete fool if you solder the cable together, and forget to put this on!
Apply heat to the 1/4" end's positive connection. Then place the Positive/Carrier wire which you've previously tinned against it. add a little bit of solder, then remove the soldering Iron after the Solder has covered these well. try to keep you solder use to a minimum, but make sure this is well covered. In time, you'll learn exactly how much solder to use.

Do the same thing for the Sheild connection.
Then bend the Strain relief over the cable's jacket(The Black rubber part).
Next slide the "Insulation sleeve" (Usually Cardboar or rubber tube that goes inside a 1/4" Cable Barrel ).
Next, screw the Barrel end on.
Now do the other end of the Cable!
