
MATERIALS
1- 6ft. length of ABS pipe 1 1/2" inside dia. 2" outside dia.
1- 1 1/2" to 1 1/4" reducer
1- 22 degree elbow female on one end. male one the other
2- 45 degree elbows female on both ends
2- 90 degree elbows female on both ends
1- screw apart type disconnect
1- small can ABS cement
1- small tube of silcone
2- large tie wraps
TOOLS
Tape measure
Hack saw
Long shaft #2 Phillips screwdriver
12mm socket and ratchet
STEP 1
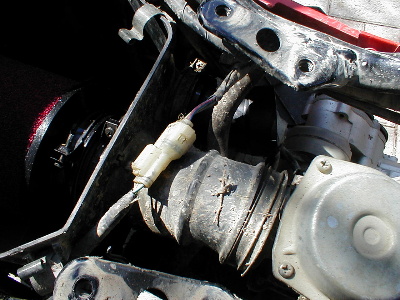
The first thing you'll need to do is remove the seat. After that use the 12mm socket to remove the gas tank (be sure to shut off the fuel and disconnect the fuel line) and the plate that the tank is bolted to. This will give you a clear area to work. Remove the airbox lid. Using the Phillips screw driver undo the bands holding the intake tube. One is on the front of the air box where the tube connects and one is where the tube connects to the frame. DO NOT dissconect the one to the carborator. Carefully pull the tube free of the frame and then out of the air box.
The first run through this is to cut the pieces to size and fit them correctly. NO GLUE is needed until all pieces are cut a dry fitted together.
Where the intake tube went through the front of the air box is where you will fit the 1 1/2"-1 1/4" reducer. The narrow end of the reducer fits in the hole and the clamp will tighten down holding it in place. During final assembly this will have silicone around it and the airbox. Attach the 22 degree male/female fitting to the reducer so that it is pointing towards the front fender on the left (when sitting on it) side. As you can see from the picture this is a tight place to work and will be the hardest of the steps.
STEP 2
Cut a 16" piece of ABS pipe and fit it to the 22 degree elbow in the last step. Use on the of the female/female 45 degree elbows and connect it to the end of the 16" pipe. Adjust these by turning untl the are not hittingthe body work and the elbow is pointing up.
STEP 3

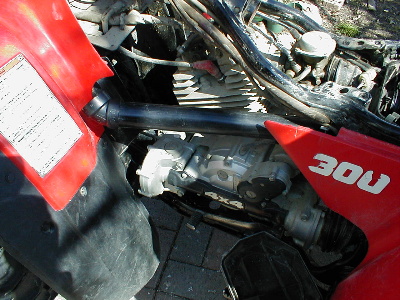
Cut another piece of ABS pipe 12" long and connect it to the 45 degree elbow in step 2. It should come up to about even with the top of the front rack.
STEP 4
Here you will need a 2" piece of ABS and the last 45 degree elbow. Attach the elbow to the 12" piece of ABS from Step 4. Align it so it is lying flat on the rack. Connect the 2" piece of ABS into the elbow. Once your finished all the steps you will try wrap the snorkle to the rack here.
STEP 5

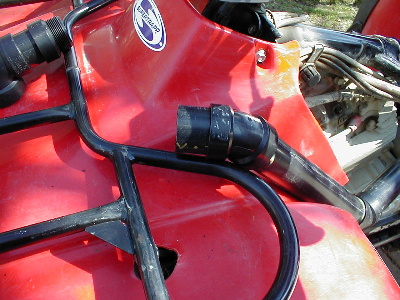
Take one of the 90 degree elbows and cut another 2" piece of ABS. Connect the 90 degree elbow to the 2" piece in Step 4 and then connect the 2" piece of ABS you just cut into the top on the 90 degree elbow. The opening should be pointing strait up. Connect the bottom half (male section) of the screw type dissconnect to the top of the 2" section of ABS.
STEP 6

The length of the ABS in this step is up to you. It all depends on how high you want to make your stack. I cut mine at 16" which put it just below eye level for myself. that way I wasn't stareing down the end of it all the time. With mine design you can also make a second shorter stack for everyday trail riding. 4" is a good height for a shorty. If you make a second stack you'll need one more 90 degree elbow than what I have listed in the material list.
Cut your ABS to the length you deicided. Insert it into the female half of the coupler and tighten it down on the half already installed. Connect the last 90 degree elbow on the top of the stack so it is pointing towards the rear of the machine.
STEP 7

It should look something like what shown in the photo. Now you need to go through the hole thing and mark each joint with a LARGE pencil mark. This will allow you to quickly line the pieces up once you have applied the glue. Once all joint are marked disassembly the snorkle and start at step one reassembling it and applying glue to each joint. The only major thing left to do is to connect the vent lines.
Vent Lines
STEP 1
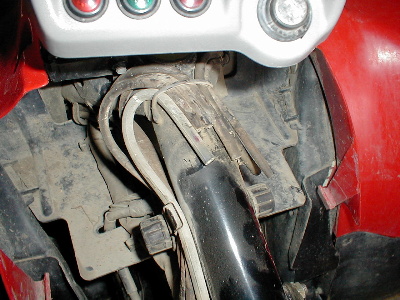
There are several vent lines on the 300. Front and rear diff., Front and rear brakes, Gear case, Crank case and the Carb. All of them except the crank case are 1/8" tubes. The cranck case is larger. the materials for this part will depend on how you decide to run the lines. All I'll say is make sure you get brass fittings, they are alot tougher that plastic and try and get the most flexable hose you can. All the 1/8 lines I T'ed off into 1/4" lines.
STEP 2
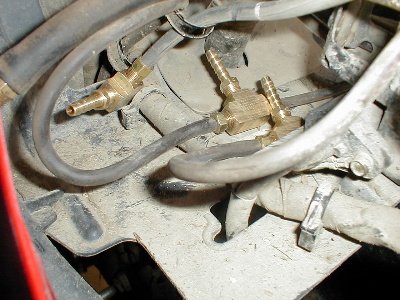
You can join some of the lines together so you don't have to run as many lines or you can run them individualy. I decided to join some. The front and rear diff's can be T'ed together, the front and rear brakes and be T'ed together. I also joined the crankcase and gear case lines. The carb line I ran buy it's self.
STEP 3
Once you have join the vent lines together you need to attch the hose you'll be snorkleing to the T's. Make sure that none of the lines get kinked. Once they are together it helps to tie wrap the T's in place so they aren't bounceing around.
STEP 4
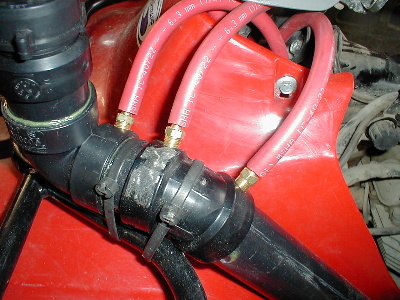
I decided to run the lines directly into the snorkle for a neater look and to make it easier to remove the stack. When drilling and tapping the hole for the hose fittings I found that going through the joint makes a better fit because of the double thickness of ABS there.
STEP 5

You can also run the lines right up the stack. I did it on one line because I ended up one fitting short. As soon as I get another fitting I'll be tapping this line into my snorkle aswell.
REJETTING
I did have to rejet my carb after installing my snorkle. First of all my machine has a IDS2 pipe and a Uni-Filter on it. The jet settings I was running with that was a 130 main and the needle jet one notch from the richest setting. Once I installed the snorkle I went up to a 132 main and the richest setting on the needle. I also richened the pilot jet by 1/2 a turn from the stock setting. It was still a little lean so I went from the 15 disc's I had in the pipe down to 10. I was really surprised at how much more "punch" my 300 had once I was done. It was almost like driving a different machine.
