| Tech Tips | Trick Tips | Racing Prouducts | Sponcers | The Team | Pictures | Schedule | Tracks | Racing | Contact |


HOW TO: REBUILD YOUR TOP END (2Stroke)
Changing your top end or just your rings are one
of the most important maintenance skills to have.
If you ride or race a lot, you may be changing
your top end often. To find out when you should be
changing your top end, check the Maintenance
Schedule.
THE PARTS:
-Piston
-Rings
-Gasket Kit
-Wrist Pin
-C Clips
 STEP 1:
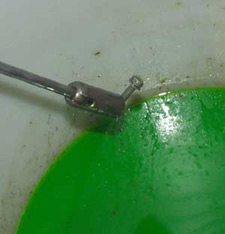
Remove the exhaust by removing the springs that
hold the pipe to the cylinder. Then remove the
bolts that hold it to the frame.
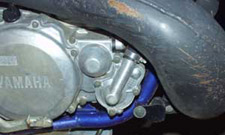
 STEP 2:
Remove the radiator hose from the water pump area
to allow all of the coolant to drain out of the
system. While the coolant is draining this is the
perfect time to remove the seat and gas tank.
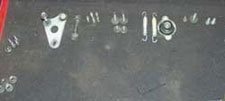 STEP 3:
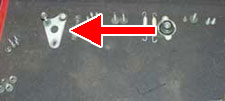
This is more of a reminder of a good practice than
a step. Make sure you lay out all your nuts, bolts
and hardware in an orderly manner so that
reassembly is just as smooth as disassembly.
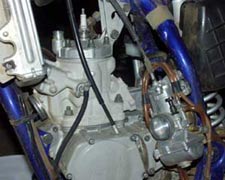 STEP 4:
Loosen the Phillips head clamps that hold the
carburetor. I usually leave the sub frame in place
and just work the carb out and lay it to the side.
 STEP 5:
the coolant. Otherwise you will be following this
step.
 STEP 6:
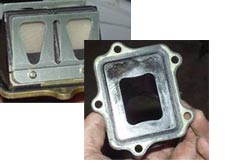
Remove the six bolts (commonly 8 mm head) that
hold the reed cage in. Inspect the Reeds for chips
or cracks. Also check the rubber intake boot for
cracks.
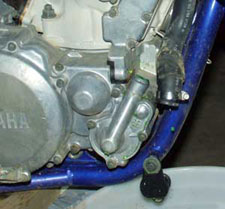
 STEP 7:
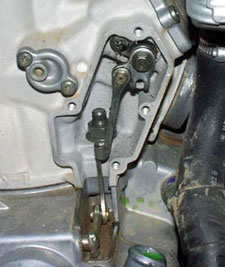
Disconnect any external Power Valve Linkages that
you may have. Yamaha owners will have to deal
with this set.
 STEP 8 :
Remove the motor mounts that connect from the
head to the frame. This should be 3 bolts and 2
brackets.
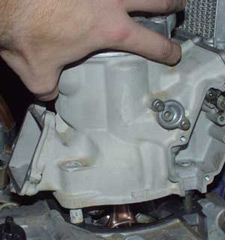 STEP 9:
Loosen the six 12mm head nuts that hold the head
on the cylinder. I only loosen them right now to
make it easier to get off after we pull the
cylinder, but we won't get any dirt in the moto if we
leave the head in place. Remove the four nuts
that hold the cylinder to the crankcase and
slowly and evenly lift the cylinder and head off the
motor.
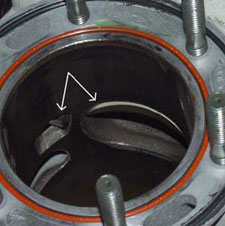 STEP 10:
Check the Power Valve assemblies that are
sticking down in to the exhaust ports. They should be
clean and free moving to insure proper function.
 STEP 11:
This piston shows some signs of wear but still is
well within the service limits allowed. Remove
one of the clips that hold the wrist pin in
place. To do this you will need a pair of needle nose
pliers. Slide the pin out and remove piston and
bearing from end of rod.
STEP 12:
With the way that the cylinders are built today,
unless you have an excessive amount of dirt go
thru your motor, ring break, piston clip come
out, or crank bearings go bad, you will not have
to worry if the cylinder is wore beyond service
limits.
Its Rebuild Time
NOTE: It is a very good idea to place a rag or
paper towel over the opening in the engine while
putting the bike back together. There are many
small pieces and it is not fun when you drop one
into the bottom end.
STEP 13:
Insert the new C Clip into one side of your new
piston. This can be a bit tricky, so you will
have to be patient. Use a pair of needle nose
pliers, get one end in the groove, then twist the
other end into the groove as well. If you put
your thumb over the end that you put in the
groove first, it will be less likely to pop out.
STEP 14:
Coat the wrist pin bearing with the same 2 cycle
Pre-Mix oil that you put in your gas. Prior to
putting the piston on the rod, slide the wrist
pin half way into the piston.
STEP 15:
Place the piston over the end of the rod, oil the
new wrist pin (Pre-Mix Oil) and slide into piston
(Make sure you put the piston in the correct
direction. Most have an arrow on the top that points
to the front of the motor. The other means of
identifying direction is that the intake side
(back) of the piston will have a cut out in the
skirt. Refer to piston pic above). Put in the
other piston C clip so that the wrist pin cannot
slide out.
STEP 16:
Put the new rings on the piston. Install the
bottom ring first and then the top.(Depending on your
bike, you may only have one ring.) In 2 stroke
motors both rings are the same so you don't have
to worry about which one is the top or bottom
ring. To put the bottom ring on, put the end of
the ring in the top groove and roll it onto the
piston bypassing the top groove with the other
end and placing it in the bottom groove. Continue
to roll it around until it is completely in the
bottom groove. Then install the other ring in the
top groove on the piston. Refer to picture of
rings above.
STEP 17:
Align the rings to that the end gaps are over the
locating pins in each ring groove. Compress the
rings with your fingers and slide the cylinder
over the top of the piston. Once the piston and
rings are up into the cylinder continue to slide
it downward as far as possible. You can also
slowly move the kickstarter to bring the piston up so
that you can seat the cylinder back down on the
crank case.
STEP 18:
It is simple from here, Begin replacing the nuts
for the cylinder and torque to proper specs. Now
put the head back on and torque the nuts in the
proper sequence and to the proper torque. The
Torque spec is very important! You can get these
from your owners manual or local dealer.
STEP 19:
Reinstall the reeds and intake boot. Remember to
Torque properly.
STEP 20:
Reinstall the carburator and tighten the clamps
that hold it in place.
STEP 21:
Reinstall the radiator hoses, fill coolant to
proper level, seat, gas tank, and exhaust. Put in
a new spark plug.
STEP 22:
Double check your work, make sure bolts and nuts
are properly torqued and everything has been
reinstalled.
STEP 24:
Now you are ready to start your machine. Allow it
to run until warm, shut it down and allow it to
cool fully and recheck all nuts and bolts for
proper torque.
STEP 25: BREAK IN
There are many different theories on break in
procedure, so here is ours. Basically, when
breaking in an engine, you do not want to strain it in
anyway, never go above 3/4 throttle, don't ride
in sand and try to keep it on flat ground:
Note: You will be riding the bike at half
throttle. To avoid fouling the plug, you may want to
install a hotter one.
1) Start the bike and warm it up. Ride for about
10 minutes at half throttle. Shut it off and
allow it to cool.
2) Check for any leaks and noises and pull the
plug to check it.
3) Start the bike, warm it up and ride for about
20 minutes. Shift through the gears, but do not
use more than half throttle. Allow the bike to
cool. Check all components of the bike, look for
leaks and check the spark plug.
4) If the bike looks good, not making any funny
noises and is not leaking, you are good to go and
the bike is ready to be put through its paces.