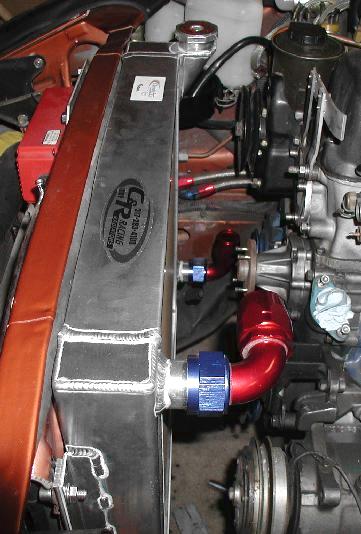
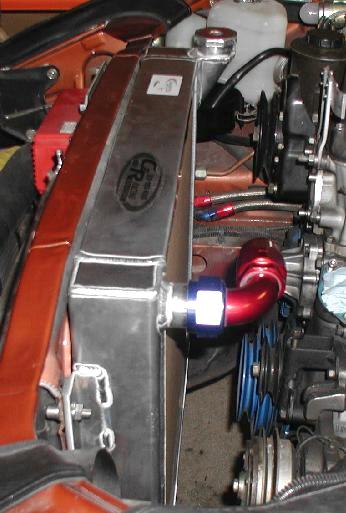
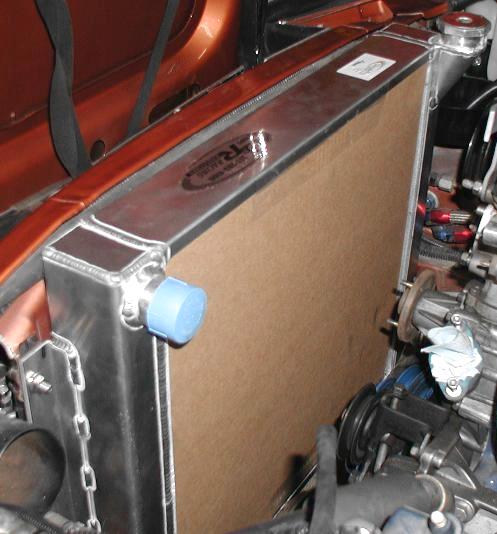
Here is a picture that shows a slightly different angle. The radiator fits the car very well. I did first design the heigth to 20" but that proved to be to tight of a fit for the part so I sent it back and had 1" taken off of the bottom of the part.
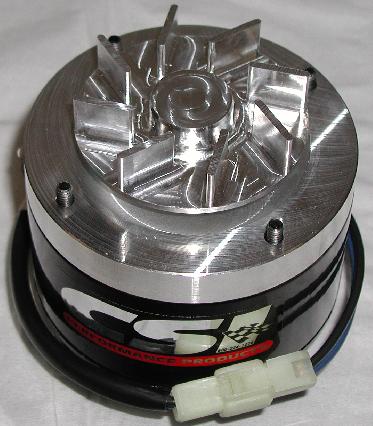
I am planning on using an electric fan setup, and also the new electric water pump that I was working on with CSI electric water pumps. They now have a part number for the part, and it will fit every L series engine. Hope this is some help to someone who wants an aluminum cross flow radiator. I have spent allot of time and money to get this part into my car. I think it will be worth the money in the long run.
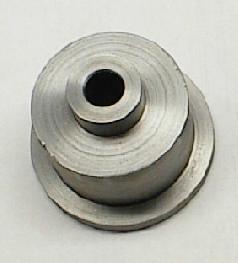
CROSS MEMBER BUSHING
Here is the finished bushing I designed to install in the rear cross member of my car. I just could not get the car to act right under heavy loads with the stock rubber mounting bushing. I also wanted to move the wheel back towards center of the wheel well. I was able to move the wheels back about .300 with the bushing mounting hole on center.
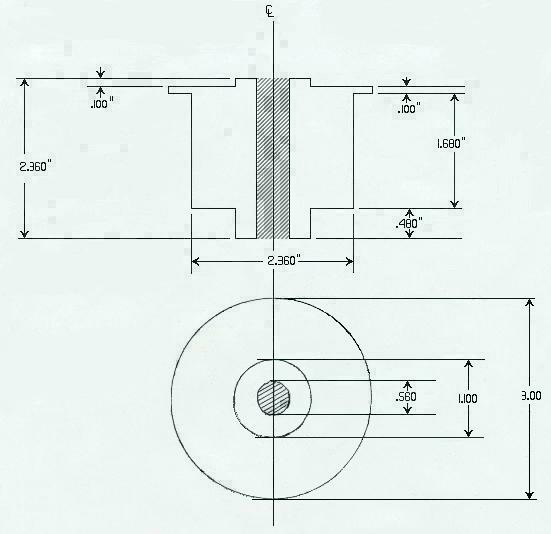
Here is the drawing of the bushing. I decided to archive the part and make it available to who ever wanted to duplicate what I have done.
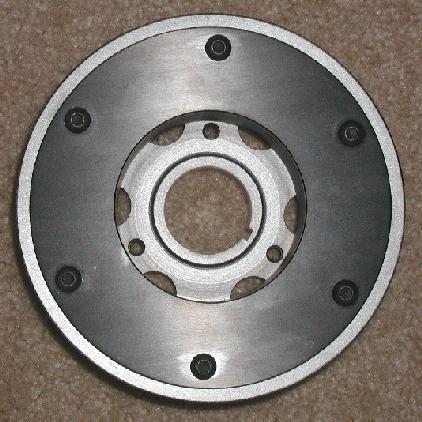
HARMONIC DAMPNER
Here is the proto damper BHJ has completed. This part is a two belt unit. The damper can be ordered with two or three belt pullies depending on wether you are running power steering or not.
Note the front plate is bolt on to the unit. This is where the third pully mounts for the power steering. The third pulley is an optional part that can be bought as well. Additionally, the trigger wheel is installed behind this pulley for use with after market fuel management systems.
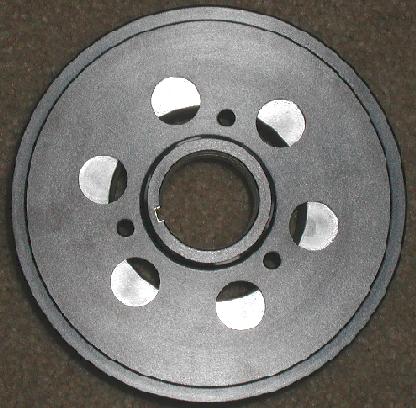
Here is the back side of the part, you can take note that there is no design provisions to install a trigger wheel to the rear of the part. The the trigger wheel is bloted to the front of the part to clear the timing cover. The trigger wheel can be adjusted as the blot holes are slotted to make corrections in your system.
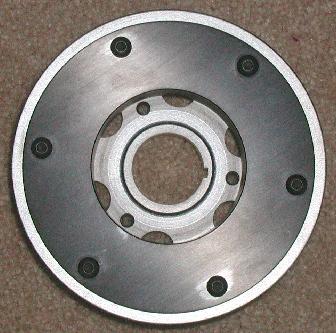
Here is the side view of the part. The damper is designed around the zx cars and will bolt directly in place of the stock unit.
Here is another view of the front of the part. Well folks that is about it on this part. I dont see any reason this unit will not do any rpm range you want it to. The part is SFI aproved. The part is being heat tested at this point to ensure it operates exactly as designed. There is going to be a first run of 10 parts. Give BHJ a call and speak to Brian or Chris at (510) 797-6980
I also did a little more work to my part to make timing easy, and in a pinch have that ability to make cam timing adjustments. I put the degree wheel indicators on this part myself in the shop at work.
NOTE: the damper timing marks will not fit every application exactly, due to the different timing brackets Nissan came up with. My solution to this was to modify the stock bracket so that it became adjustable. I drilled holes in the bracket to fit say a 10/32" machine screw. I also slotted both of the new holes so that the timing marks, or bracket could be positioned and adjusted to match the TDC mark on the damper. I made a 1/8" thick aluminum base for the bracket and drilled and taped the holes with the screw size I wanted to use. I used the stock bracket to locate and drill the 10mm and 12mm holes in the base bracket, for the mounting to the front cover. Then I used my indicator, or however you do it yourself, to find TDC exactly. Then I adjusted the new timing bracket assembly to match TDC and it was a done deal.
TRANNY
Here is the new tranny for the car. This is a Tremec TKO2 transmission. Looking at the picture of the T5 (spare I have laying around) and the TKO2 there is quite a difference in the TKO and its size. This transmission is being used by the ford guys in the mustangs and they are able to run 9 second cars with this unit without breaking it. My car is not a 9 second car, but it will be able to run about a 10.07 through the 1/4 mile. I researched a number of transmissions for my car and found this to be the best fit and best rated unit I would be able to get and not have to hack the heck out of my car in the process. This transmission with its gear ratios will put my topend to 165MPH and I think that is fast enough for me. The freeway rpm will be good for good fuel economy as well.
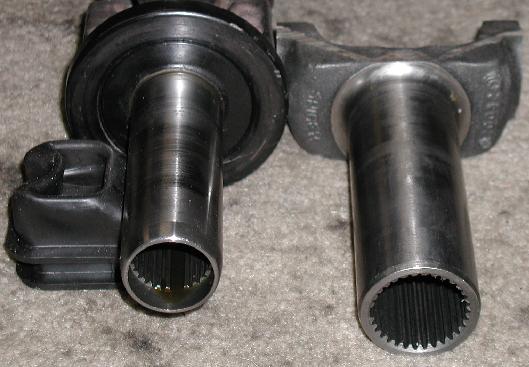
Here is a comaprison of the output yoke from the T5 and the TKO. The Tko yoke is much larger then the T5 yoke, maybe that is why it can handle more power.
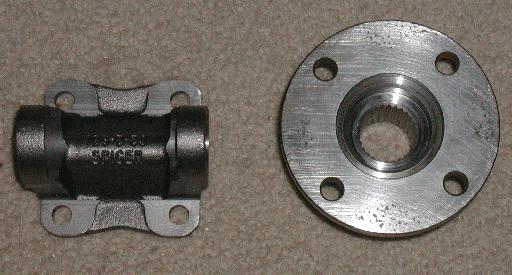
Here is the flange for the differential. This part is from the 300zxt LSD differential. Spicer makes the companion flange for the universal joint that utilizes a 1310 universal joint. The universal joint is about twice as big as the Nissan part. This stuff will be very durable and give me some security that they will not break. When I pulled the drive line from the car, I found the Nissan universal joint was starting to get a little worn. I really like the fact that the spicer part is replaceable, so if it goes bad I will not have to send the drive line out for repair like I would have to do with the Nissan part. Nissan made the universal non replaceable, but I do believe MSA sells a replaceable part for the Nissan universal, but I have never looked into what it takes to replace it.

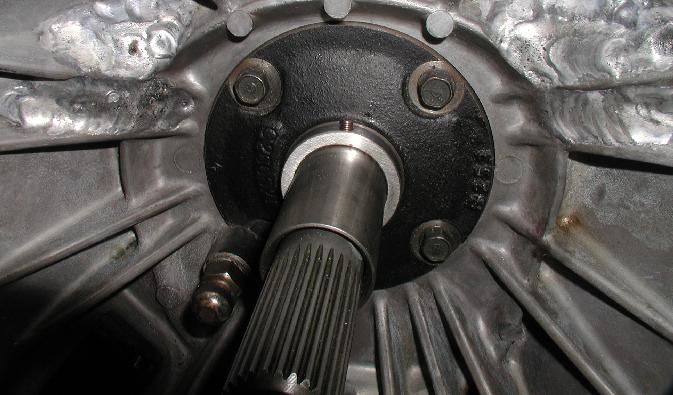
Here is the new driveline. The length of the tube went from 22.750 to 23.250 but it appears the overall length has shortened somewhat. The input shaft of the TKO2 is shorter. You can clearly see the universal joints are much larger and beefier then the nissan part. I went with non greasable universal joints, they are not drilled in the center for the grease to get to the caps. The parts are cheap so I decided it was better to be stronger (some would argue that) and go with a solid part. We will see how long they last, and if they go out fast then I can always go with a greasable part. Inland empire driveline did the driveline. The part is constructed from a .085 chrome molly tube and spicer flanges and universal joints. The drive line weighs in at 15 pounds.

Here is a pic of the clutch. This unit was built by Robin at superior Friction in northern CA. This clutch held the torque from my car, no problem. I was running a centerforce unit but it was gone in about 3K miles, and the run on the dyno killed it. I have posted the one dyno run when it gave out. The torque and Hp drop off quickly. I dont think I will ever bother with one of their clutches again, at least for racing, they just dont hold the power. The claim by their webpage that their clutch holds 90% more power then a stock clutch is a bunch of bunk. My stock turbo clutch held up better then their new dual friction unit did.
I am sending this unit back for inspection, and to have the hub changed to fit the TKO spline. I really like the unit, although it is notchier then a standard clutch, but as the saying goes, you want to play you have to pay. The case with the clutch makes a little hard driving, but not unmanageable. This is one case where you cant have your cake and eat it to.

Here is what the two trannies look like next to each other with the throw out bearings installed. The T5 input shaft looks like a toy compared to the TKO input shaft. I think this is going to work out very well in the car.

This is the throw out bearing slider I made and the new bearing. Check out the rust, it has been sitting for a while waiting to get installed.

here is another picture of the throwout bearings.
Here is a little spacer to go over the collar. I made the spacer from the extra material from the throw out bearing. I did not want the throwout bearing to slide to far back on the collar. The part turned out nice.

Here is what I had to cut away in the hump to get sufficient clearance for the top of the transmission. Not to much in the way of hacking the car, and I was very happy about that. The black pieces are from the removable bracket for the cross member. I was just going to leave the bracket off of the car, but decided to just modify the bracket to fit the new transmission.
Oil Pan

I decided to repair a parblem the cars and others like it have under heavy accelleration. Because there is so much pull under heavy loads, the oil in the pan was getting thrown to the back of the pan. I couls see the pressure fluxations on the oil pressure gauge.
A Note on the stock gauge: Nissan engines run very low idle oil pressure. A person can expect between 10-15 pounds pressure at idle. I never did like that about the oil pump. The stock gauge reads in the middle scale at that point. The ZX cars have a red light, and that is the one to check when the engine starts. The light should go off within a few seconds. The gauge is calibrated for low oil pressure, so if you have a half gauge reading you may not have enough oil at higher rpm levels. The very best thing you can do for yourself is go with a manual gauge and a oil line going to the gauge. You will be sure exactly what the oil pressure is.
The oil pan need to be modified with a windage tray, and a box and trap doors to keep the oil going into the oil pump pickup consistantly. Also the windage tray, will help keep the rod ends from slapping the oil round.

Here is a picture of the oil pan installed in the car. I think for all of the time and money I spent on this item it was worth it. The system now holds 7 quarts of oil, it has a windage tray, and most importantly, it has a oil trap for the oil pump pickup. I am pleased with the end result, although there were times I thought I was looking at a 750.00 piece of hacked up junk LOL.
Cross Member

I have been kicking around going to manual steering. I removed a cross member from a 79zx rebuilt the unit and have it ready to install in the car. I will think about this one for a while. I dont want arm atrong steering, and I dont want to hassle with trying to park the car. I am going to keep the power steering for a while and see how it goes.
SAFETY

Here is something most people dont think about, until you break the 11 sec mark at the track, the driveline safety loop.
I know some of you are thinking yea right, but let me tell you something. I use to drive a 67 chevelle malibu, I built the car in high school, it was my baby. I put a SB 302 in the car, YES FORD, but when you are limited on funds and get an engine and tranny T10 TOP LOADER you dont argue with the cost, well anyway, I built the engine well for my first ford engine, and it was fast. I had to upgrade the clutch because the stock unit was not to good and at the time I worked for Sig Erson Cams, which intitled me to all of the discounts from SUPER SHOPS, remember super shops? So I got a 3800 Lb Hays clutch and installed that in the car. I have to say they do make one of the best clutches I have ever run. So being in a rural area and the little spazzzzzzz that I am, I never missed an opportunity to do a good burnout from the stop sign. So one day my step Bro askes me to take him to his dads house and I said no problem. We were out of the way a little bit and I say hey Ronnie lets go for it. I nail it off the stop sign, 6 grand and dump the clutch, it was cool, I hit second and am jaming it for all it has, and as soon as I clutch second the car goes BOOOOOM. I'm freaking out in that split second because I am thinking I just blew the engine, but I realize the engine is hitting redline and we are no going anywhere, All of this in about two seconds, I shut it down and I hear this noise under the car because we were still rolling. I stop and look under the car, and yes you guessed it, the driveline is dragging on the ground, BUT it is being pushed down the road because it broke right off the tranny end. I didn't think about it to much at the time, but if I had hit a pot hole, and they were common on that road, that would have really ruined my day and my Bro's day to. That drive line was long enough to make the car do an endo and flip. Scared the heck out of me when I got to thinking about what happened. I literally sheared the universal and destroyed the output yoke. I tore the universal cap holders right off the output yoke. But the important thing here folks is that I could have easily killed myself and my Bro because there was nothing there to hold the driveline up in the car.
Safety, safety, safety is all I have to say, and for 38.00 dollars and some change from Summit, it is worth every penny. This is serious stuff here folks, I bet most of you didn't know Big Daddy Don Garlets lost half of his right foot because a clutch let lose on his dragster did you. Ever wonder why dragsters (not funny cars) went to rear engine cars, that had alot to do with it. That along with alot of other safety stuff like blower straps, sounds stupid doesn't, but I have seen a blower come off an engine and it was spectacular really, but you would never have thought a blower could be blown 60 feet or so into the air and when it hit the ground it bounced up at least 30 feet again. I saw that in the late 70's on a car, once you see something like that you never forget it, and you begin to realize this is very serious stuff here, YOUR LIFE DEPENDS ON IT. Keep that in mind always and save your own life folks, but most of all, have a great time doing what you are doing.
SPEEDO UPGRADE

Here is the upgrade speedo I have been working on. I sanded the center of the gauge, and painted it black. I am going to finish it up with 600 wetsand sand paper to give it a good matt finish. Then it will just need the MPH silkscreen installed. I have a shop that can do the recalibration of the unit and then it is in the car. I will be able to keep the correct mileage with the 85MPH movement as it counts six digits instead of five digits that the 130MPH speedo has. I cant wait to get it installed.

This is the way the speedo will look installed in the car. I finished up the silk screen lettering and I think it looks pretty good.

And here my prize, an installed 210MPH speedo for my car. The only one of a kind as far as I know of. I like the finished product. I could have done a better job on it, but that would have required an air brush set and I was not going to invest the money for the system for just one project. I think it looks good, the camera shows up every flaw, and I really cant see them when I am behind the wheel driving so it is good enough for me. Let me know if you would like a setup like this one. The hard part is getting the back plane with the correct meter numbers, but as I understand it this is from a car in Canada, any place that uses KM/h for the standard speed in that country. This gauge has been claibrated and it is accurate from 10MPH to 150MPH. That is the fastest the machine will go up to LOL.
Here is the finished cluster. I installed a 3mm BLUE LED in the tach to have the bright light indicator. I also installed the back light for the temp gauge. Both circuits had to have a voltage regulator installed to get the correct lighting, but after much hassle and retrofitting both gauges are inatalled and working well. The cool thing is that I really did not have to make any radical changes to the instrument cluster wiring in the process. In fact, if I wanted to reinstall the stock gauges the cluster will work fine. The only thing that would have to be changed is the gray front part of the cluster because I finished up the hole on the temp side for the new gauge. All of the sensors still work and are hoked up. I was able to trigger the tach from the stock tach trigger wire (blue wire from the coil) from the back plane of the cluster. The B+ power, ACC power, back light and ground were a snap as well. The controller is tucked up under the lower dash panel. I don't need all of the bells and whistles the controller provides. I just want readings with the limits set to each gauge.
I did look at the DEFI site for additional gauges, but they don't have a fuel level gauge, and now I found out they are discontinueing the Tach as well. I was also interested in a DEFI speedo, but that to is not available. To bad that would make a killer dash gauge assembly.

Timing Chain

I have finally gotten a much desired and needed performance part for the engine now. The cam timing chain tensioner. This part is strait from Japan. The cost was right at 550.00 shipped to my house. I realize this is an expensive part, but The cam chain slap in the L series engines has always been a sensitive spot for me. As you know when the cam changes its timing while the engine is running you get inconsistant power output from the engine. While most people never feel the difference, it is there, and it will cause you to tune the car a little loose with regard to air/fuel ratios.
The second thing I was concerned with the L series engines was the hydrolic tensioner. I NEVER did like that method of tensioning the timing chain for any car. I have had problems in the past of the chain hitting the front cover when I started the car, it was on very cold days, but it happened none the less. I think this is an excellent part for any z engine and would highly recommend it to whoever is willing to spend the bucks on the part.
Now all I have to do is pull the front cover and install it. Sound like fun? It doesn't to me, to do the job correctly, I will pull the oil pan and change out the gasket to make sure I dont get any oil leaks all over the place. That part of the engine flings oil every where and I dont want to turn my car into a grease pit. So I guess it is time to take it apart again, oh well what else is new LOL.