|
synJet is a 3D flight simulator in which you may select from four models of aircrafts to fly in, and destroy land targets and dogfight with other human players. While this may take a little effort learning to fly, synJet is definitely a good action game (I hope I made you happy this time, right Dan?), where accurate control and correct choice of weapons are key to everything. Because synJet's aerodynamics is based on realism (that is to say, compared to synSpace, etc), flying the plane requires a correct knowledge of controls and reading the HUD. There are three ways of controls in synJet:
The joystick will only work if you have checked the "Use Joystick" checkbox found in the toy preferences. Otherwise, the game will assume you will use the keyboard, which everybody should have, or if you don't, that's very very strange. The NumPad, however, may be missing, typically when you have a laptop (like myself). While you can fly your plane without the NumPad, some of the useful functions are bound to NumPad keys, including firing your weapons, meaning you'll be missing out a lot of the game! If that's the case, you can get an external USB NumPad. If for some reason that's not possible, I believe there is a little key called NumLock on your keyboard that replaces some of the keys into the NumPad (see my keyboard's photo, notice the little numbers on the side) and use them instead. This will of course conflict with your chatting, though. Now, if for some reason your laptop does not have that either... "um.. you're probably screwed at the moment." -Dan Anyways, here's the table of controls for the keyboard (for the joystick, I don't know anything since I don't own one):
And the toy preferences button opens the Options as follows:
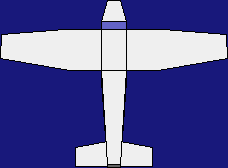
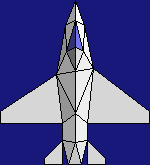
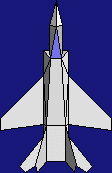
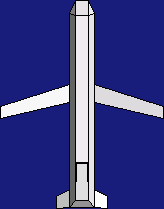
Just for fun, here are the four 3D models available in synJet:
OK, so now you know the controls, are you ready to fly? Not just yet. You should learn to read the HUD of your high-tech plane, as it contains tons of useful information you will be seeing throughout your flight.
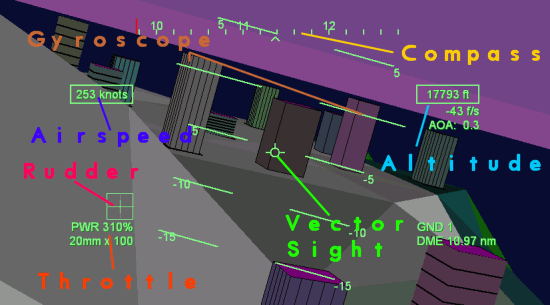
This is your HUD. As you can see, there are a lot of numbers and meters that you may be too busy flying to see. But do not take them lightly, these will come in handy when your plane has gone out of control; you NEED these information to fly your plane properly. Trust me on this and someday you'll want to thank me for this (and Dan who actually implemented this amazingly detailed HUD interface). For the HUD to be fully shown, you must set your view to "Front". In other views, the gyroscope/radar and the vector sight will not be shown. The default view should be "Front", so you shouldn't have a problem here. Here are what each of the display means:
You do not need to remember all of them at once, you will slowly learn as you play the game. But you'll still need to be able to tell what each of them means, or you can't make it past the pilot school. By now you may be saying, "Hey, I didn't have to read all these! I'm sure I can figure those things out myself, so just LET ME FLY this damn thing!" Very well, then. Go ahead and play the game! Try a few minutes of flying your new plane and see it for yourself! Good luck! ...... OK, it's about time you've come back running and screaming, "HELP! My plane is going crazy and I don't know what to do about it!" No? Well, in any case, it never hurts to learn how to fly - PROPERLY. First things first, if you did cry about your plane going out of control, and you have absolutely no confidence that you can handle it, then I highly recommend switching your control scheme to "Easy" via toy preferences. From this point on, I will assume you're on an "Easy" jet for clarity's sake. The "Real" control guide will be covered later.
You may also turn your plane by using your rudder keys, which would be Insert and Delete by default (if key config will ever be added, I mean). Pressing these keys will cause your plane to 'yaw' without tilting sideways. This will be useful when you want to make smaller moves without rolling. This, however, does not allow you to turn as quickly as rolling, so think of this as just an desperation move. You shouldn't have a problem with climbing up and down as it's an easy action. Just hold Up/Down from the parallel position, and the plane will pitch up/down. One important note here is that pitching down isn't as fast as pitching up, more noticeably in "Easy" jets. So doing a turn with pitch down wouldn't be as effective. This can, on the other hand, be used to make small adjustment to your course. This will be especially important when flying in "Real" mode. To speed up, press PageUp and bring your throttle level up. This is also a simple action. To slow down, press PageDown and decrease your throttle level down, which will eventually slow down your plane (remember, the jets don't have airbrakes... yet). Slowing down too much will cause your plane to stall, or lose balance and start falling down. Stalling is bad because your plane's control will go jack, and if you're unlucky you may crash on terrain (which isn't all that bad). If this happens, immediately throttle up and regain speed. Maintaining high speed is a good idea because not only will it prevent stall and therefore stablilizes your control, but it also helps you reach your target faster (duh!). But it isn't always good, because you may overshoot your target, and people tend to panic when this happens. That's about it for "Easy" flying 101. We will cover more detailed flight techniques in "Real" jets. All right, I bet you've all been waiting for this: Weapons and Destructions! Where's all the fun if you can't blow up stuff?! But before you continue, I suggest practicing a little more on flying so you won't panic when you have to use your mouse. Now, shooting weapons isn't that complicated, as it only requires a few keystrokes. Splashing a target, however, is a different story. Never expect to go all wild and expect anything to hit. Once again, the HUD is vital here as it will provide critical information for you:
The HUD does, in fact, show more than just your speed and weapon (which you were probably looking at before you read this). It just can't be more helpful! In order to destroy anything, you should begin by selecting it from the shootlist at your right. This requires a mouse, so make sure your plane's course is in order before you let go of your joystick! In the shootlist, you will find three categories of targets for you to choose from: GND, the ground targets, AIR, the airborne targets and PLAYERS, and NAV, your friendly units, which you can destroy but aren't really supposed to. Once the units in the category is shown, click on the unit names to 'follow' that target. The next step is to find your target. It is a good idea to first fly toward that direction. You can identify this by looking at the compass. Once the target is chosen, a "needle" will appear on the compass, showing the current direction of the target. If it is in green, then the target can be found within 180 degrees in your peripheral sight. If it is in red, then the target is behind you and you should make a hard turn to see it. Once you are headed to the right direction, you should see a green box in your screen, which is your target container. If you don't, then the target is likely to be an AIR target who is flying too high or too low to fit in your screen. If this is the case, look at the lower-right corner of your HUD, where you will find information about how far your target is. The DME is the actual distance between you and the target, in neutical miles, or nm. The D is how high or how low your AIR target is from you, which you should be looking at. The positive value means the target is above you, and vice versa. If you get a large value, something like +10,000 feet, then you'll have to climb up like mad. And it's not easy to climb up that high. You may also hit F9 to toggle your radar, which will show the 2D radar of your HUD. This radar will show the accurate positions of your targets, but not height, so keep your eye on the D value. You can toggle between 3 raday ranges, each being short (10 nm), medium (30 nm), and long (100 nm). In any case, once you managed to get your target inside your screen, throttle up and get close to it as much as possible. While you're at it, you may want to press F2 to select your missile weapon. When you get close enough to your target, which would around 4.30nm, your missile should automatically lock on. You will know when you have a lock-on your target, when you see the message "LOCKED" below your DME, and a rhombus-shaped missile seeker will appear inside the target container. You're all set to destroy your target! Go ahead and press NumPad Enter to unleash your missiles! Don't worry about the missile path and other realistic crap, because the missiles are unrealistcally accurate... and powerful. At least it is as of time being. Anyways, most of the time, targets can take multiple missiles, especially buildings, so send your target a rain of missiles, and splash them into sprinters! Once you run out of your missile, press F2 again to use your next set of missiles! So yes, you did it! You've learned the correct use your weapons, and how to use them to your full advantage to cause havoc! But just for fun's sake (honestly, the missiles will be like the only weapon you'll ever use against other players), let us learn about the other types of weapons, shall we?
Oh, and don't ask me why I added the Wikipedia links to each of the weapons... I just felt like it.
The rest of the ramps do not work. My best guess is that they aren't supported yet. Let me also guess what those ramps mean:
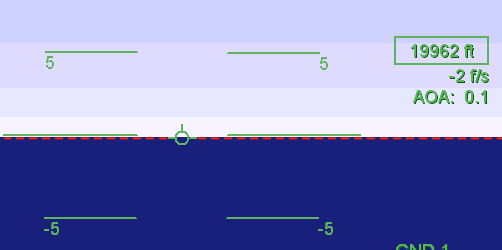
You will also find your eject button here. This is basically a "resign" button, and will boot you from the game, in which case you'll be a spectator for the remainder of the mission. Remember, do not eject when you are simply shot down! Okay, so back to school! But this time in "Real" controls... Welcome to the advanced pilot training camp! The "Real" mode is much harder to fly, because the plane will keep turning even if you release your fingers from the keys, unless you manually control it back to neutral position. Things will get easily messed up if you're not careful with your handle. So why would you ever want to fly in real mode? Umm... I don't know, because you can show off your skill, perhaps? I personally find it cool to have the only real jet, when 10 people in the same server are all using the n00bish Easy jets. Don't you agree? On a serious note, there is a slight advantage to flying a real jet: Your rolls and pitches are much quicker now that they are no longer 'saved' by Easy mode limitations. This can come in real handy when making hard turns, or even quick 180 turns! It is also easier to get out of stall in Real mode, as split-S is easier to perform. Of course, you can still get your plane in the "crazy-tornado-dance" quite easily, so always watch your control (unless you actually enjoy seeing your plane in chaos, but it'll only make YOU, not the plane, the laughing stock of the others. i.e. "lmao noob"). Before doing anything in real mode, remember this single important point: never hold your arrow keys down for more than a split-second! This is probably where most people screw up. If you do this, your plane will pitch/roll too quickly, and will totally go out of your control. Even if it does, never try to manually fix it yourself, because the chances are that you'll panic and mess up even more. It's the worst thing you could ever do. So in real mode, always always always TAP your arrow keys when you fly. If you need to make a quick turn, tap that many times quickly. Simple, but this really cuts down on unexpected mishaps. Keeping that in mind, begin by making a roll turn. The keystrokes aren't much different from Easy, only you need to TAP your keys. Also, when you tilt your plane, you must press the arrow key of opposite direction to stop the roll. Same goes for pitch up and down. Suppose you were to make a right turn. To do this, with the actual keystrokes, you should tap Right to tilt your plane, then TAP Left to make the plane stop rolling. Now, tap Down to pull pitch up and turn, then tap up to stop the turn. Finally, tap left to slowly bring the plane back to parallel position, and tap Right to stop the roll. In any of the process, you should never press arrow keys down, I'll repeat this until it makes sense, if I must. Practice this a couple of times (and forget about your targets, you'll probably screw up anyways). At first this will be easy, but at a certain point you can't help messing up and getting your plane out of control no matter how careful you were. You will do less of this as you practice more. Don't panic, as this can be saved by a single keystroke: NumPad 5. This will immediately set your rudder control back to neutral position, meaning your plane will suddenly stop turning and spinning around like crazy. Yup, it's that simple! I guess I should have told you about this a lot sooner, but at times I like to be mean... Anyways, here's another generous (yeah right!) tip for you: Should your plane go out of control, press NumPad5 to make it stop! Now the next step will be much simpler than you thought: you'll practice to fly straight. This is much harder than it sounds like, actually. Well, not really, once you get the hang of it. You'll still have a hard time, though, after all that turns and spins. So what we're practicing here is actually bringing back your plane back to parallel position, then navigating your course straight. This is where gyroscope comes into play. After you hit NumPad 5 and stop your plane from spinning around, tilt your plane left/right until the lines are parallel. Now, pitch up or down until your vector sight comes inbetween the zero lines, like below:
Notice the red dashed line, that is the horizon. Notice how the vector sight is placed right on the horizon. Your goal is to keep your plane like this, so you'll be flying straight. Remember, your plane will always be 'warping' upward or downward. You will have to adjust your pitch as needed, keeping your AOA as close to zero as possible (also notice on the screenshot above, the AOA is 0.1, which is just about right). So now you've learned to save yourself from the uncontrollable state, congraturations! You pretty much know how to fly in Real Mode! Now you can go test your skill in fancy aero tricks (also known as "maneuvers"), like making hard turns! I've written so many freakin' times not to hold your arrow keys when turning, but now you know to control yourself, go ahead and try pressing your pitch keys hard to make much quicker turns (than in Easy jets). But still, you should never ever hold your Left/Right keys pressed, because these are harder to control. Actually, only the pitch up key (Arrow Down key) should ever be pressed hard, should it be necessary. Also, I personally don't recommend using your INS/DEL keys in Real Mode for simplicity's sake. Now, for some miscellaneous note:
That's about it for the flying school, but for one last time, let us recap some critical points when flying in real mode:
Congraturations, pilot! You're no longer a long-life rookie! I'm proud to say you're an ace! I'm sure you'll be accredited to your squad! Now, report to duty! To play a mission, the moderator must pick one for everyone. When a mission has been selected, you will proceed to the briefing screen. Here, players will be introduced to a simple briefing of the mission, along with the 3D target map. You may click on anywhere on the 3D map to enlarge it (much like Ace Combat 2, really). When you're ready, click on "Start Mission" to join the game! As of time being, missions are very simple and do not have special events in it yet. All you have to do is pretty much destroy everything in the shootlist except for the NAV units (your friend!) to complete the mission. If in the future updates the missions get beefed up, I will promise to write a mission walkthrough. In multiplayer mode, missions are both Deathmatch and Coop. This means that you may work together to complete your missions, or just have fun splashing each other. Once a mission has been completed, all players will be taken to the debriefing screen, which is similar to the briefing, except it shows who destroyed how many units. You will also be taken here if you eject your plane during the mission, which will then serve as the spectator screen where you are to watch others play and wait until the mission ends and the moderator picks a new mission for you to play. You may want to be creative and find a new game of your own making, instead of just your ordinary Deathmatch and Coop. My favorite is a teamplay game called "Jets and Missiles". Players are to be divided among two teams, the missiles (must use the Cruise Missile model) and the jets (may use any model but the Cruise Missile), and the jets' goal is to shoot down all the missiles within designated time (2 to 3 minutes is good), while the missiles must survive and try not to get shot down. When a missile player gets shot down, he must eject immediately. If any of the missiles survive, the missiles win; otherwise it's score one for the jets. This is rather unfair to the missile players since they MAY NOT ATTACK at all, and that the missile weapons are super-accurate, which is why it's a good idea to keep the time limit short so that the jets will have a challenge. Either that, or make it a 1 jet against everyone's missile game. OK, it's not like my total favorite, since I'm just writing this from on top of my head. But hey, there's nothing wrong with being creative! |

 The first thing you'll probably learn is to how to make a turn.
You can tilt your plane sideways by pressing Left/Right (this action is called "roll"), but that will just rotate the jet endlessly.
So how do you make a turn? Start off by tiling your plane right until it is perpendicular to the ground.
Keep your plane in that angle, then press Down to pitch up.
This will cause your plane to quickly pull up rightwards, allowing you to change your direction.
After you finish turning, press Left to roll your plane back to parallel position.
The first thing you'll probably learn is to how to make a turn.
You can tilt your plane sideways by pressing Left/Right (this action is called "roll"), but that will just rotate the jet endlessly.
So how do you make a turn? Start off by tiling your plane right until it is perpendicular to the ground.
Keep your plane in that angle, then press Down to pitch up.
This will cause your plane to quickly pull up rightwards, allowing you to change your direction.
After you finish turning, press Left to roll your plane back to parallel position.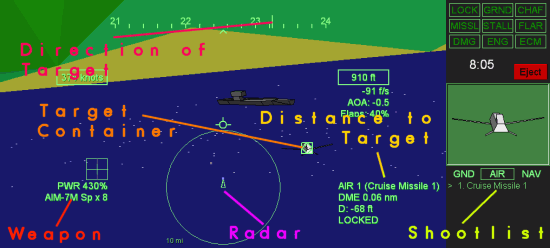
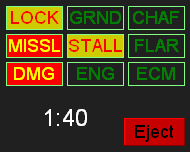 While we're at it, let us take a look at the ramp rights above the shootlist.
These lights will light up should there be any alert or crisis. The redder the ramp glows, more urgent the alert is.
While we're at it, let us take a look at the ramp rights above the shootlist.
These lights will light up should there be any alert or crisis. The redder the ramp glows, more urgent the alert is.