

Scanning for Pubs
This tutorial will help with
scanning for pubs.
Explanation
of PUBs
A pub (short for public)
is just as its name implies, a public server that is used for public uploading and
downloading. It will majority of the
time allow for anonymous logon. This is where a majority of public file sharing
takes place. The files can be anything from games (PSX, DC, PC …), moviez,
programs, and just about anything that you would like to upload and share. Unfortunately, due to the fact that these
pubs are not owned or moderated by the uploaders, there is limited number of
time the pub is available and may become inaccessible at any time (this can be as
little time as a couple of hours or a couple of months). For more information
on how to access both pubs and FTPs read the faq on FTP and Pubs.
Before you can use a pub you
must first find a pub. This is done one of two ways: (1) someone else has a
listing of pubs for you to use. (2) You scan for a pub yourself. The second is
the one we will focus on in this tutorial.
Scanning
for Pubs
Scanning for the pubs is the
act of finding a pub. Now that I have the textbook definition out of the way I
will explain in detail. First you will need a scanning program. I prefer to use
Grim’s Ping, which I will refer to as just ping in this tutorial. To download
click here
and select “Download”. It is easy to
use and works very well. There are other scanning programs; it is entirely up
to you which one you would like to use.
NOTE: When scanning for pubs,
some internet providers (especially dial-ups), frown upon this. Make sure that you have permission to do
this. Most ips don’t have this problem, but make certain.
Configuring Ping
 Step 1: Start Ping. You will
see this screen.
Step 1: Start Ping. You will
see this screen.
 Step 2: Press F8
for the preferences Screen.
Step 2: Press F8
for the preferences Screen.
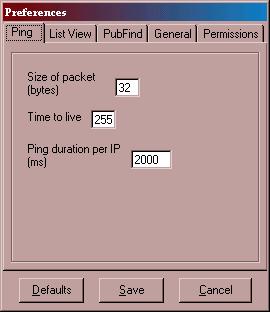
Step 3: For best scanning set
the preferences as follow:
Ping Tab:
Size of packet (bytes) = 32
Time to live = 255
Ping duration per IP (ms) =
2000
List View Tab:
Show gridlines: checked
Column reorder: checked
Full row select: checked
Autoscroll: not checked
Pub Find Tab: this one has 4 sub tabs
General:
Threads = 100
Timeout (s) = 10
Firewall:
Use a firewall = not checked
Everything else blank
Firewall Backups:
Leave everything empty.
Logging:
Log only anonymous =
checked
Log all = not checked
Log Wingate engines during scan = checked
Anonymous FTP logfile = you can leave this the way it is or you
can specify a different place.
Overwrite log every scan = not checked
Use single line format for log file = not checked
General Tab:
Remember up to 50 recent
ranges.
Autosave queue = unchecked
Autoload queue = unchecked
Queue save location = you can
leave this the way it is or you can specify a different place.
Double-click action = Attempt
login selected only one selected
Scan on reconnect to internet
= unchecked
Permissions Tab:
Log directory permissions =
checked
Check the following
directories = this is a list of all the
directories that are checked by ping to see if you can upload files. (/pub/,
/public/, /pub/incoming/, /incoming/, /_vti_pvt/, /upload/, /temp/ are just a few
of the directories listed you can add more by clicking the “Add” button and
typing the directory)
When finished configuring
preferences click “SAVE”.
Scanning for pubs
Now it is time to scan some
pubs.
Press F6. This screen should
popup:

Enter a starting ip address.
NOTE: You should leave the
last to boxes set at 1 – 254.
For a good starting address
use a search engine (such as Yahoo, Google, Lycos, and many others) and look up an address
that possibly could have a large number of servers/pubs. A good example is a
school or possibly a large business. Next you will need the actual ip numbers.
To get this goto the Start button of Windows select Run. You should see this
box.

type “command” without the
quotation marks. You should then see this screen:

at the prompt type “ping”
(without the quotation marks) followed by a space and then the web address.
Note: Make sure you are
connected to the internet.
You should see the following
information:
Note: I used Gamer's
Junktion address:

The number in brackets ([]) is
the ip address. J
Enter this number and you are
ready to go.
After you enter the first
three sets of numbers you can now instruct ping to search multiple ranges, this
is advised. The more you search the better the chances of finding a good pub.
To enter multiple ranges;
click the Add multiple ranges button:

You will then see this dialog
box:

Enter a number. The higher the
number the longer it will take. I make it point to not exceed 50 at a time.
This is entirely personal preference. Click OK.
Next click the Add to queue
button:

Click the “X” button and you
are ready to go.
Next you will need to start
the scan. To start the scan click the “start light” and you will be ready to
go:

Checking the results
After the scan is complete, it
is time to check the results.
If ping found a pub that you
can upload and save files to it will list the pub(s) in a file called
perms.log. To view perms.log press the F2 key.
An example of a found pub:
###.###.###.###
--------------
DIR: /pub/
DELETE STATS: deletable
RUNNING OS: Windows_NT version 5.0
RESUMABLE: Yes
FXP STATS: non-FXPable
SEND SPEED: 10038:Socket operation on nonsocket
Now use this information to
check your pub out.
Tagging the Pub
Tagging a pub is like saying,
“I found this pub and now only me or my friends can use this pub.” It is
considered extremely rude to tag a pub that someone has already tagged and has
lead to some major conflicts between groups. Remember that if someone else has
already tagged the pub that is considered used by them or their friends. Most
often you will see a folder that says something along the lines of: /Tagged,
/Tagged by, /Taken, /Used/, or even a /Temp (/tmp) folder, that contains a
directory within that has the name of the taggers.
An example of a tagged pub:
/tagged
by/johnandjennifer/for/gamersjunktion/
This directory basically says
that johnandjennifer has tagged a pub for gamersjunktion. If anyone from
gamersjunktion would like to upload or download the file feel free.
Testing the Pub
If the pub is not tagged you
should test the pub to ensure that it will allow up/download, protection, and
hidden files.
To test the pub, make a
directory on the pub. Upload a test file to the pub. If the file uploads, check
to see if you can download the file. If you can download the file, check to see
if you can protect the file. For information on protecting a file and making
hidden directories check out my faq on Protecting Your Pub.
If the pub has nice speed,
works great, and meets your needs go ahead and tag it. Then fill it up with
games, movies, programs, and anything else. Then share it with everyone else.
The rule of D’oh!
The rule of D’oh! Simply put
“Don’t be stupid”.
(1) It is not always best to use the starting directory to
post your tag. Sometimes we are using
pubs that the admin doesn’t quite know we are using. So sometimes we create a
temp folder to kind of “hide” us. This isn’t really a good idea, but sometimes
we have no choice.
(2) Don’t use your real name when posting a tag. This should
be common sense, but you would be surprised.
(3) Don’t post your pub in a public forum unless you are
certain that you wouldn’t mind a dozen or so people connection at once. In
other words if you are still uploading, wait till you finish your upload then
post.
(4) I know I have already said this, but do not try to tag someone
else’s pub. I have seen this lead to very bad things. One board attacks the
other board. Flame wars ensue. For those of you who don’t know, flame wars are
arguments that have declined to simple name calling. Usually the original
subject of the argument has been lost, and all that is left is insults. I have
also seen worse things happen, one board tries to crash the other board. I can
not stress this enough, if it is already tagged leave it unless you have
permission by the tagger to use it.
If I have left any out feel
free to post them and I will try to add them to the list.
I hope this will help newbies,
and some not so new, to start scanning for pubs. If you find a large number of
pubs (over 2 J) then feel free to post them for everyone to use. J
-John
johnandjennifer