| www.angelfire.com/dragon/letstry
cwave04 at yahoo dot com |  |
Making the hardware
When I started dabbling with programmers I wanted to proceed step by step. I wanted to see some sign of success before I'd invest more labour. This isn't a bad working principle per se, but I certainly overdid it when I decided to make my first experiments with a breadboard to avoid soldering.Guideline 2: Do not use breadboards or similar loose connections
Though I did get my first flicker of success with breadboards, yet I had to spend days before I could reproduce that first flicker. Experiments that cannot be reproduced are extremely frustrating, to say the least. Breadboards have a pretty high capacitance between the parallel plates, and when signals move at a rate of 8 MHz, they sometimes behave as short circuits. Remember: missing 1 pulse out of 30 is enough to reduce an otherwise perfect set up to utter failure. Take the time to solder. Test the connections with a meter before inserting your microcontroller. Go slow, because that saves a lot of time. An hour of careful soldering is better than a day of frustrated debugging. The web is full of fancy programming circuits. But we shall use the barest minimum. The circuit is based on the datasheet (page 19). We have just added the parallel port connections.
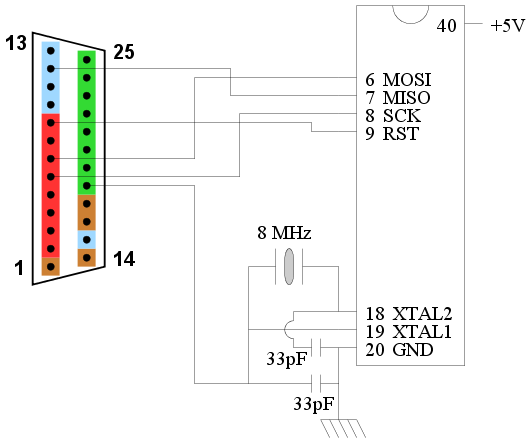 |
| Hardware for the programmer |
- Use a good power supply. The simplest one is made from 4 cells of 1.5V. That makes it 6V insead of 5V, but that's OK. I have also used a Nokia mobile phone charger (6V DC output) and it works perfectly. I had earlier worked with a Nokia 14V charger together with a LM7805 chip. That also worked nicely.
- However, do not expect that the programmer can get its power directly from the parallel port. The port is too weak to drive the microcontroller during the writing. It may be enough during the program enabling, but the writing may fail.
- The wires connecting the microcontroller to the parallel port must not be more than 1 foot in length. I know you feel bad about that. But parallel ports by themselves are just not strong enough to send fast signals over a greater length. And remember that this website is devoted to teaching the basic working principle behind a making a programmer. Once you grasp that using short wires, you can always add extra buffers to boost your signals down longer cables (or even use a more powerful port like the serial port or the USB port).
- Microcontrollers are very robust, it is not easy to fry them...unless you really torture them. I have seen 20V being accidentally fed into the microcontroller power supply and yet the microcontroller survived quite merrily. But one sure way to fry a microcontroller is to interchange the power supply polarity. So make very sure about the polarity (especially if you are using a Nokia phone charger).
- Use an IC base for the microcontroller. You might even use a ZIF socket if you can afford one. This will allow you to remove the microcontroller easily after programming. But a simple IC base is enough for the purpose of programming.
- Test all your solderings with an Ohmmeter before inserting the microcontroller into the base. Insert the microcontroller, apply power, check that the microcontroller is getting power. Then connect it to your parallel port.
- ...do not lose hope! Few people ever get a microcontroller programmer to work in the first attempt.
- ...try inserting delays in
pulseClockfunction. - ...there is a BIG chance that your circuit is suffering from synchronisation problem, which means some bits are getting dropped by chance. This is nasty, but it does happen more frequently that you'd expect. The main culprit is random noise. We shall learn to tackle this in the next page. In fact, even if your programmer works in the very first attempt, chances are that it would suddenly cease to work if you do minor changes (like disconnect the micro and put it back again)! The synchronisation techniques discussed in the next page are a must to make your programmer robust.
