 The Eraser. This tool erases part of your drawing. But it can also be used as a color replacer for palette swapping. More on that later.
If you're here it's because you want to learn about sprite art. So let's skip all the bull and get right into it, shall we?
First things first. Open up MS Paint. No, that was not a joke. Sure you can go out and waste your money on some fancy program like Photoshop but I've yet to see any program that can beat MS Paint when it comes to spriting.
Now then, there are a few tools you'll need to become a accustomed to. Here's a quick list for you:
The Eraser. This tool erases part of your drawing. But it can also be used as a color replacer for palette swapping. More on that later.
 The Magnifier is a spriter's best friend. Using this you can zoom in on your picture to work on those tiny details without sacrificing picture quality as you would with the stretch/skew option. If you want to see what your picture will look like normal sized as you're editing select the "View" pulldown menu, go to "Zoom" and select "View Thumbnail."
The Magnifier can zoom to 100% (normal size), 200%, 600%, or 800%. By going to View-Zoom-Custom youc an also set it to 400%.
 The Pencil. This tool will let you change the color of single pixels. Goes without saying.
 Select. Drag to create a box. You can then drag the box to move whole parts of your drawing. The star-shaped symbol beside this one is the Freehand Select symbol. Freehand Select is kinda clumsy so you shouldn't use it.
 The Dropper lets you pick up a color off your drawing. Use along with the color replace option of the Eraser to palette swap easily.
Now we'll make a simple sprite edit using MS Paint. It is, of course, possible to make a sprite entirely from scratch but for our purposes we'll be editing a sprite. For a word on sources and some links to sprite sites click here.
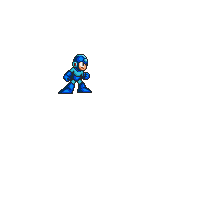
Mega Man 7 sprites are popular so let's use one of those. Find a sprite on the internet, right click and select "Copy" then paste it into Paint using the Paste command in the Edit pulldown menu or by pressing Ctrl + V.
Now then our job as sprite editers is to change this sprite to look like a character of our own creation. For starters get into a good editing view. Resize the editing window to a size you feel comfortable with, then use the magnifier to zoom in and open up the thumbnail window.
Let's start with some simple palette swapping. I want my sprite to be red and yellow. Select the Dropper tool and left click to select the dark blue color in his hands and feet. Now right click to select the color to swap to. In this case, let's select the dark red color from the color palette at the bottom.
Now that we have our colors selected use the Eraser tool. By right clicking with the Eraser tool it becomes a Color Replacer and will erase ONLY the left-click-selected color and replace it with the right-click-selected color. Let's use this technique to replace the dark blue with dark red.

Now use that same technique for the rest of the sprite. During your spriting you will inevitably need a shade that isn't on the palette. To select a color that isn't on the palette you can either double-click a color in the palette OR go to the Colors pulldown menu and select "Edit Colors..."
That will open the Edit Colors window. At the bottom of that window is a button labeled Define Custom Colors. Using it you can select any color you need.
So let's finish palette swapping the sprite. Be sure to select shades that will blend together enough to be even, but not so much as to look like the same color.

Now let's move onto another technique that is important to sprite editers: frankenspriting. Frankenspriting is the art of taking pieces from another sprite and adding them to your own. This could involve replacing (such as taking out the sprite's arm and putting a different one) or simply adding new parts to a sprite. For our sprite let's add some wings. To keep with MM7 style, I'll use Shade Man's wings.
Once we take the piece we want we use the Select tool to move the wings into position behind our sprite. Chances are they won't match, so we'll need to palette swap them to the correct color and edit to fill in any problems.
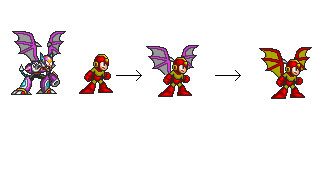
So far we have a palette swapped Mega Man with Shade Man's wings. Well, that's all well and good but it's still just a palette swap with some minor frankenspriting. So here we move onto the most time consuming part: scratch.
Scratch is the term for any sprite work you do entire yourself. Some people make whole sprites out of scratch. For today, we'll just do some minor scratch work.
For starters, select your outline color -in our case black- and draw the outline of your scratch area. Then fill it in. Be sure to shade evenly. Remember to shade folds if you're coloring a cloth section of your sprite. And if you're having to color in a large area use a thin line of medium shade between shades to help them blend.
For our sprite, I want to add some shoulder pads, some horns, and maybe a weapon as well.
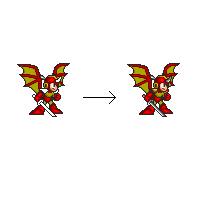
So now here we are. At this point we can do some more advanced editing if we want. But for the purposes of this tutorial, this is a finished work. Now we can save this and show it off to all our friends.
So good luck and happy spriting!