This technique for creating tiles utilizes one filter, called Half-Wrap. It is particularly useful if you have a pattern that isn't seamless, or if you have a small themed overlapping graphic. Bubbles, coins, shapes, flowers, etc lend themselves to this type of treatment. Of course, you can create any wallpaper by leaving a lot of space around a graphic; the problem is that when it tiles it either tiles in straight rows and columns, or in clumps, which makes the background somewhat distracting. Example 1
If you have your graphic overlapping randomly, you add visual interest to the page without fixating the reader's eye on the marching rows of one figure or square. The filter you will need can be downloaded from Simple Filters.
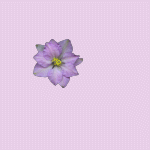
I used two tubes to make the two tiles we're going to work on. One is a flower and one is a kokopelli. You can download them here: Floral tube; Kokopelli tube.
The examples are thumbnails, left click each one to see normal size. To make the floral tile:
Start a new file: File/new, about 150x150 (pixels). Make sure to select the image type as 16.7 million colors. You can make this background white to start, then pour in a different color afterward. I used #E7CEE7 (you can type this in to the Color window next to HTML code).
Click on Picture Tube icon, select the tube you downloaded and installed, and size it down to 10 or 15 percent. I used size 10 (smallest size it will go). If you're going to change your background color, do it now before you start adding tubes. Select the Flood Fill Tool/Solid color, and pour in the color you chose earlier.
Keeping the tubes mostly within the boundaries of the graphic window, fill the window with the flowers. We'll fix the ones that went over the edge in the next 2 steps.
Select Image/Plug-in Filters/Simple/Halfwrap. Now the flowers have been wrapped around the tile, and any large open space or partially chopped off petals have been flipped into the middle of the tile. This space will be easy to see and cover. Fill in all the holes and cover the incomplete petals. This time, make sure you stay completely within the boundaries. Edit/Undo if you accidentally overlap with a flower.
If you just want to use the tile for Windows Wallpaper, save it to your Windows folder as a bmp file. If you want to use it for a web page, it will need to be lightened. Go to Colors/Adjust/Brightness-Contrast. Set it to your desired shade of lightness; I used Brightness=65, Contrast=-44 (minus 44). Now save as a gif or jpeg to the folder you keep your web graphics in. This also makes a nice fill for a banner or button; I used a different flower to make the banner at the top of the page.
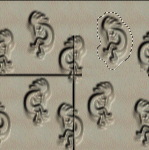
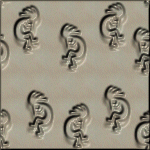
Now we're going to use the kokopelli tube to illustrate how to get rid of the box that forms around a tile when you use textures and Blade Pro effects on a tile. The following example, for instance, illustrates a tile that not only goes in a straight line, but also has a box that formed around it when I used Blade Pro to add texture. Example: Textured Lizard tile
This procedure is more complex than the method used above, but it is worth mastering in order to create tiles that have depth and texture, yet tile seamlessly. To make the kokopelli tile:
Start a new file: File/new, about 150x150 (pixels). Make sure to select the image type as 16.7 million colors. Background color doesn't matter as long as it's a light color.Blade Pro and some other filters work better on light colors.
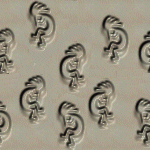
Use the kokopelli tube to add 3 or 4 figures, then use Image/Mirror to turn the figures facing backward. Finish filling the tile with more of the same tube.
Apply a texture or a filter. If you have PSP 6, the effect applied here was Image/Effects/Sculpture. I used pattern=20; Smoothness=6; Depth=7; Ambience=42; Shine=41. Use the defaults for the light settings. You can also apply a Blade Pro effect. If you don't have any Filters or textures available to you, download this tile to work on, and continue with the next steps. (Right click/Save picture as..)
Now go to Image/Plug-in Filters/Simple/Half-wrap. Notice the deep grooves that run through the center of the tile now. The next steps will deal with smoothing that out.
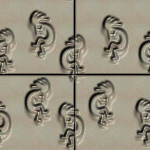
The following tiles illustrate various steps in smoothing. The main tool I used was the clone brush, sized at about 10 square with a hardness of 100. Right click with the brush on a section that's smooth, then left click on the portion to be covered. You'll see an X on the portion that's being copied. When the X gets close to a part you don't want to copy, shift the portion you're copying from, ie - right click on another portion of the pattern that's smooth.
When you get to the kokopellis with the groove running through them, the clone brush won't work. Now you need to cut and paste from the figures that weren't distorted. Use the Lasso selection tool, Selection type=Freehand, Feather=0. Use the zoom to make the tile larger, then use the lasso tool to select one of the other figures. Select Edit/Copy, then select Edit/Paste as transparent selection. Move the copy over one of the sections that has been distorted by the groove and release it. Use the Clone brush to smoothe around it. Copy another figure the same way, and cover the other figure. Make sure there are no irregular bits in the tile, then save as whatever you want to name it.
If you want to see how it looks tiled (to check your work), save it to your Windows folder as a bmp, then choose the tile as a wallpaper. Make sure you choose the tile option.
If you use the tile on a web page and it is too dark, fade it using the technique we applied to the flower above.
If you used a different pattern and you're having trouble with it, e-mail me at JJJPEMom@aol.com and send me a copy of what you're working on.
This page was created on August 28, 1999. It was last updated on: September 3, 2001


 I used #E7CEE7 (you can type this in to the Color window next to HTML code).
 Keeping the tubes mostly within the boundaries of the graphic window, fill the window with the flowers. We'll fix the ones that went over the edge in the next 2 steps.
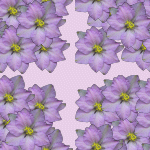 This space will be easy to see and cover. Fill in all the holes and cover the incomplete petals. This time, make sure you stay completely within the boundaries. Edit/Undo if you accidentally overlap with a flower.
 Go to Colors/Adjust/Brightness-Contrast. Set it to your desired shade of lightness; I used Brightness=65, Contrast=-44 (minus 44). Now save as a gif or jpeg to the folder you keep your web graphics in. This also makes a nice fill for a banner or button; I used a different flower to make the banner at the top of the page.
 Background color doesn't matter as long as it's a light color.Blade Pro and some other filters work better on light colors.
 I used pattern=20; Smoothness=6; Depth=7; Ambience=42; Shine=41. Use the defaults for the light settings. You can also apply a Blade Pro effect. If you don't have any Filters or textures available to you, download this tile to work on, and continue with the next steps. (Right click/Save picture as..)
 Now go to Image/Plug-in Filters/Simple/Half-wrap. Notice the deep grooves that run through the center of the tile now. The next steps will deal with smoothing that out.