|
Texture & Pattern Usage |
Textures and Patterns are the skins of images. Choosing the right ones is important. And the best way to get the texture or pattern you want is to make your own! Its easy! |
![]()
 |
These are the 6 textures and Patterns I use the most. All were made by me. Creating your own patterns is the best way to go, it will ensure that the image is exactly how you want it. |
 |
For this interface I used texture #6. Its become one of my favorites. It gives a metallic rough look. |
|
|
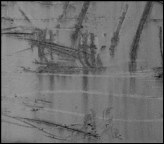
| I made this texture out of the image on the right. The image is pretty ugly, but it made a great texture. To create your own texture , first find an image, press control+A to select all, then go to the "Art Materials" palette and click on the "Paper" text. Select "Capture Paper" and there you go! | |
|
|
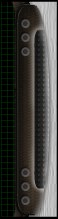
For this section of the interface I'll explain which patterns I used and why. To the left of it you see the green & black pattern. Which is pattern #3 at the top of this page. I used it to give it a computer-technical look for the screen section of my interface. Then the brown area was made with pattern #1, I used it to give it a wooden handle effect. Then on the right I used pattern #4 to give a palm-grip effect. Like I said, making your own patters always comes in handy! |
|
|
|
 |
This shows my pattern palette. I created a little more than half of these, and I use most of them in all of my images. So start making those patterns! |
| Making a pattern is easy, But you have to know how to tile an image. Making an image tile is self-explanatory. Once you have the tiled image ready, select it (control+A) and click on the "Pattern" text in the art materials palette. Select "Capture Pattern" and there you go! | |
![]()
Hopefully you learned a little, Get started on making those patterns! |
Hope that helps! |
![]()
![]()